normalian blog

Let's talk about Microsoft Azure, ASP.NET and Java!

CentOS on Microsoft Azure で mdadm を利用した大容量領域の作成

はじめに

Microsoft Azure の IaaS(仮想マシン)で RDB を構築したくなるケースが往々にして存在すると思うが、この際に課題となりやすいのが「仮想マシンのディスク一本あたり上限サイズが 1TB 」という点だ。昨今(というか一昔前でも)の RDB なら 1TB ではサイズが足りないのが正直なところだろう。今回はこうした課題に対応するため、Microsoft Azure の IaaS 上で複数ディスクを束ねて一つの大きな論理ボリュームに見せる方法を紹介する。
Microsoft Azure の IaaS 上」と前置きしたが、実際には「複数 1TB 容量ディスクを接続された Linux OS でどの様に大きな論理ボリュームを作成するか?」が主題となる認識だ。Linux 上で本要件を実現する技術としては LVM と MDADM が存在するものの Azure Storage secrets and Linux I/O optimizations に以下の記載が存在する。

Software RAID

If you want to scale out on the number of IOPS that a single disk can provide, you will need to use some kind of software RAID configuration at the LINUX file system level.
 I tested both MD and LVM and we found that, at least in Azure, MD (MDADM) outperform LVM since it scales much better. As you can read in the details on software RAID later
 in this post, it is recommended to use 64KB for the “chunk” parameter. Since Azure already take care of disk replication (3 copies) for high-availability, as explained
 in the previous “Azure disk resiliency & high-availability” section, it is recommended to use RAID-0 striping configuration (no parity). Before proceeding with software
 RAID configuration using MDADM, you will need to do some preparation steps, which are create partitions on newly added data disks, format and mount. The complete procedure
 is described at the following link:

Configure Software RAID on Linux

http://azure.microsoft.com/en-us/documentation/articles/virtual-machines-linux-configure-raid

One important factor to consider, in the context of software RAID, is the CPU power: the higher the number of cores, the better will be the scalability factor on using
 multiple disks, with a significant advantage of Intel-bases D-SERIES VM SKUs over AMD-based A-SERIES ones.

上記によれば Microsoft Azure 上でテストした限り、LVM よりも MDADM の方が性能がスケールするとある。また、chunk サイズを 64KB とし、ソフトウェア RAID であるために RAID-0 (可用性は Microsoft Azure ストレージ側に頼る)を利用することを推奨されていることが分かる。
今回は上記を踏まえて CentOS 7.2 を利用した大容量領域の作成を行う。

MDADM 領域の作成

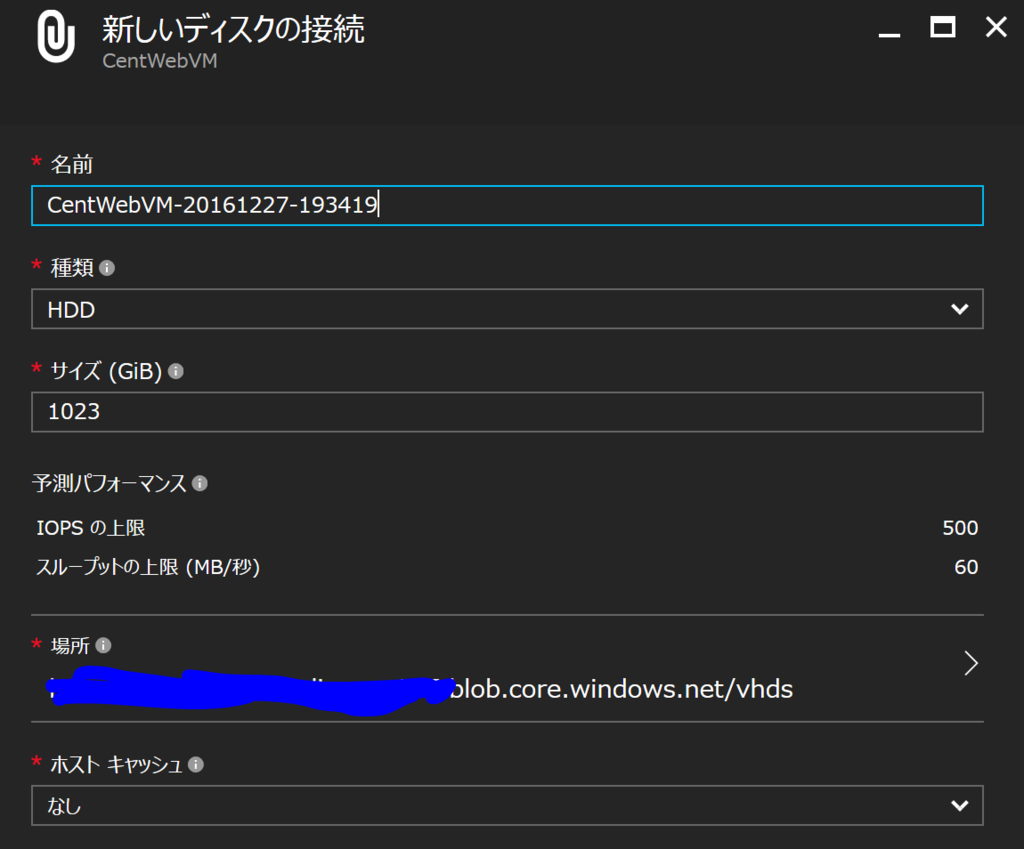
こちらは特に解説は不要だと思うが、以下のように選択した仮想マシンから [新しいディスクの接続] を選択し、以下のように [ホストキャッシュ] を [なし] にしてディスクを N 本(今回は 2 本)追加する。
f:id:waritohutsu:20161227193627p:plain

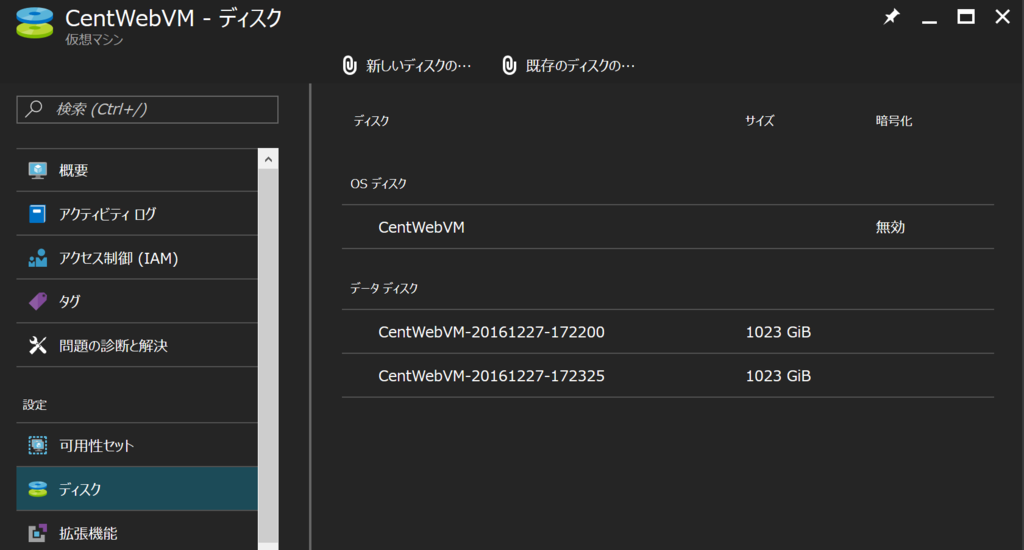
以下の様な画面になっていればディスク追加は完了だ。
f:id:waritohutsu:20161227193509p:plain

ここからは Linux 仮想マシンSSH でログインした後の作業となる。まずはログイン後、管理者としてログインしなおして mdadm のインストールを行ってみる。

[azureuser@XXXXXXXXX ~]$ sudo su -
[root@XXXXXXXXX ~]# yum install mdadm
Loaded plugins: fastestmirror, langpacks
Loading mirror speeds from cached hostfile
Package mdadm-3.4-14.el7.x86_64 already installed and latest version
Nothing to do

ご覧の様に Microsoft Azure 上で作成する CentOS 7.2 の標準環境では mdadm モジュールが既存でインストール済の様だ。次に、以下のように接続ディスクの確認を行う。

[root@XXXXXXXXX ~]# ls /dev/sd*
/dev/sda  /dev/sda1  /dev/sdb  /dev/sdb1  /dev/sdc  /dev/sdd

上記のうち /dev/sda は OS ディスク領域、/dev/sdb は SSD の一時ディスク領域となる(今回仮想マシンを D シリーズで作成したために存在する)。管理ポータルから接続したディスクは /dev/sdc, /dev/sdd だ。ここで念のため /dev/sdb 領域を確認してみる。

[root@XXXXXXXXX ~]# df -h
Filesystem      Size  Used Avail Use% Mounted on
/dev/sda1        30G  1.6G   29G   6% /
devtmpfs        1.7G     0  1.7G   0% /dev
tmpfs           1.7G     0  1.7G   0% /dev/shm
tmpfs           1.7G  8.3M  1.7G   1% /run
tmpfs           1.7G     0  1.7G   0% /sys/fs/cgroup
/dev/sdb1       6.8G   32M  6.4G   1% /mnt/resource
tmpfs           345M     0  345M   0% /run/user/1000

[root@XXXXXXXXX ~]# ls /mnt/resource/
DATALOSS_WARNING_README.txt  lost+found
[root@XXXXXXXXX ~]# cat /mnt/resource/DATALOSS_WARNING_README.txt
WARNING: THIS IS A TEMPORARY DISK.

Any data stored on this drive is SUBJECT TO LOSS and THERE IS NO WAY TO RECOVER IT.

Please do not use this disk for storing any personal or application data.

For additional details to please refer to the MSDN documentation at :
http://msdn.microsoft.com/en-us/library/windowsazure/jj672979.aspx

上記のように「一時領域だから保存データおかないでね!リカバリする方法ないよ!!」と明記されている。こちらはデータベースの一時領域等で利用しよう。

ここで漸く論理ボリュームの作成に入る。まず、以下の手順を /dev/sdc, /dev/sdd(さらにディスクを接続済ならその分も)に対して実行し、パーティションを作成する。

[root@XXXXXXXXX ~]# fdisk /dev/sdc
Welcome to fdisk (util-linux 2.23.2).

Changes will remain in memory only, until you decide to write them.
Be careful before using the write command.

Device does not contain a recognized partition table
Building a new DOS disklabel with disk identifier 0xe67aee68.

The device presents a logical sector size that is smaller than
the physical sector size. Aligning to a physical sector (or optimal
I/O) size boundary is recommended, or performance may be impacted.

Command (m for help): n
Partition type:
   p   primary (0 primary, 0 extended, 4 free)
   e   extended
Select (default p): p
Partition number (1-4, default 1): 1
First sector (2048-2145386495, default 2048):
Using default value 2048
Last sector, +sectors or +size{K,M,G} (2048-2145386495, default 2145386495):
Using default value 2145386495
Partition 1 of type Linux and of size 1023 GiB is set

Command (m for help): w
The partition table has been altered!

Calling ioctl() to re-read partition table.
Syncing disks.

上記を実行することで /dev/sdc1, /dev/sdd1 の論理ボリュームが作成されている。こちらを用いて以下のように論理ボリュームを束ねた新規ボリュームを作成する。この際、冒頭で記載した chunk サイズを 64K にすることに注意して欲しい。

[root@XXXXXXXXX ~]# mdadm --create /dev/md127 --level 0 --raid-devices 2 /dev/sdc1 /dev/sdd1 -c 64
mdadm: Defaulting to version 1.2 metadata
mdadm: array /dev/md127 started.

更にこちらを ext4ファイルシステムでフォーマットする。

[root@XXXXXXXXX ~]# mkfs -t ext4 /dev/md127
mke2fs 1.42.9 (28-Dec-2013)
Filesystem label=
OS type: Linux
Block size=4096 (log=2)
Fragment size=4096 (log=2)
Stride=16 blocks, Stripe width=32 blocks
134070272 inodes, 536280576 blocks
26814028 blocks (5.00%) reserved for the super user
First data block=0
Maximum filesystem blocks=2684354560
16366 block groups
32768 blocks per group, 32768 fragments per group
8192 inodes per group
Superblock backups stored on blocks:
        32768, 98304, 163840, 229376, 294912, 819200, 884736, 1605632, 2654208,
        4096000, 7962624, 11239424, 20480000, 23887872, 71663616, 78675968,
        102400000, 214990848, 512000000

Allocating group tables: done
Writing inode tables: done
Creating journal (32768 blocks): done
Writing superblocks and filesystem accounting information: done

上記の領域を blkid コマンドを利用して UUID を確認し、/etc/fstab に作成したマウントポイント(以下の /mnt/data )を追記し、barrier 無効(barrier=0)としてマウント情報を記載する。

[root@XXXXXXXXX ~]# blkid
/dev/sda1: UUID="0177d0ac-2605-4bfb-9873-5bdefea12fe2" TYPE="xfs"
/dev/sdb1: UUID="beab1720-9779-4fb0-9c6a-2b53bf861873" TYPE="ext4"
/dev/sdc1: UUID="b09c7a9a-b577-c937-cb1f-075432fd1bab" UUID_SUB="e6775322-8a2c-74e8-d3a1-f7bb8d391f78" LABEL="XXXXXXXXX:127" TYPE="linux_raid_member"
/dev/sdd1: UUID="b09c7a9a-b577-c937-cb1f-075432fd1bab" UUID_SUB="b378d3d5-0611-d3ed-d02f-0b4005316319" LABEL="XXXXXXXXX:127" TYPE="linux_raid_member"
/dev/md127: UUID="488685aa-4434-483f-b773-fa737ea270c6" TYPE="ext4"

[root@XXXXXXXXX ~]# mkdir /mnt/data
[root@XXXXXXXXX ~]# vi /etc/fstab
[root@XXXXXXXXX ~]# cat /etc/fstab
#
# /etc/fstab
# Created by anaconda on Wed Oct 26 19:33:38 2016
#
# Accessible filesystems, by reference, are maintained under '/dev/disk'
# See man pages fstab(5), findfs(8), mount(8) and/or blkid(8) for more info
#
UUID=0177d0ac-2605-4bfb-9873-5bdefea12fe2 /                       xfs     defaults        0 0
UUID=488685aa-4434-483f-b773-fa737ea270c6 /mnt/data               ext4    defaults,barrier=0        0 2

実際にマウントして情報を確認する。

[root@XXXXXXXXX ~]# mount -a
[root@XXXXXXXXX ~]# df -h
Filesystem      Size  Used Avail Use% Mounted on
/dev/sda1        30G  1.6G   29G   6% /
devtmpfs        1.7G     0  1.7G   0% /dev
tmpfs           1.7G     0  1.7G   0% /dev/shm
tmpfs           1.7G  8.3M  1.7G   1% /run
tmpfs           1.7G     0  1.7G   0% /sys/fs/cgroup
/dev/sdb1       6.8G   32M  6.4G   1% /mnt/resource
tmpfs           345M     0  345M   0% /run/user/1000
/dev/md127      2.0T   81M  1.9T   1% /mnt/data

上記で 2.0T の領域が作成されていることが確認できたと思う。

Azure Automation を利用して PowerShell DSC for Linux で Apache をセットアップする

今回も LinuxMicrosoft Platform の露払いをしたいと思う。Desired State Configuration と呼ばれるコンセプトの実現技術として Linux では Puppet, Chef 等が存在するが、PowerShell DSC と呼ばれる技術も Linux 版に対応していることをご存じだろうか。
Get started with Desired State Configuration (DSC) for Linux に入門編があるが、こちらはオンプレミスで PowerShell DSC for Linux を構成する方法であるため、今回はこちらを Microsoft Azure の PaaS である Azure Automation を利用して実現する方法を紹介する。

利用する Microsoft Azure のコンポーネント

今回利用する環境は以下となる。毎度 CentOS を利用しているが、これは Microsoft 公式サイトでは Ubuntu を利用したドキュメントが多いものの日本の大企業では RHEL が多いことへの配慮となる。

今回の設定手順の概要

以下が今回の作業手順になる。

  • 管理ポータル側の作業 - その 1
    • Azure Automation アカウントを作成する
    • PowerShell DSC 向けのスクリプトを作成し、Azure Automation アカウントの DSC 構成に登録する
    • モジュール nx をギャラリーから追加する
    • コンパイルを実施する
  • Linux 仮想マシン側の作業
    • OMI と DSC パッケージをインストールする
    • コマンドを実行して Azure Automation アカウントに紐づける
  • 管理ポータル側の作業 - その 2

上記における「コマンドを実行して Azure Automation アカウントに紐づける」の作業は Windows Server であれば管理ポータル上から可能であり、「Linux 仮想マシン側の作業」である OMI と DSC パッケージのインストールも不要な点が LinuxMicrosoft Azure 上の PowerShell DSC を利用する場合の差異となる。

管理ポータル側の作業 - その 1

まずは管理ポータルから新規に Azure Automation のアカウントを作成する。[新規]-[Monitoring + management]-[オートメーション]を選択し、適切なパラメータを設定して作成する。
f:id:waritohutsu:20161225120410p:plain

作成した Azure Automation アカウントに Linux 仮想マシンに対する制御を行う nx モジュールをインポートする。以下の [資産]-[モジュール] を選択し、ギャラリーから追加を選択した後に nx で文字列検索を実施すると以下の画面となる。
f:id:waritohutsu:20161225120933p:plain

上記から Module with DSC Resources for Linux を選択する。設定が無事完了すると以下の画面の様に nx モジュールが利用可能で追加される。
f:id:waritohutsu:20161225121045p:plain

更に以下の 01.CentOS-Configuration.ps1 ファイルを作成する。以下のスクリプトLinux マシンに yum を利用して Apache をインストールし、サービスを実行中にする処理を行うものだ。

Configuration CentOSConfig
{
    # ここで nx モジュールを明示的にインポートしないとエラーが発生する
    Import-DscResource -Module nx

    Node CentOS.Apache
    {
        nxPackage Httpd
        {
            PackageManager = "yum"
            Name = "httpd"
            Ensure = "Present"
        }

        nxService HttpdStatus
        {
            Controller = "systemd"
            Name = "httpd"
            Enabled = $true
            State = "Running"
            DependsOn = "[nxPackage]httpd"
        }
    }
}

次に [DSC 構成] を選択して [構成の追加] から 01.CentOS-Configuration.ps1 ファイルを選択し、管理ポータル上にアップロードする。以下の様に [DSC 構成] に CentOSConfig が追加されていれば成功だ。
f:id:waritohutsu:20161225120701p:plain

登録した DSC 構成である CentOSConfig を選択し コンパイル を選択して仮想マシンに登録可能な形式に変換する。以下の様に「キュー登録済み」となり、数分待つとジョブが完了するので、エラーが発生しないか確認してほしい。
f:id:waritohutsu:20161225121247p:plain

この際、「Import-DscResource -Module nx」を記載し忘れるとコンパイル時に以下のエラーが発生するので注意が必要だ。

Exception calling "NewScriptBlock" with "1" argument(s): "At line:9 char:9 + nxPackage httpd + ~~~~~~~~~ Undefined DSC resource 'nxPackage'. Use Import-DSCResource to import the resource. At line:17 char:9 + nxService SSHDStatus + ~~~~~~~~~ Undefined DSC resource 'nxService'. Use Import-DSCResource to import the resource." (At line:9 char:9 + nxPackage httpd + ~~~~~~~~~ Undefined DSC resource 'nxPackage'. Use Import-DSCResource to import the resource. At line:17 char:9 + nxService SSHDStatus + ~~~~~~~~~ Undefined DSC resource 'nxService'. Use Import-DSCResource to import the resource.)

Linux 仮想マシン側の作業

次に PowerShell DSC for Linux で構成管理したい Linux マシンへアクセスし、OMI と DSC パッケージをインストールすため、以下のコマンドを実行する。

[azureuser@XXXXXXXXXXXX ~]$ sudo su -
[root@XXXXXXXXXXXX ~]# yum -y install https://github.com/Microsoft/omi/releases/download/v1.1.0-0/omi-1.1.0.ssl_100.x64.rpm
[root@XXXXXXXXXXXX ~]# yum -y install https://github.com/Microsoft/PowerShell-DSC-for-Linux/releases/download/v1.1.1-294/dsc-1.1.1-294.ssl_100.x64.rpm

以下を実施した後、管理ポータルから「プライマリ アクセス キー」と「URL」を取得する。
f:id:waritohutsu:20161225121914p:plain

上記の値を利用して以下のコマンドを実行する。正常終了の場合には以下の様に ReturnValue=0 がコマンド後に返される。

[root@XXXXXXXXXXXXX ~]# /opt/microsoft/dsc/Scripts/Register.py [プライマリ アクセス キー] [URL]
instance of SendConfigurationApply
{
    ReturnValue=0
}

上記のコマンドを実行すると以下の様に DSC ノードとして登録され管理ポータル上に反映される。
f:id:waritohutsu:20161225122054p:plain

管理ポータル側の作業 - その 2

ポータル上にノードとして割り当てられた仮想マシンに対し、登録済みの [DSC 構成] を仮想マシンに設定する。
f:id:waritohutsu:20161225122128p:plain

以下の様に保留中になるので、「準拠」に状態が変わるまでしばらく(20分~30分程度)待つ。上記が無事完了すると状態が準拠になるので Apache の動作が確認可能になる。

Linux 版 PowerShell を利用して ARM テンプレートをデプロイしてみる

最近の Microsoftクロスプラットフォームに力を入れているのはよくご存じだと思う。ご存知の方も多いと思うが PowerShell on Linux and Open Source!PowerShell on Linuxオープンソース化のうえ、Linux で利用できるようになったことが発表されている。Linux on PowerShellHello World を行う程度のサンプルは多いが、実際に Azure Resource Manager Cmdlets を利用するまでのサンプルは少ないので、今回は CentOS 7.2 を対象として ARM テンプレートをデプロイするまでの疎通をとってみた。

PowerShell on Linux のインストール

まず yum を利用して PowerShell を以下のようのインストールする。

[azureuser@XXXXXXXXXXXX ~]$ sudo su -
[root@XXXXXXXXXXXX ~]# yum install https://github.com/PowerShell/PowerShell/releases/download/v6.0.0-alpha.14/powershell-6.0.0_alpha.14-1.el7.centos.x86_64.rpm
Loaded plugins: fastestmirror, langpacks
powershell-6.0.0_alpha.14-1.el7.centos.x86_64.rpm                                                       |  39 MB  00:00:06     
Examining /var/tmp/yum-root-pz_gPk/powershell-6.0.0_alpha.14-1.el7.centos.x86_64.rpm: powershell-6.0.0_alpha.14-1.el7.centos.x86_64
Marking /var/tmp/yum-root-pz_gPk/powershell-6.0.0_alpha.14-1.el7.centos.x86_64.rpm to be installed
Resolving Dependencies
--> Running transaction check
---> Package powershell.x86_64 0:6.0.0_alpha.14-1.el7.centos will be installed
--> Processing Dependency: libicu for package: powershell-6.0.0_alpha.14-1.el7.centos.x86_64
base                                                                                                    | 3.6 kB  00:00:00     
extras                                                                                                  | 3.4 kB  00:00:00     
openlogic                                                                                               | 1.3 kB  00:00:00     
updates                                                                                                 | 3.4 kB  00:00:00     
(1/5): base/7/x86_64/group_gz                                                                           | 155 kB  00:00:00     
(2/5): openlogic/7/x86_64/primary                                                                       |  11 kB  00:00:00     
(3/5): extras/7/x86_64/primary_db                                                                       | 183 kB  00:00:00     
(4/5): updates/7/x86_64/primary_db                                                                      | 1.2 MB  00:00:00     
(5/5): base/7/x86_64/primary_db                                                                         | 5.6 MB  00:00:00     
Determining fastest mirrors
openlogic                                                                                                                56/56
--> Processing Dependency: libunwind for package: powershell-6.0.0_alpha.14-1.el7.centos.x86_64
--> Processing Dependency: uuid for package: powershell-6.0.0_alpha.14-1.el7.centos.x86_64
--> Running transaction check
---> Package libicu.x86_64 0:50.1.2-15.el7 will be installed
---> Package libunwind.x86_64 2:1.1-5.el7_2.2 will be installed
---> Package uuid.x86_64 0:1.6.2-26.el7 will be installed
--> Finished Dependency Resolution

Dependencies Resolved

===============================================================================================================================
 Package          Arch         Version                              Repository                                            Size
===============================================================================================================================
Installing:
 powershell       x86_64       6.0.0_alpha.14-1.el7.centos          /powershell-6.0.0_alpha.14-1.el7.centos.x86_64       124 M
Installing for dependencies:
 libicu           x86_64       50.1.2-15.el7                        base                                                 6.9 M
 libunwind        x86_64       2:1.1-5.el7_2.2                      base                                                  56 k
 uuid             x86_64       1.6.2-26.el7                         base                                                  55 k

Transaction Summary
===============================================================================================================================
Install  1 Package (+3 Dependent packages)

Total size: 131 M
Total download size: 7.0 M
Installed size: 148 M
Is this ok [y/d/N]: y
Downloading packages:
(1/3): libunwind-1.1-5.el7_2.2.x86_64.rpm                                                               |  56 kB  00:00:00     
(2/3): uuid-1.6.2-26.el7.x86_64.rpm                                                                     |  55 kB  00:00:00     
(3/3): libicu-50.1.2-15.el7.x86_64.rpm                                                                  | 6.9 MB  00:00:00     
-------------------------------------------------------------------------------------------------------------------------------
Total                                                                                          7.1 MB/s | 7.0 MB  00:00:00     
Running transaction check
Running transaction test
Transaction test succeeded
Running transaction
  Installing : 2:libunwind-1.1-5.el7_2.2.x86_64                                                                            1/4 
  Installing : uuid-1.6.2-26.el7.x86_64                                                                                    2/4 
  Installing : libicu-50.1.2-15.el7.x86_64                                                                                 3/4 
  Installing : powershell-6.0.0_alpha.14-1.el7.centos.x86_64                                                               4/4 
  Verifying  : libicu-50.1.2-15.el7.x86_64                                                                                 1/4 
  Verifying  : uuid-1.6.2-26.el7.x86_64                                                                                    2/4 
  Verifying  : 2:libunwind-1.1-5.el7_2.2.x86_64                                                                            3/4 
  Verifying  : powershell-6.0.0_alpha.14-1.el7.centos.x86_64                                                               4/4 

Installed:
  powershell.x86_64 0:6.0.0_alpha.14-1.el7.centos                                                                              

Dependency Installed:
  libicu.x86_64 0:50.1.2-15.el7             libunwind.x86_64 2:1.1-5.el7_2.2             uuid.x86_64 0:1.6.2-26.el7            

Complete!

上記のコマンド実行の完了後 /opt/microsoft/powershell 以下にバージョン毎にフォルダが作成されて PowerShell のモジュールが配置される。以下のコマンドで確認できる。

[root@XXXXXXXXXXXX ~]# ls /opt/microsoft/powershell/6.0.0-alpha.14/                          
(中略)
System.IO.FileSystem.Primitives.dll                   System.Xml.Serialization.dll
System.IO.FileSystem.Watcher.dll                      System.Xml.XDocument.dll
System.IO.MemoryMappedFiles.dll                       System.Xml.XmlDocument.dll
System.IO.Packaging.dll                               System.Xml.XmlSerializer.dll
System.IO.Pipes.dll                                   System.Xml.XPath.dll
System.IO.UnmanagedMemoryStream.dll                   System.Xml.XPath.XDocument.dll
System.Linq.dll                                       System.Xml.XPath.XmlDocument.dll
System.Linq.Expressions.dll

インストールされた powershell コマンドを実行し、$PSVersionTable にてバージョン情報を表示する。Linux 版では以下となる。

[root@XXXXXXXXXXXX ~]# powershell
PS /root> $PSVersionTable                                                                                               
Name                           Value                                                                                           
----                           -----                                                                                          
PSVersion                      6.0.0-alpha                                                                                    
PSEdition                      Core                                                                                           
PSCompatibleVersions           {1.0, 2.0, 3.0, 4.0...}                                                                        
BuildVersion                   3.0.0.0                                                                                        
GitCommitId                    v6.0.0-alpha.14                                                                                
CLRVersion                                                                                                                    
WSManStackVersion              3.0                                                                                            
PSRemotingProtocolVersion      2.3                                                                                            
SerializationVersion           1.1.0.1                  

Windows 版は以下となるが PSEdition が Windows では Desktop となり、CLRVersion が Linux 版では存在しないことが分かる。

PS C:\Windows\System32\WindowsPowerShell\v1.0> $PSVersionTable

Name                           Value                                                                                        
----                           -----                                                                                        
PSVersion                      5.1.14986.1000                                                                               
PSEdition                      Desktop                                                                                      
PSCompatibleVersions           {1.0, 2.0, 3.0, 4.0...}                                                                      
BuildVersion                   10.0.14986.1000                                                                              
CLRVersion                     4.0.30319.42000                                                                              
WSManStackVersion              3.0                                                                                          
PSRemotingProtocolVersion      2.3                                                                                          
SerializationVersion           1.1.0.1 

次に Azure Resource Manager Cmdlets の環境を構築する。

Azure Resource Manager Cmdlets のインストールとセットアップ

前述の powershell コマンドを実行後、以下の様に Install-Package を利用して Azure Resource Manager Cmdlets をインストールする。さらに PowerShell環境変数を設定した後、Import-Module で AzureRM.NetCore.Preview をインポートする。

PS /root> Install-Package -Name AzureRM.NetCore.Preview -Source https://www.powershellgallery.com/api/v2 -ProviderName NuGet -ExcludeVersion -Destination /opt/microsoft/powershell/6.0.0-alpha.14/Modules              
PS /root> $env:PSModulePath = $env:PSModulePath + ":/opt/microsoft/powershell/6.0.0-alpha.14/Modules"
PS /root> Import-Module AzureRM.NetCore.Preview  

環境変数の設定時にバージョン( 6.0.0-alpha.14 の 14 部分は特に )を打ち間違えるとモジュールのインポートに失敗するので注意が必要だ。以上で Azure Resource Manager Cmdlets のインストールは完了となる。
念のため Get-Module -ListAvailable を実行し、AzureRM.NetCore.Preview, AzureRM.NetCore.Preview, AzureRM.Resources.NetCore.Preview が表示されるかを確認する。

PS /root> Get-Module -ListAvailable                                                                                            
VERBOSE: Loading module from path 
'/opt/microsoft/powershell/6.0.0-alpha.14/Modules/Microsoft.PowerShell.Utility/Microsoft.PowerShell.Utility.psm1'.
VERBOSE: Loading module from path 
'/opt/microsoft/powershell/6.0.0-alpha.14/Modules/Microsoft.PowerShell.Archive/Microsoft.PowerShell.Archive.psm1'.
VERBOSE: Loading module from path 
'/opt/microsoft/powershell/6.0.0-alpha.14/Modules/PSDesiredStateConfiguration/PSDesiredStateConfiguration.psm1'.
VERBOSE: Loading module from path '/opt/microsoft/powershell/6.0.0-alpha.14/Modules/PSReadLine/PSReadLine.psm1'.
VERBOSE: Populating RepositorySourceLocation property for module PackageManagement.
VERBOSE: Loading module from path 
'/opt/microsoft/powershell/6.0.0-alpha.14/Modules/PackageManagement/1.1.2.0/PackageManagement.psm1'.
VERBOSE: Loading module from path '/opt/microsoft/powershell/6.0.0-alpha.14/Modules/Pester/Pester.psm1'.
VERBOSE: Populating RepositorySourceLocation property for module PowerShellGet.
VERBOSE: Loading module from path '/opt/microsoft/powershell/6.0.0-alpha.14/Modules/PowerShellGet/1.1.2.0/PSModule.psm1'.
VERBOSE: Loading module from path 
'/opt/microsoft/powershell/6.0.0-alpha.14/Modules/AzureRM.Profile.NetCore.Preview/Microsoft.Azure.Commands.Profile.dll'.
VERBOSE: Loading module from path 
'/opt/microsoft/powershell/6.0.0-alpha.14/Modules/AzureRM.Resources.NetCore.Preview/Microsoft.Azure.Commands.Resources.dll'.
VERBOSE: Loading module from path 
'/opt/microsoft/powershell/6.0.0-alpha.14/Modules/AzureRM.Resources.NetCore.Preview/Microsoft.Azure.Commands.Resources.Cmdlets
.dll'.


    Directory: /opt/microsoft/powershell/6.0.0-alpha.14/Modules


ModuleType Version    Name                                ExportedCommands                                                    
---------- -------    ----                                ----------------                                                    
Manifest   0.3.4      AzureRM.NetCore.Preview                                                                                 
Manifest   0.3.4      AzureRM.Profile.NetCore.Preview     {Login-AzureRmAccount, Select-AzureRmSubscription}                  
Manifest   0.3.4      AzureRM.Resources.NetCore.Preview                                                                       
Manifest   1.0.1.0    Microsoft.PowerShell.Archive        {Compress-Archive, Expand-Archive}                                  
Manifest   3.0.0.0    Microsoft.PowerShell.Host           {Start-Transcript, Stop-Transcript}                                 
Manifest   3.1.0.0    Microsoft.PowerShell.Management     {Add-Content, Clear-Content, Clear-ItemProperty, Join-Path...}      
Manifest   3.0.0.0    Microsoft.PowerShell.Security       {Get-Credential, Get-ExecutionPolicy, Set-ExecutionPolicy, Conver...
Manifest   3.1.0.0    Microsoft.PowerShell.Utility        {Format-List, Format-Custom, Format-Table, Format-Wide...}          
Script     1.1.2.0    PackageManagement                   {Find-Package, Get-Package, Get-PackageProvider, Get-PackageSourc...
Script     3.3.9      Pester                              {Describe, Context, It, Should...}                                  
Script     1.1.2.0    PowerShellGet                       {Install-Module, Find-Module, Save-Module, Update-Module...}        
Script     0.0        PSDesiredStateConfiguration         {StrongConnect, IsHiddenResource, Write-MetaConfigFile, Get-Inner...
Script     1.2        PSReadLine                          {Get-PSReadlineKeyHandler, Set-PSReadlineKeyHandler, Remove-PSRea...

上記の様に表示されれば Azure Resource Manager Cmdlets のコマンドが利用可能になる。

ARM テンプレートのデプロイ

最後に Linux から ARM テンプレートのデプロイを実施する。まずは以下の様に Login-AzureRmAccount コマンドでログイン処理を実施する。

PS /root> Login-AzureRmAccount                                                                     
VERBOSE: To sign in, use a web browser to open the page https://aka.ms/devicelogin and enter the code XXXXXXXXXXX to 
authenticate.


Environment           : AzureCloud
Account               : XXXXXXXXXXXXXXXXXXXXXXXXXXXXXXXXXXXX
TenantId              : XXXXXXXXXXXXXXXXXXXXXXXXXXXXXXXXXXXX
SubscriptionId        : XXXXXXXXXXXXXXXXXXXXXXXXXXXXXXXXXXXX
SubscriptionName      : XXXXXXXXXXXXXXXXXXXXXXXXXXXXXXXXXXXX
CurrentStorageAccount : 

試しにリソースグループの一覧を表示してみる。以下の様に自身のリソースグループ一覧が表示されればログインは成功だ。

PS /root> Get-AzureRmResourceGroup | Select-Object -Property ResourceGroupName                                                 

ResourceGroupName                 
-----------------                 
adds-joined-rg                    
WGVMRG                            
WGVNetRG                 

最後に ARM テンプレートのデプロイを行う。azure-quickstart-templates と呼ばれるテンプレート一覧の 100-blank-template のデプロイを実施する。以下のコマンドを参考にすればデプロイが実施可能だ。

PS /root> New-AzureRmResourceGroup -Name "hello-linuxpowershell-rg" -Location "japanwest"                                      
WARNING: The usability of Tag parameter in this cmdlet will be modified in a future release. This will impact creating, 
updating and appending tags for Azure resources. For more details about the change, please visit 
https://github.com/Azure/azure-powershell/issues/726#issuecomment-213545494
VERBOSE: 4:30:28 PM - Created resource group 'hello-linuxpowershell-rg' in location 'japanwest'


ResourceGroupName : hello-linuxpowershell-rg
Location          : japanwest
ProvisioningState : Succeeded
Tags              : 
ResourceId        : /subscriptions/XXXXXXXXXXXXXXXXXXXXXXXXXXXXXXXXXXXX/resourceGroups/hello-linuxpowershell-rg


PS /root> New-AzureRmResourceGroupDeployment -ResourceGroupName "hello-linuxpowershell-rg" -TemplateUri https://raw.githubusercontent.com/Azure/azure-quickstart-templates/master/100-blank-template/azuredeploy.json -TemplateParameterUri https://raw.githubusercontent.com/Azure/azure-quickstart-templates/master/100-blank-template/azuredeploy.parameters.json                         
VERBOSE: 4:33:32 PM - Template is valid.
VERBOSE: 4:33:33 PM - Create template deployment 'azuredeploy'
VERBOSE: 4:33:33 PM - Checking deployment status in 5 seconds


DeploymentName          : azuredeploy
ResourceGroupName       : hello-linuxpowershell-rg
ProvisioningState       : Succeeded
Timestamp               : 12/23/16 4:33:33 PM
Mode                    : Incremental
TemplateLink            : 
                          Uri            : https://raw.githubusercontent.com/Azure/azure-quickstart-templates/master/100-blank
                          -template/azuredeploy.json
                          ContentVersion : 1.0.0.0
                          
Parameters              : 
Outputs                 : 
DeploymentDebugLogLevel : 

Azure AD ドメインサービスを利用して Windows も Linux もドメイン参加させてみる - その2 ~Windows と Linux マシンをドメインに参加させる~

はじめに

前回で Azure AD ドメインサービスを利用して Windows も Linux もドメイン参加させてみる - その1 ~まずはドメインサービスの有効化~ にてドメインサービスの有効化を記載したが、今回は実際に Windows Server と Linux サーバをドメインに参加させる手順を記載する。また、今回は前回手順で作成済みの以下のリソースを利用する点に留意してほしい。

今回は以下を作成するための概要を記載する。

  1. Azure Resource Manager モードの仮想ネットワークに DNS サーバを設定
  2. Azure Resource Manager モードの仮想ネットワークを作成し、VNET Peering で接続
  3. Windows Server のドメイン参加を設定
  4. Linux サーバのドメイン参加を設定

DNS サーバの設定と VNET Peering 接続の設定

まず、Azure Resource Manager 上の仮想ネットワークを作成した後、仮想ネットワークに対して以下の様に DNS サーバを設定する。この IP アドレスはクラシックポータル側から取得する。
f:id:waritohutsu:20161219015942p:plain

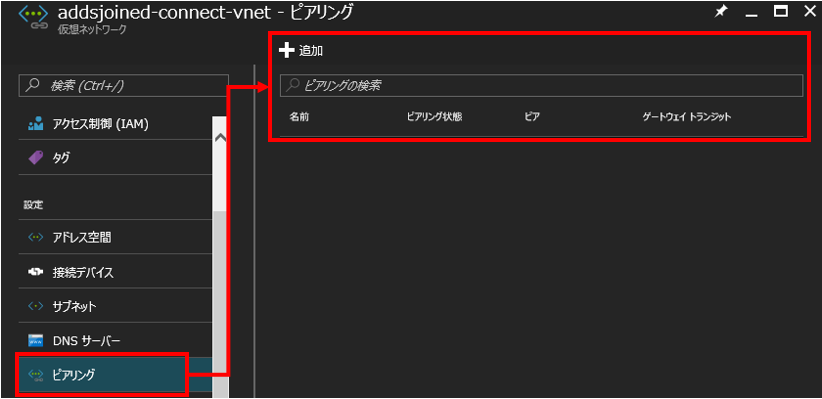
次に、以下の様に仮想ネットワーク - ピアリングを選択し、Azure Resource Manager の仮想ネットワークと Azure Service Manager モードの仮想ネットワークを接続する。
f:id:waritohutsu:20161219020543p:plain

Windows Server を作成してドメイン参加を設定

Windows Server 2012 R2 の仮想マシンインスタンスCentOS 7.2 の仮想マシンインスタンスを Azure Resource Manager 上の仮想ネットワークに作成する(こちらの手順自体は省略する)。これらを設定した時点で、以下の様な構成になっているはずだ。

├MYSERVICE-ARM-VNET:10.1.0.0/16
│ └─default:10.1.0.0/24
│    │
│    ├─ForAD-WinVM
│    │
│    └─ForAD-LinuxVM
│
<VNET Peering>
│
│
└MYSERVICE-ASM-VNET:10.100.0.0/16
  └─AD-Subnet:10.100.0.0/24

Windows Server 2012 R2 のドメイン参加

エクスプローラを開き、Computer を右クリックして Properties を選択する。その後、以下の様に作成したドメインサービスのドメイン名(例:xxxxx.onmicrosoft.com)を設定する。
f:id:waritohutsu:20161219021025p:plain

Windows Server をドメイン参加する際の注意点として、Azure Active Directory に登録したユーザ名が

  • exampleusername@exampledomain.onmicrosoft.com

の場合、ドメイン参加時は以下になる点だ。

  • exampleusername@exampledomain

上記のユーザ認証が完了すれば、無事にドメイン参加が完了するはずだ。

CentOS 7.2 のドメイン参加

Linux サーバは Samba v4 以降を利用してドメインへの参加が可能となっている(が、この辺りは設定を踏まえて詳しい方が居たら指摘をお願いしたい)。まずは必要なパッケージのインストールを実施する。

# yum update
# yum -y install samba-winbind krb5-workstation samba-client oddjob-mkhomedir samba winbind

次に名前解決の参照順を変更する /etc/nsswitch.conf ファイルを以下の様に編集する。

# /etc/nsswitch.conf
#
# 中略
#
passwd:    files winbind
shadow:    files winbind
group:     files winbind

次にケルベロス認証の設定ファイルである /etc/krb5.conf を以下の様に変更する。

# Configuration snippets may be placed in this directory as well
includedir /etc/krb5.conf.d/

[logging]
 default = FILE:/var/log/krb5libs.log
 kdc = FILE:/var/log/krb5kdc.log
 admin_server = FILE:/var/log/kadmind.log

[libdefaults]
 dns_lookup_realm = false
 ticket_lifetime = 24h
 renew_lifetime = 7d
 forwardable = true
 rdns = false
# default_realm = EXAMPLE.COM
 default_ccache_name = KEYRING:persistent:%{uid}

[realms]
 exampledomain.onmicrosoft.com = {
  kdc = exampledomain.onmicrosoft.com
  admin_server = exampledomain.onmicrosoft.com
 }

[domain_realm]
 .exampledomain.onmicrosoft.com = exampledomain.onmicrosoft.com
 exampledomain.onmicrosoft.com = exampledomain.onmicrosoft.com

その後、Samba の設定ファイルである /etc/samba/smb.conf を以下の様に編集する。

# See smb.conf.example for a more detailed config file or
# read the smb.conf manpage.
# Run 'testparm' to verify the config is correct after
# you modified it.

[global]
        workgroup = exampledomain
        password server = *
        realm = exampledomain.onmicrosoft.com
        security = ads
        winbind offline logon = false
        winbind use default domain = true 
        idmap config * : range = 16777216-33554431
        template shell = /bin/bash
        log file = /var/log/samba/log.%m
        max log size = 50

[homes]
        comment = Home Directories
        valid users = %S, %D%w%S
        browseable = No
        read only = No

本設定後に systemctl start smb でデーモンを起動する。その後、ケルベロス認証を以下の様に実行する。

# kinit exampleusername@EXAMPLEDOMAIN.ONMICROSOFT.COM
Password for exampleusername@EXAMPLEDOMAIN.ONMICROSOFT.COM: 

# klist 
Ticket cache: KEYRING:persistent:0:0
Default principal: exampleusername@EXAMPLEDOMAIN.ONMICROSOFT.COM

Valid starting       Expires              Service principal
12/14/2016 03:58:37  12/14/2016 13:58:37  krbtgt/EXAMPLEDOMAIN.ONMICROSOFT.COM@EXAMPLEDOMAIN.ONMICROSOFT.COM
        renew until 12/21/2016 03:58:34

この際、小文字でドメイン名を指定すると以下の様にエラーとなるので注意して欲しい。

# kinit exampleusername@exampledomain.onmicrosoft.com
Password for exampleusername@exampledomain.onmicrosoft.com: 
kinit: KDC reply did not match expectations while getting initial credentials

最後に smb と winbind が OS 起動時に自動起動する様に設定を加える。

# chkconfig smb on
Note: Forwarding request to 'systemctl enable smb.service'.
Created symlink from /etc/systemd/system/multi-user.target.wants/smb.service to /usr/lib/systemd/system/smb.service.
# chkconfig winbind on    

Linux/Windows Server がドメインに参加しているか確認

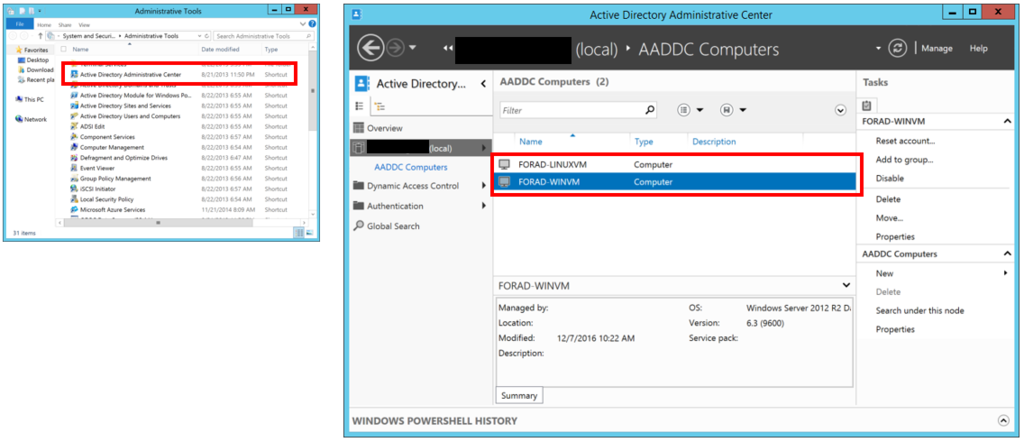
Active Directory Administrative Center と呼ばれるツールを利用して確認が可能だ。「参考情報」のリンクを参考に Windows Server 2012 R2 に設定を実施し、同ツールを起動することでドメインに参加しているサーバを以下の様に確認できる。
f:id:waritohutsu:20161219021824p:plain

Azure AD ドメインサービスを利用して Windows も Linux もドメイン参加させてみる - その1 ~まずはドメインサービスの有効化~

はじめに

Azure Active Directory には様々な機能があるが、特に Azure Active Directory ドメイン サービスクラウド上の PaaS としてドメインコントローラを利用できる便利な機能だ。現状(2016年12月現在)では以下の制約があるが、PoC 等で利用する場合には非常に有用であるため、

  • 東日本・西日本にデプロイできない。VPN 機能等を利用して東日本・西日本側の仮想ネットワークと連携する必要がある
  • Azure Resource Manager モードの仮想ネットワークに接続できない。Azure Resource Manager モードのリソースと連携するには VNET Peering 等を利用する必要がある

今回は以下の記事に記載してある内容の踏襲だが、参考になれば幸いだ。
docs.microsoft.com

セットアップしてみる

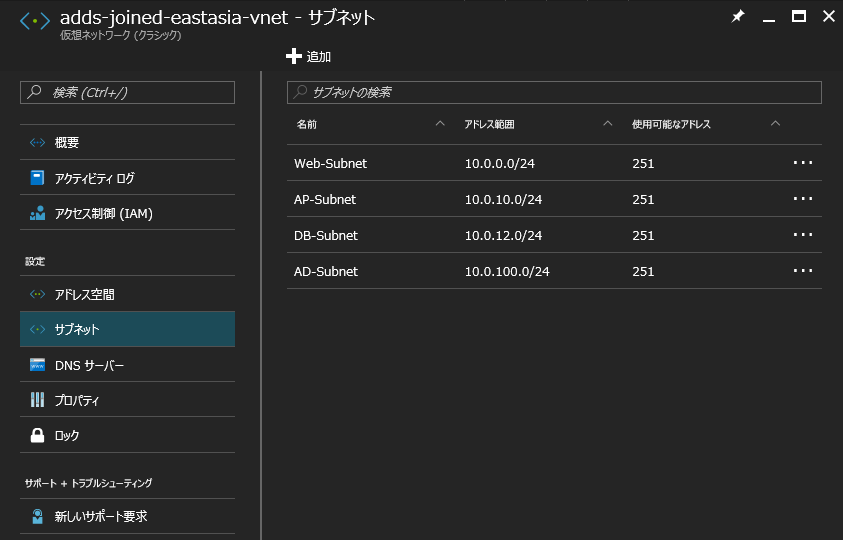
まずは以下の様に「仮想ネットワーク(クラシック)」を作成する。この際に「東アジア」で作成し、東日本・西日本で作成していない点に注意してほしい。
f:id:waritohutsu:20161219005118p:plain

次にクラシックポータル側に移動し、メニューから「APP SERVICES - ACTIVE DIRECTORY - ディレクトリ - カスタム作成」を選択し、以下の様に新しいドメインを作成する。この際に「国・リージョン」は日本で作成しても問題ないが、B2C ディレクトリは利用してはいけないのを注意してほしい。
f:id:waritohutsu:20161219005537p:plain

次にクラシックポータルポータルにて作成したディレクトリに移動して「構成」タブを選択し、以下の様にドメインサービスを有効化した後にドメインサービスに接続する仮想ネットワークを選択する。この際、仮想ネットワークを東日本・西日本に作成しているとドメインサービスに接続できないので注意が必要だ。
f:id:waritohutsu:20161219010332p:plain

更に、ドメイン参加向けのユーザを登録する。Azure AD ドメインサービスにドメイン参加するは「AAD DC Administrator」というグループを作成し、ユーザを登録する必要がある。Power BI 向けの組織アカウントをお手軽に作ってみる を参考に組織ユーザを作成し、以下の様に「AAD DC Administrator」グループを作成してこちらにユーザを登録する。
f:id:waritohutsu:20161223235800p:plain

次回以降

ドメインに参加した後、以下の様に IP アドレスが割り当てられる。こちらを当該仮想ネットワークの DNS サーバに割り当てる IP アドレスとして利用していく。

次回以降で実際に Windows Server や Linux サーバをドメインに参加する手順を記載していく。

Azure AD へサービス プリンシパル認証をさせるための簡単な azure-cli 向けスクリプト

自分の備忘録となるが、Microsoft Azure のリソースを操作する場合は Azure リソース マネージャーでのサービス プリンシパルの認証 に記載されている内容を一通り租借をしなければならない。
既に PowerShell 版は Azure AD へサービス プリンシパル認証をさせるための簡単な PowerShell スクリプト で記載したが、azure-cli 版がなかったので備忘録として記載しておく。

# Azure Resource Manager モードに設定
$ azure config mode arm

# ログイン
$ azure login

# サービスプリンシパルを作成し、結果から Object Id を取得する
$ azure ad sp create -n <your app name. e.g.: mylinuxexampleapp> --home-page <your home-page name. e.g.: http://normalianmylinuxapp.azurewebsite.net> --identifier-uris <your identifier-uris name. e.g.: http://normalianmylinuxapp.azurewebsite.net> -p <your password>
info:    Executing command ad sp create
+ Creating application <your app name. e.g.: mylinuxexampleapp>
+ Creating service principal for application <your application-id>
data:    Object Id:               <your object-id>
data:    Display Name:            <your app name. e.g.: mylinuxexampleapp>
data:    Service Principal Names:
data:                             <your application-id>
data:                             <your identifier-uris name. e.g.: http://normalianmylinuxapp.azurewebsite.net>
info:    ad sp create command OK


# 取得した Object Id からロールアサインを作成する。この際、Reader 権限だと仮想マシンの作成等ができないので注意
$ azure role assignment create --objectId <your object-id> -o Owner -c /subscriptions/<your subscriptionid>/
info:    Executing command role assignment create
+ Finding role with specified name
/data:    RoleAssignmentId     : /subscriptions/<your subscriptionid>/providers/Microsoft.Authorization/roleAssignments/<your role assignment id>
data:    RoleDefinitionName   : Owner
data:    RoleDefinitionId     : <role definition id>
data:    Scope                : /subscriptions/<your subscriptionid>
data:    Display Name         : <your app name. e.g.: mylinuxexampleapp>
data:    SignInName           : undefined
data:    ObjectId             : <your object-id>
data:    ObjectType           : ServicePrincipal
data:
+
info:    role assignment create command OK


# サブスクリプションの情報一覧を取得する
$ azure account list
info:    Executing command account list
data:    Name                      Id                                    Current  State
data:    -------------------       ------------------------------------  -------  -------
data:    <your subscription name>  <your subscriptionid>                 true     Enabled
info:    account list command OK


# サブスクリプション一覧から特定のサブスクリプション情報を取得し、Tenant ID を取得する
$ azure account show <your subscriptionid>
info:    Executing command account show
data:    Name                        : <your subscription name>
data:    ID                          : <your subscriptionid>
data:    State                       : Enabled
data:    Tenant ID                   : <tenant-id>
data:    Is Default                  : true
data:    Environment                 : AzureCloud
data:    Has Certificate             : No
data:    Has Access Token            : Yes
data:    User name                   : my-mail-address@hotmail.com
data:
info:    account show command OK

# 作成済のサービスプリンシパルでログインする
$ azure login -u <your identifier-uris name. e.g.: http://normalianmylinuxapp.azurewebsite.net> --service-principal --tenant <tenant-id> -p <your password>

ご参考までに。

参考

詳細な情報を知りたい場合は以下のリンクを参考にしてほしい。

Azure AD へサービス プリンシパル認証をさせるための簡単な PowerShell スクリプト

今回はほぼ自分の備忘録としての記載となるが、Azure ARM SDK 等のアプリケーションから Microsoft Azure のリソースを操作する場合は Azure リソース マネージャーでのサービス プリンシパルの認証 に記載されている内容を一通り租借をしなければならない。

上記の記事における「パスワードで認証する: PowerShell」については、以下の PowerShell スクリプトを利用することでサービスプリンシパル認証が可能な情報を取得できる。

# ログイン
Login-AzureRmAccount

# 利用するサブスクリプションを確認
Get-AzureRmSubscription

# 利用するサブスクリプションを選択
$subscriptionId = 'your subscription id'
Select-AzureRmSubscription -SubscriptionId $subscriptionId

$displayName = 'your app name'
$homePage = 'your home page url'
$identifierUris = 'your identifier url'
$password = 'your password'

# Azure AD にアプリケーション オブジェクトを作成
$azureAdApplication = New-AzureRmADApplication -DisplayName $displayName -HomePage $homePage -IdentifierUris $identifierUris -Password $password

# サービスプリンシパル オブジェクトを作成
New-AzureRmADServicePrincipal -ApplicationId $azureAdApplication.ApplicationId

# サービス プリンシパル に権限を割り当て
New-AzureRmRoleAssignment -RoleDefinitionName Owner -ServicePrincipalName $azureAdApplication.ApplicationId

# アプリで使えるようにするため、サービス プリンシパルとしてログインする
$cred = Get-Credential # $azureAdApplication.ApplicationId/$password での認証情報を作成 
$subscription = Get-AzureRmSubscription -SubscriptionId $subscriptionId
Login-AzureRmAccount -Credential $cred -ServicePrincipal -TenantId $subscription.TenantId

# 以下の 4つの情報があれば SDK 等のアプリで利用可能
## subscription-id
$subscription.SubscriptionId

## tenant-id
$subscription.TenantId

## client-id
$azureAdApplication.ApplicationId

## secret
$password


上記の情報を利用して、Azure ARM SDK for Java で以下の様なコードが記述可能だ。

package org.mydomain.armsdksample;

import java.util.List;

import com.microsoft.azure.credentials.ApplicationTokenCredentials;
import com.microsoft.azure.credentials.AzureEnvironment;
import com.microsoft.azure.management.resources.ResourceManagementClient;
import com.microsoft.azure.management.resources.ResourceManagementClientImpl;
import com.microsoft.azure.management.resources.models.ResourceGroup;

public class Main {
	final static String subscriptionId = "your subscription id";
	final static String clientId = "your client id";
	final static String tenantId = "your tenant id";
	final static String secret = "your password";

	public static void main(String[] args) throws Exception {

		ResourceManagementClient client = new ResourceManagementClientImpl(
				new ApplicationTokenCredentials(clientId, tenantId, secret, AzureEnvironment.AZURE));
		client.setSubscriptionId(subscriptionId);

		List<ResourceGroup> rgList = client.getResourceGroupsOperations().list(null, null).getBody();
		for (ResourceGroup rg : rgList) {
			System.out.println(rg.getId());
		}

		System.out.println("end");
	}
}

備忘録に等しいが、ご参考までに。