normalian blog

Let's talk about Microsoft Azure, ASP.NET and Java!

ARM 版の Application Gateway を PowerShell で作成する

今回はコマンドラインにて Application Gateway を作成する。Application Gateway をご存じでない方のために簡単に捕捉すると「機能が豊富なロードバランサ( Azure ロードバランサ比)」だ。よく使いたいといわれる Application Gateway の機能は以下だ。

  • cookie ベースでの振り分け
  • パスベースでのアクセス振り分け( デフォルトは サーバ A、/admin/* はサーバ B 等)
  • SSL オフロード

一方でApplication Gateway は有料であり、中規模以上で2インスタンス以上でないと SLA が保証されない点に注意してほしい。以下は Application Gateway の価格 の抜粋だ。

Microsoft は、複数の中規模またはより大規模なインスタンスを持つ各 Application Gateway Service に対し、
99.95% 以上の可用性を保証します。インスタンスが 1 つのみ、あるいは小規模なインスタンスしか含まれない
 Application Gateway Services に関しては SLA は提供していません。SLA の詳細については、SLA のページを
ご覧ください。

パスベースのルールを持つ Application Gateway を作成する PowerShell スクリプト

Application Gateway は管理ポータルからでも作成できるが、ルール名等々を柔軟に設定するには PowerShell が有効なので、以下を備忘録として張り付けておく。以下が前提なことに注意してほしい。

  • リソースグループ my-demo-rg が作成済み
  • 仮想ネットワーク my-demo-vnet が作成済みであり、waf-subnet が作成済み
  • Application Gateway が配置されるサブネットと通信できる場所に 10.0.1.10 アドレスの WEB サーバが配置済み
  • Application Gateway が配置されるサブネットと通信できる場所に 10.0.1.20 アドレスの WEB サーバが配置済み
# まずはログイン
Get-AzureRmSubscription

# 利用サブスクリプションを選択
Select-AzureRmSubscription -SubscriptionId "your subscription id"

# 配置先のリソースグループ、仮想ネットワーク、サブネット、リージョンを指定
$rgName = "my-demo-rg"
$vnetName = "my-demo-vnet"
$subnetName = "waf-subnet"
$location = "japanwest"
$publicIPName = "APPGW-Public-IP"
$wafName = "my-gateway"

$vnet = Get-AzureRmVirtualNetwork -Name $vnetName -ResourceGroupName $rgName
$subnet = $vnet.Subnets[0]
$publicip = New-AzureRmPublicIpAddress -ResourceGroupName $rgName -name $publicIPName -location $location -AllocationMethod Dynamic
$gipconfig = New-AzureRmApplicationGatewayIPConfiguration -Name $wafName -Subnet $subnet

# 振り分け先のサーバを指定、複数指定する場合は , でつなげる
$defaultPool = New-AzureRmApplicationGatewayBackendAddressPool -Name defaultPool -BackendIPAddresses 10.0.1.10 #1d34.170.185.46, 134.170.188.221,134.170.185.50
$adminPool = New-AzureRmApplicationGatewayBackendAddressPool -Name adminPool -BackendIPAddresses 10.0.1.20 #1d34.170.185.46, 134.170.188.221,134.170.185.50

# 80 番ポートを指定し、cookie ベースの振り分けを有効化
$poolSetting = New-AzureRmApplicationGatewayBackendHttpSettings -Name appGatewayBackendHttpSettings -Port 80 -Protocol Http -CookieBasedAffinity Enabled
$fp = New-AzureRmApplicationGatewayFrontendPort -Name frontendport01  -Port 80
$fipconfig = New-AzureRmApplicationGatewayFrontendIPConfig -Name appGatewayFrontendIP -PublicIPAddress $publicip

# デフォルトは 10.0.1.10、/admin/* は 10.0.1.20 の振り分け指定
$listener = New-AzureRmApplicationGatewayHttpListener -Name appGatewayHttpListener -Protocol Http -FrontendIPConfiguration $fipconfig -FrontendPort $fp
$adminPathRule = New-AzureRmApplicationGatewayPathRuleConfig -Name "adminPathrule" -Paths "/admin/*" -BackendAddressPool $adminPool -BackendHttpSettings $poolSetting
$urlPathMap = New-AzureRmApplicationGatewayUrlPathMapConfig -Name "urlpathmap" -PathRules $adminPathRule -DefaultBackendAddressPool $defaultPool -DefaultBackendHttpSettings $poolSetting
$adminRule = New-AzureRmApplicationGatewayRequestRoutingRule -Name "adminRule" -RuleType PathBasedRouting -HttpListener $listener -UrlPathMap $urlPathMap

# SLA が担保される SKU を指定
$sku = New-AzureRmApplicationGatewaySku -Name "Standard_Medium" -Tier Standard -Capacity 2
$appgw = New-AzureRmApplicationGateway -Name appgwtest -ResourceGroupName $rgName -Location $location -BackendAddressPools $defaultPool, $adminPool -BackendHttpSettingsCollection $poolSetting -FrontendIpConfigurations $fipconfig -GatewayIpConfigurations $gipconfig -FrontendPorts $fp -HttpListeners $listener -UrlPathMaps $urlPathMap -RequestRoutingRules $adminRule -Sku $sku -Debug

上記を実行すれば ARM 版の Application Gateway が作成されるはずだ。

参考

ASM 版の仮想マシンを ARM 版の仮想マシンに移行する

今回は掲題の通り Azure Service Management 版の仮想マシンを Azure Resource Manager 版の仮想マシンに移行する方法を紹介する。何を言っているのか分からない方もいると思うので、念のため以下でざっくりおさらいをする。

  • Azure Service Management(ASM): Microsoft Azure 旧式のリソース管理方式、俗称 IaaS v1
  • Azure Resource Manager(ARM): Microsoft Azure の新しいリソース管理方式、俗称 IaaS v2

ARM 版の方がネットワークインターフェースが個別でリソース化している、ロードバランサ不要で仮想マシンが配置できる等々の違いはあるが、ARM 版の方が新しいリソース管理方式であることが理解できれば問題ない。ちょくちょく聞かれる内容は「既存の ASM 版のリソースを ARM 版のリソースに簡単に移行する方法は無いか?」は本記事のテーマだが、調べたところ以下の三つが存在した。

上記のうち、MigAz と Platform Supported Migration を試したので紹介しようと思う。

MigAz での移行

本ツールはリンク先の GitHub よりバイナリをダウンロードして migAz.exe を実行してアプリケーションを起動する。以下の画像の要領に従って操作することで ARM テンプレートの JSON ファイルを出力することができる。
f:id:waritohutsu:20170206083437p:plain
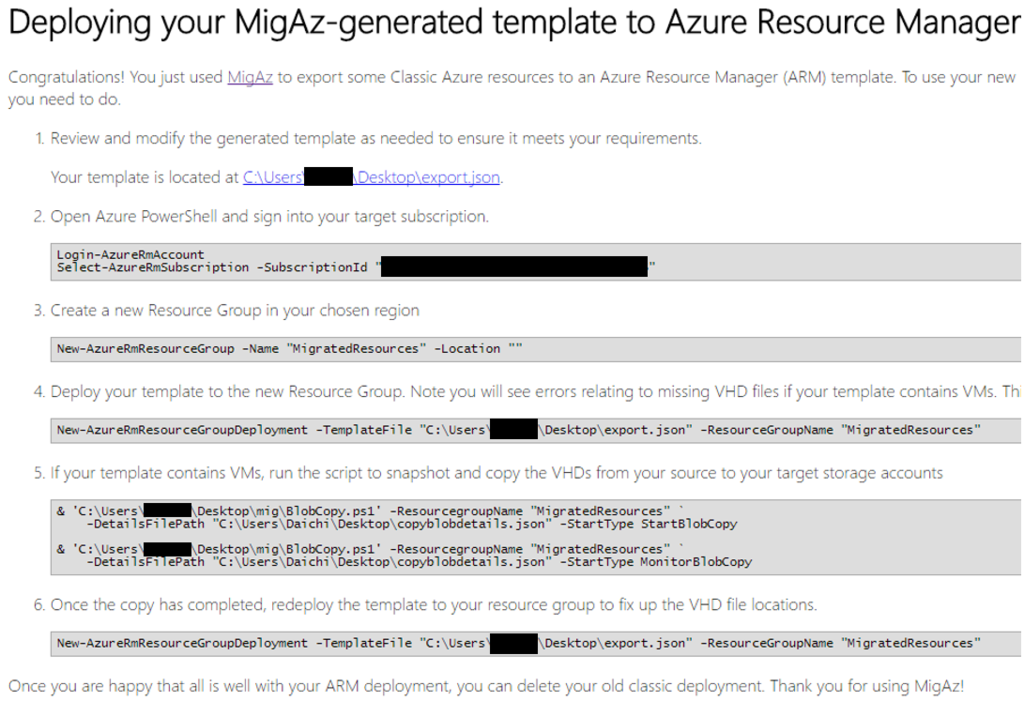
export.json, copyblobdetails.json, DeployInstructions.html というファイルが出力される。このうちの DeployInstructions.html ファイルをブラウザで確認すると以下の様に表示される。
f:id:waritohutsu:20170206083501p:plain
上記の指示の中に ASM 版のストレージアカウントから ARM 版のストレージアカウントに仮想マシンVHD をコピーする処理が含まれていることに注意してほしい。それ以外は指示通りに実行すればリソースの移行は完了するはずだ。

Platform Supported Migration

Azure PowerShell のコマンドを利用する方法で ASM 版リソースから ARM 版リソースへの移行を試してみる。

# まずは ASM 版、ARM 版にログイン
PS v1.0> Add-AzureAccount
PS v1.0> Login-AzureRmAccount

# 移行する ASM 版リソースの情報を取得
PS v1.0> $serviceName = "移行したいクラウドサービス名"
PS v1.0> $deployment = Get-AzureDeployment -ServiceName $serviceName
PS v1.0> $deploymentName = $deployment.DeploymentName

# 移行準備を実施
PS v1.0> Move-AzureService -Prepare -ServiceName $serviceName -DeploymentName $deploymentName -CreateNewVirtualNetwork
OperationDescription OperationId                          OperationStatus
-------------------- -----------                          ---------------
Move-AzureService    291e994f-0ed8-7a5a-ac84-47c7df732322 Succeeded      

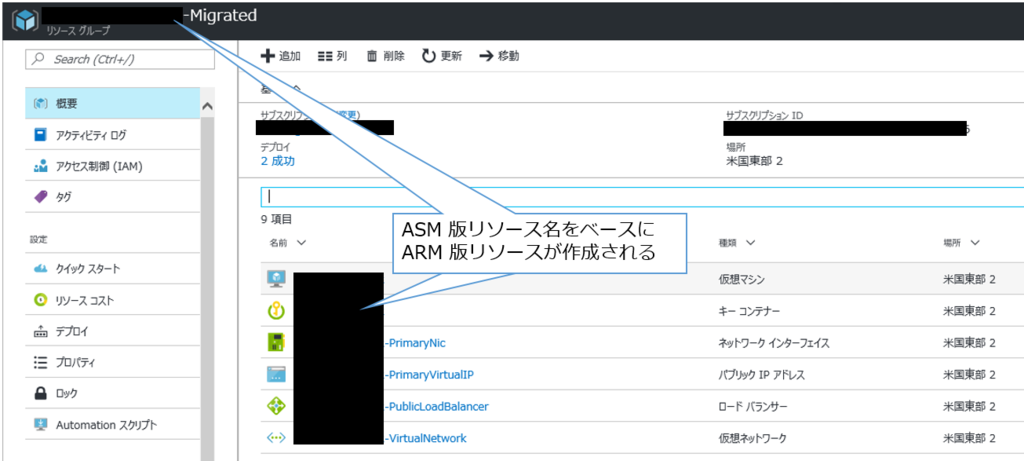
上記の PowerShell スクリプトを実施時点で以下の様に ASM 版リソースの情報ベースで ARM 版リソースが作成されている。
f:id:waritohutsu:20170206083539p:plain
管理ポータルにて準備作成済みの Migrated リソースを指定し、以下の様に指定することで移行準備が整う。

#
PS v1.0> existingVnetRGName = "<元のクラウドサービス名>-Migrated"
$vnetName = "<元のクラウドサービス名>-VirtualNetwork "
$subnetName = "Subnet-1"

PS v1.0> Move-AzureService -Prepare -ServiceName $serviceName -DeploymentName $deploymentName `
      -UseExistingVirtualNetwork -VirtualNetworkResourceGroupName $existingVnetRGName `
      -VirtualNetworkName $vnetName -SubnetName $subnetName


OperationDescription OperationId                          OperationStatus
-------------------- -----------                          ---------------
Move-AzureService    d17b99fc-a017-7fcf-b993-e3ba17415f44 Succeeded      

上記の様に Succeeded の結果が帰ってくれば移行は移行準備が整ったことを意味している。後は以下のコマンドを実行することで移行は完了だ。

PS v1.0> Move-AzureService -Commit -ServiceName $serviceName -DeploymentName $deploymentName

OperationDescription OperationId                          OperationStatus
-------------------- -----------                          ---------------
Move-AzureService    8b2663ec-c91c-73d7-a092-20057a0f3077 Succeeded      

移行が完了した後、ASM版の仮想マシンは削除されており、Windows Server 2012 R2 のユーザープロファイルもそのまま移行されていることを確認した。さらに、ストレージアカウントが ASM 版のままで残される点も要注意だ。

Microsoft Azure の請求書をメールで取得する

先月末にクラウド課金の見落としを心配する各位に朗報となる機能が追加された。掲題通り請求書をメールで送付してくれる機能であり、Azure invoices emailed directly to your inbox によれば月次で請求書を設定したメールアドレスに送付してくれるとのことだ。

今まで

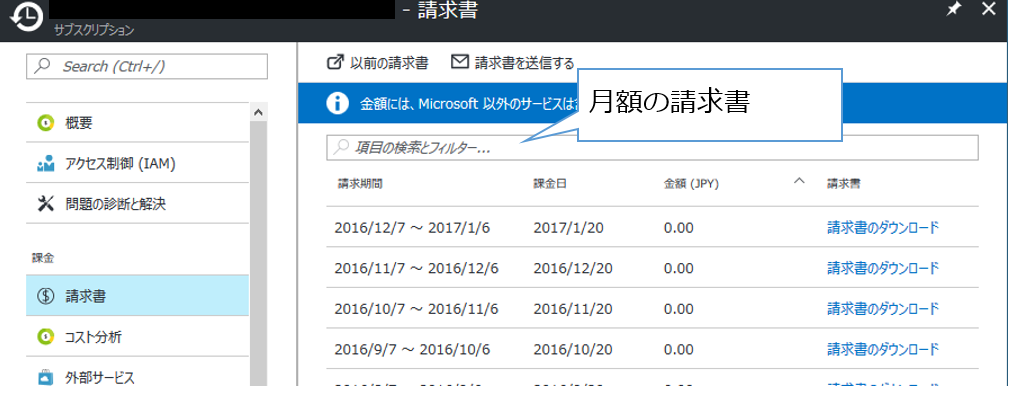
管理ポータル( https://portal.azure.com/ )の左メニューからサブスクリプションを選択し、当該サブスクリプションを選択する。そこから「請求書」を選択すると以下の様に各月の請求書がダウンロード可能だった。
f:id:waritohutsu:20170203113443p:plain

新機能

新機能では課金カテゴリに「請求書を送信する」というメニューが追加されている。こちらを選択し「オプトイン」を選択する。
f:id:waritohutsu:20170203113449p:plain

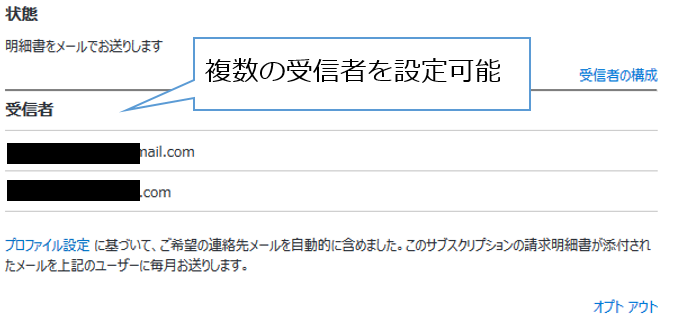
以下の画像の要領で請求書を受信するメールアドレスを追加する。記載させて頂いている通り、複数のメールアドレスで受信が可能だ。
f:id:waritohutsu:20170203113456p:plain

Linux+Apache の認証で Azure Active Directory を利用する

年末からに引き続き、Microsoft テクノロジ on Linux の露払いを行いたいと思う。今回紹介したいのは掲題の通り、Azure Active DirectoryApache の認証に利用する方法だ。
Azure Active Directory は他クラウドMicrosoft Azure の明確な差別化機能であり、本機能を利用することで SSO が容易に実現できることはいたるところのドキュメントで見かけるだろう。だが、大多数のケースとして Windows Server と Linux サーバが混在しているのが現実であり、Windows Server や Windows クライアントの例だけを見せられても「Linux サーバや Mac OS が混在している現状だと利用できないんじゃない?」とお嘆きの方が多いだろう。
そんな疑問に答えるために記載するのが本トピックだ。今回の記事で利用する機能は PAM 経由で Node.js 上で実行可能な Allows Linux user authentication to Azure AD via pam_exec であり、本機能を利用することで Apache に限らず様々な Linux 上で稼働するソフトウェアでの認証を Azure Active Directory で行えることが理解できると思う。GitHub のサンプル使った例が SSH ばかりだが、実地だと違うだろうなぁと思い、今回の記事を作成した。。。。

事前準備

Azure Active Direcotry ディレクトリの設定

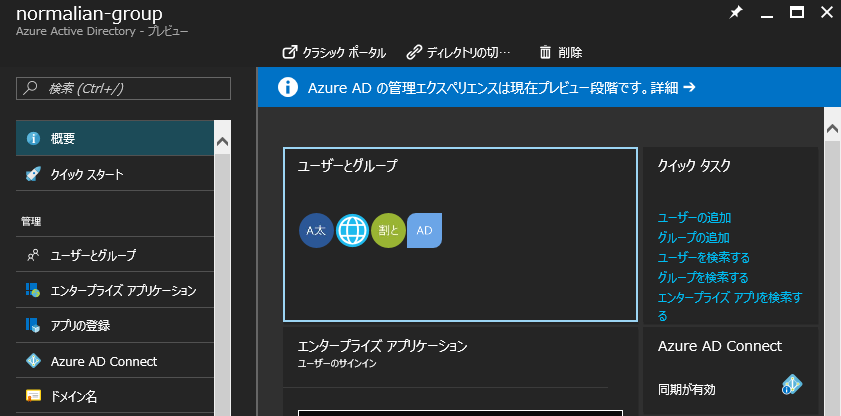
管理ポータルから以下の Azure Active Directory ディレクトリを作成する。
f:id:waritohutsu:20170108030912p:plain
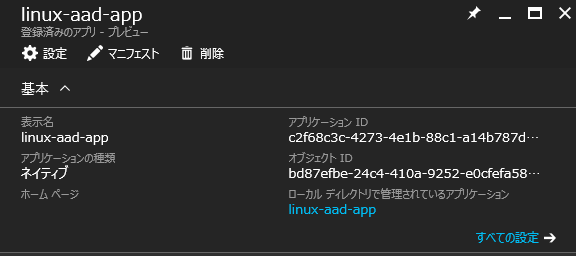
作成したディレクトリに Node.js が呼び出すためのアプリケーション情報を登録する。作成した Azure Active Directoryディレクトリから [アプリ登録]-[追加] を選択し、以下の要領でアプリケーション登録する。

  • 名前:任意(例:linux-aad-app
  • アプリケーションの種類:ネイティブ
  • リダイレクト URI:任意(例:https://<自分のドメイン名>.onmicrosoft.com

以下のように登録されていれば問題ない。
f:id:waritohutsu:20170108030942p:plain
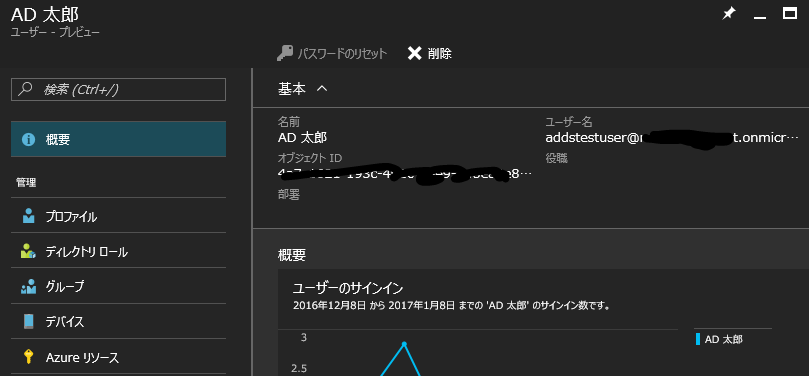
更に、Azure Active Directoryディレクトリから [ユーザーとグループ]-[すべてのユーザー]-[追加] を以下の様に作成する。今回は以下の様に addstestuser@<自分のドメイン名>.onmicrosoft.com としてユーザを作成する。
f:id:waritohutsu:20170108031002p:plain
ユーザ作成直後に一時パスワードが発行されるので、本記事の検証で利用する前に一度ブラウザでログインしてパスワードを再設定が必要となるので注意してほしい

Linux 仮想マシンの設定

Linux仮想マシンに接続し、以下の様に npm, nodejs, git をインストールして Azure AD 用の Node.js モジュールインストールし、/opt/aad-login/aad-login.js に作成した Azure Active Directoryディレクトリ名とアプリケーションIDを入力する。

[azureuser@xxxxxxxx ~]$ sudo su -
[root@xxxxxxxx ~]# yum install -y epel-release
[root@xxxxxxxx ~]# yum install -y npm nodejs git
[root@xxxxxxxx ~]# git clone https://github.com/bureado/aad-login
[root@xxxxxxxx ~]# mkdir -p /opt/aad-login
[root@xxxxxxxx ~]# cd aad-login/
[root@xxxxxxxx ~]# cp aad-login /usr/local/bin/
[root@xxxxxxxx ~]# cp aad-login.js package.json /opt/aad-login/
[root@xxxxxxxx ~]# cd /opt/aad-login/
[root@xxxxxxxx ~]# npm install
[root@xxxxxxxx ~]# vi aad-login.js
[root@xxxxxxxx ~]# head -n 10 /opt/aad-login/aad-login.js 
/*
  aad-login.js
  Requests a token from Azure AD using username/password

  Available under the Apache 2.0 License
*/

// Configuration parameters
var directory = '<自分のドメイン名>.onmicrosoft.com';
// Azure AD ポータル上に登録したアプリのアプリケーションID
var clientid  = 'xxxxxxxx-xxxx-xxxx-xxxx-xxxxxxxxxxxx';

また、管理ポータルで登録したユーザを NSS で利用可能にするため以下のコマンドを実行する。ユーザ名は適宜変更すること。

[root@xxxxxxxx ~]# useradd -m addstestuser

次に Apache のインストールと設定を行う。authnz_external.conf にて "/" 以下全てに外部認証が必要なことを設定し、/etc/pam.d/pwauth で Azure AD に認証を移譲することを設定している。以下は BASIC 認証だが、パスワードが平文で送付されるため、本番環境に適用する場合はコメントで記載が SSL の有効化を行う等の対応をしてほしい

[root@xxxxxxxx ~]# yum -y install httpd mod_authnz_external
[root@xxxxxxxx ~]# vi /etc/httpd/conf.d/authnz_external.conf
[root@xxxxxxxx ~]# cat /etc/httpd/conf.d/authnz_external.conf 

LoadModule authnz_external_module modules/mod_authnz_external.so

DefineExternalAuth pwauth pipe /usr/bin/pwauth

#
# see also: http://code.google.com/p/mod-auth-external/wiki/ConfigApache22
#

<Location "/">

        # Require SSL connection for password protection.
        # SSLRequireSSL

        AuthType Basic
        AuthName "Staff content"
        AuthBasicProvider external
        AuthExternal pwauth
        require valid-user

</Location>
[root@xxxxxxxx ~]# vi /etc/pam.d/pwauth 
[root@xxxxxxxx ~]# cat /etc/pam.d/pwauth 
#%PAM-1.0
auth       sufficient   pam_exec.so expose_authtok /usr/local/bin/aad-login # この行を追加
auth       include      password-auth
account    include      password-auth

以下を設定した後、Apache 起動の設定と SELinux を無効に設定し、OS を再起動する。`

[root@xxxxxxxx ~]# systemctl enable httpd
[root@xxxxxxxx ~]# vi /etc/selinux/config
[root@xxxxxxxx ~]# head -n 7 /etc/selinux/config 

# This file controls the state of SELinux on the system.
# SELINUX= can take one of these three values:
#     enforcing - SELinux security policy is enforced.
#     permissive - SELinux prints warnings instead of enforcing.
#     disabled - No SELinux policy is loaded.
SELINUX=disabled
[root@xxxxxxxx ~]# reboot

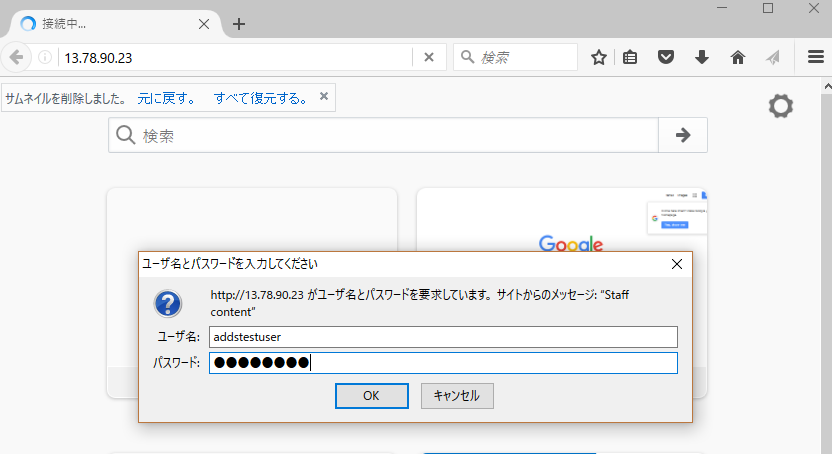
上記の設定後、作成した Linux 仮想マシンApache にアクセスすると以下のように認証情報を求められる。
f:id:waritohutsu:20170108031037p:plain
設定したユーザ名とパスワードを入力後、今回は ASP.NET Core アプリの起動を設定済みなので以下のような Apache の画面が表示される。
f:id:waritohutsu:20170108031204p:plain

ASP.NET Core の疎通を Linux 上でとってみる

年明け一発目の投稿では ASP.NET Core を Linux 上( CentOS 7.2 )で疎通をとる手順を紹介する。また、単なる Hello World に加えて Windows 上で作成した ASP.NET Core アプリを Linux 上にデプロイして動かす方法も試してみた。

CentOS 上でアプリを作成して公開する

まずは CentOS 上で環境構築を行う。.NET Core アプリケーションを起動するために必要なモジュールを設定ため、管理者となり以下のコマンドを実行する。

[azureuser@XXXXXXXX ]$ sudo su -
[sudo] password for azureuser: 
Last login: Thu Dec 29 03:29:20 UTC 2016 on pts/0
Last failed login: Sun Jan  1 03:07:07 UTC 2017 from 218.65.30.25 on ssh:notty
[root@XXXXXXXX ~]# yum install  libunwind libicu
[root@XXXXXXXX ~]# curl -sSL -o dotnet.tar.gz https://go.microsoft.com/fwlink/?LinkID=835019
[root@XXXXXXXX ~]# mkdir -p /opt/dotnet && sudo tar zxf dotnet.tar.gz -C /opt/dotnet
[root@XXXXXXXX ~]# ln -s /opt/dotnet/dotnet /usr/local/bin

次に、Apache 越しに .NET Core アプリケーションにアクセスするため Apache のインストールと *.conf ファイルを作成する。

[root@XXXXXXXX ~]# yum install httpd mod_ssl
[root@XXXXXXXX ~]# vi /etc/httpd/conf.d/hellomvc.conf
[root@XXXXXXXX ~]# cat /etc/httpd/conf.d/hellomvc.conf
    <VirtualHost *:80>
        ProxyPreserveHost On
        ProxyPass / http://127.0.0.1:5000/
        ProxyPassReverse / http://127.0.0.1:5000/
        ErrorLog /var/log/httpd/hellomvc-error.log
        CustomLog /var/log/httpd/hellomvc-access.log common
    </VirtualHost>

設定ファイル作成後、作成した hellomvc.conf ファイルの構文チェックを行う。

[root@XXXXXXXX ~]# service httpd configtest
AH00558: httpd: Could not reliably determine the server's fully qualified domain name, using 10.0.0.4. Set the 'ServerName' directive globally to suppress this message
Syntax OK

「Syntax OK」が表示されたことを確認後、Apache を起動する。

[root@XXXXXXXX ~]# systemctl enable httpd
[root@XXXXXXXX ~]# systemctl start httpd
[root@XXXXXXXX ~]# systemctl status httpd
● httpd.service - The Apache HTTP Server
   Loaded: loaded (/usr/lib/systemd/system/httpd.service; enabled; vendor preset: disabled)
   Active: active (running) since Thu 2016-12-29 03:40:09 UTC; 2 days ago
     Docs: man:httpd(8)
           man:apachectl(8)
 Main PID: 1705 (httpd)
   Status: "Total requests: 50; Current requests/sec: 0; Current traffic:   0 B/sec"
   CGroup: /system.slice/httpd.service
           ├─1705 /usr/sbin/httpd -DFOREGROUND
           ├─1706 /usr/sbin/httpd -DFOREGROUND
           ├─1707 /usr/sbin/httpd -DFOREGROUND
           ├─1708 /usr/sbin/httpd -DFOREGROUND
           ├─1709 /usr/sbin/httpd -DFOREGROUND
           ├─1710 /usr/sbin/httpd -DFOREGROUND
           ├─1738 /usr/sbin/httpd -DFOREGROUND
           ├─1743 /usr/sbin/httpd -DFOREGROUND
           ├─1745 /usr/sbin/httpd -DFOREGROUND
           ├─1746 /usr/sbin/httpd -DFOREGROUND
           └─5538 /usr/sbin/httpd -DFOREGROUND
Warning: Journal has been rotated since unit was started. Log output is incomplete or unavailable.

上記の様に Aapache が正常に起動されていることを確認後、以下の様に ASP.NET Core アプリケーションを作成する。

[azureuser@XXXXXXXX ~]$ rm -rf MyWebapp/
[azureuser@XXXXXXXX ~]$ mkdir MyWebapp
[azureuser@XXXXXXXX ~]$ cd MyWebapp/
[azureuser@XXXXXXXX MyWebapp]$ dotnet new -t web
Created new C# project in /home/azureuser/MyWebapp.

[azureuser@XXXXXXXX MyWebapp]$ ls
appsettings.json  Controllers  gulpfile.js  package.json  project.json  Services    Views       wwwroot
bower.json        Data         Models       Program.cs    README.md     Startup.cs  web.config

その後、以下の様にコマンドを実行してアプリケーションのパッケージの復元&アプリケーションの実行を行う。

[azureuser@XXXXXXXX MyWebapp]$ dotnet restore
log  : Restoring packages for /home/azureuser/MyWebapp/project.json...
warn : Dependency specified was Microsoft.NETCore.App (>= 1.1.0-preview1-001153-00) but ended up with Microsoft.NETCore.App 1.1.0.
log  : Restoring packages for tool 'Microsoft.AspNetCore.Razor.Tools' in /home/azureuser/MyWebapp/project.json...
log  : Restoring packages for tool 'Microsoft.AspNetCore.Server.IISIntegration.Tools' in /home/azureuser/MyWebapp/project.json...
log  : Restoring packages for tool 'Microsoft.EntityFrameworkCore.Tools' in /home/azureuser/MyWebapp/project.json...
log  : Restoring packages for tool 'Microsoft.Extensions.SecretManager.Tools' in /home/azureuser/MyWebapp/project.json...
log  : Restoring packages for tool 'Microsoft.VisualStudio.Web.CodeGeneration.Tools' in /home/azureuser/MyWebapp/project.json...
log  : Writing lock file to disk. Path: /home/azureuser/MyWebapp/project.lock.json
log  : /home/azureuser/MyWebapp/project.json
log  : Restore completed in 9331ms.

[azureuser@XXXXXXXX MyWebapp]$ dotnet run
Project MyWebapp (.NETCoreApp,Version=v1.1) will be compiled because expected outputs are missing
Compiling MyWebapp for .NETCoreApp,Version=v1.1
/home/azureuser/MyWebapp/project.json(5,30): warning NU1007: Dependency specified was Microsoft.NETCore.App >= 1.1.0-preview1-001153-00 but ended up with Microsoft.NETCore.App 1.1.0.

Compilation succeeded.
    1 Warning(s)
    0 Error(s)

Time elapsed 00:00:02.0095423
 

info: Microsoft.Extensions.DependencyInjection.DataProtectionServices[0]
      User profile is available. Using '/home/azureuser/.aspnet/DataProtection-Keys' as key repository; keys will not be encrypted at rest.
Hosting environment: Production
Content root path: /home/azureuser/MyWebapp
Now listening on: http://localhost:5000
Application started. Press Ctrl+C to shut down.

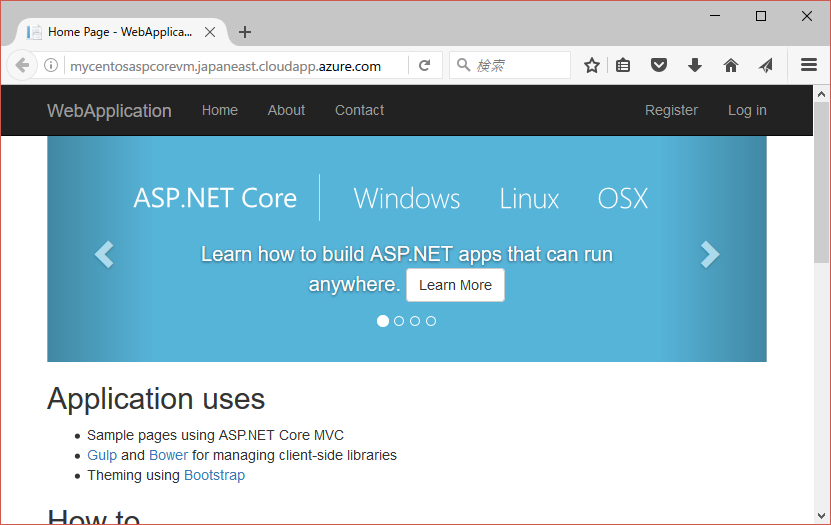
上記を確認後、ブラウザからアクセスして以下のページが表示されることを確認する。
f:id:waritohutsu:20170101132903p:plain

Windows 上で作ったアプリを CentOS 上で公開する

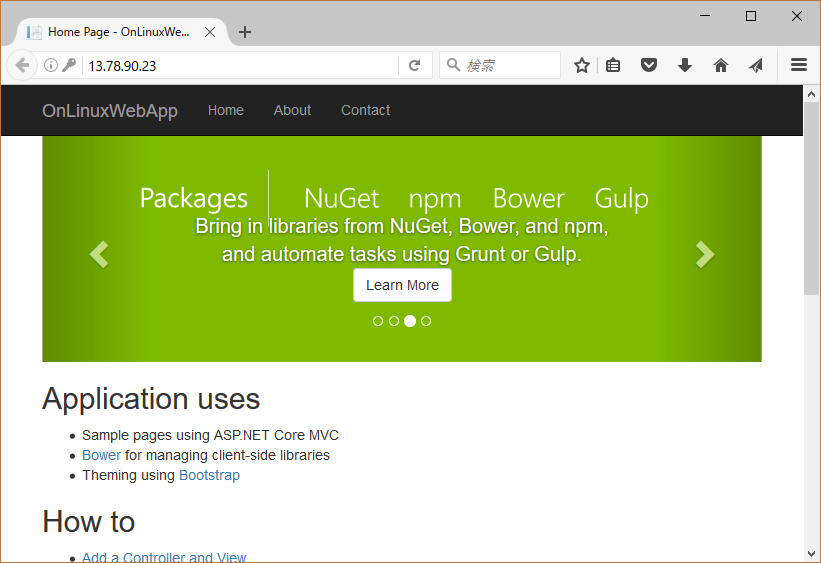
次に WindowsVisual Studio 上で作成した ASP.NET Core アプリケーションを CentOS で動かそうとしてみる。Visual Studio 2015 Update3 で ASP.NET Core アプリケーションを新規で作成し、以下の様に WinSCP で接続してアプリケーションのモジュールを CentOS 上に配置する。モジュールを配置後、以下の様に dotnet restore を実行してパッケージを復元してアプリケーションを実行してみる。

[azureuser@XXXXXXXX  ~]$ cd OnLinuxWebApp/                                                                                     
[azureuser@XXXXXXXX OnLinuxWebApp]$ dotnet restore                                                                            
log  : Restoring packages for /home/azureuser/OnLinuxWebApp/project.json...
log  : Restoring packages for tool 'BundlerMinifier.Core' in /home/azureuser/OnLinuxWebApp/project.json...
log  : Restoring packages for tool 'Microsoft.AspNetCore.Razor.Tools' in /home/azureuser/OnLinuxWebApp/project.json...
log  : Restoring packages for tool 'Microsoft.AspNetCore.Server.IISIntegration.Tools' in /home/azureuser/OnLinuxWebApp/project.json...
log  : Writing lock file to disk. Path: /home/azureuser/OnLinuxWebApp/project.lock.json
log  : /home/azureuser/OnLinuxWebApp/project.json
log  : Restore completed in 7477ms.
[azureuser@CentWebVM OnLinuxWebApp]$ 
[azureuser@CentWebVM OnLinuxWebApp]$ dotnet run                                                                                
Project OnLinuxWebApp (.NETCoreApp,Version=v1.0) will be compiled because expected outputs are missing
Compiling OnLinuxWebApp for .NETCoreApp,Version=v1.0

Compilation succeeded.
    0 Warning(s)
    0 Error(s)

Time elapsed 00:00:01.3216328
 

The specified framework 'Microsoft.NETCore.App', version '1.0.1' was not found.
  - Check application dependencies and target a framework version installed at:
      /opt/dotnet/shared/Microsoft.NETCore.App
  - The following versions are installed:
      1.1.0
  - Alternatively, install the framework version '1.0.1'.

上記を確認すると Visual Studio 上で作成したアプリケーションは 'Microsoft.NETCore.App' のバージョンが '1.0.1' だが、同バージョンのモジュールが見つからずにアプリケーションが実行できない旨が表示されている。
仕方がないので、試しに他の .NET Core アプリケーションを Linux 上で作成して Microsoft.NETCore.App のバージョンを確認する。

[azureuser@XXXXXXXX ~]$ mkdir HelloApp
[azureuser@XXXXXXXX ~]$ cd HelloApp
[azureuser@XXXXXXXX HelloApp]$ dotnet new 
Created new C# project in /home/azureuser.
[azureuser@XXXXXXXX HelloApp]$ head -n 14 project.json 
{
  "version": "1.0.0-*",
  "buildOptions": {
    "debugType": "portable",
    "emitEntryPoint": true
  },
  "dependencies": {},
  "frameworks": {
    "netcoreapp1.1": {
      "dependencies": {
        "Microsoft.NETCore.App": {
          "type": "platform",
          "version": "1.1.0"
        }

上記から 1.1.0 のバージョンであれば有効であることが分かる。Visual Studio で作成したアプリケーションの project.json 内の Microsoft.NETCore.App をバージョン 1.1.0 に修正し、再度 dotnet restore を実行してアプリケーションを起動する。

[azureuser@XXXXXXXX OnLinuxWebApp]$ dotnet restore
log  : Restoring packages for /home/azureuser/OnLinuxWebApp/project.json...
log  : Restoring packages for tool 'BundlerMinifier.Core' in /home/azureuser/OnLinuxWebApp/project.json...
log  : Restoring packages for tool 'Microsoft.AspNetCore.Razor.Tools' in /home/azureuser/OnLinuxWebApp/project.json...
log  : Restoring packages for tool 'Microsoft.AspNetCore.Server.IISIntegration.Tools' in /home/azureuser/OnLinuxWebApp/project.json...
log  : Writing lock file to disk. Path: /home/azureuser/OnLinuxWebApp/project.lock.json
log  : /home/azureuser/OnLinuxWebApp/project.json
log  : Restore completed in 7193ms.
[azureuser@CentWebVM OnLinuxWebApp]$ dotnet run
Project OnLinuxWebApp (.NETCoreApp,Version=v1.0) will be compiled because inputs were modified
Compiling OnLinuxWebApp for .NETCoreApp,Version=v1.0

Compilation succeeded.
    0 Warning(s)
    0 Error(s)

Time elapsed 00:00:01.3575381

正常に実行されていればブラウザ越しにアプリケーションにアクセスできるはずだ。実際の運用時には Windows 側と Linux 側でのバージョンの整合性については注意してほしい。

Docker for Windows を試してみる

今回はもう流行ってずいぶん経つ Docker が Windows 版に対応したので、こちらの疎通をとってみる。今回の手順は Get started with Docker for Windows を踏襲した程度なので、英語に抵抗感のない人はこちらを試すことをお勧めする。
注意として現状のクライアント OS は「64bit Windows 10 Pro, Enterprise and Education (1511 November update, Build 10586 or later)」のバージョンのみ利用可能だという点だ( Windows Server 側はこの限りではない )。
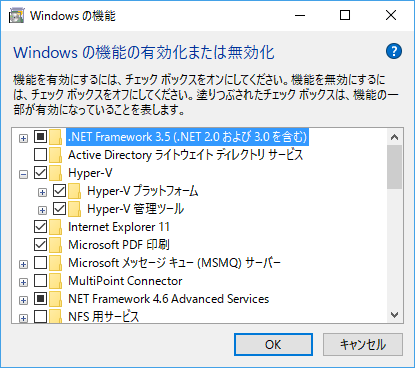
Docker for Windows は内部で Hyper-V を利用しているため「Windows の機能の有効化または無効化」で以下の様に Hyper-V の機能を有効化する。
f:id:waritohutsu:20161231015736p:plain

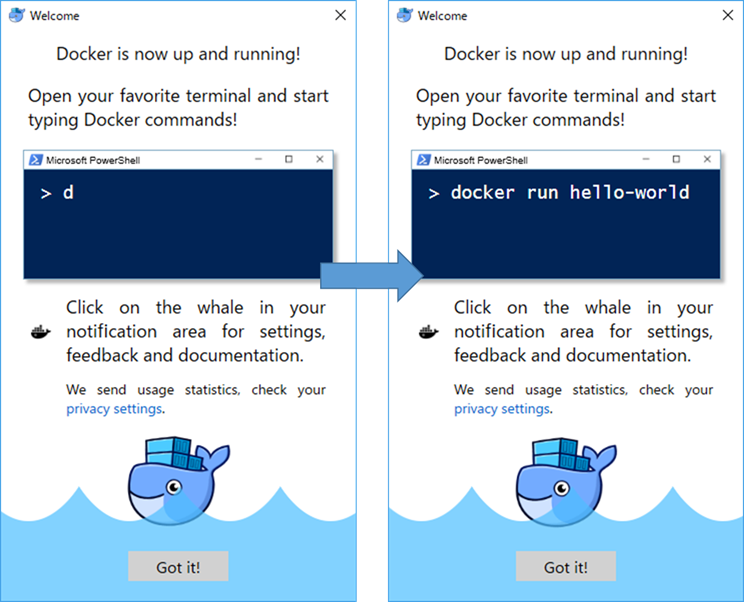
上記を実施後に Get started with Docker for Windows から Docker for Windowsインストーラを取得し、セットアップを実施する。セットアップの実施後、作成された Docker for Windows のアイコンから起動すると以下のウィンドウが表示される。
f:id:waritohutsu:20161231015856p:plain

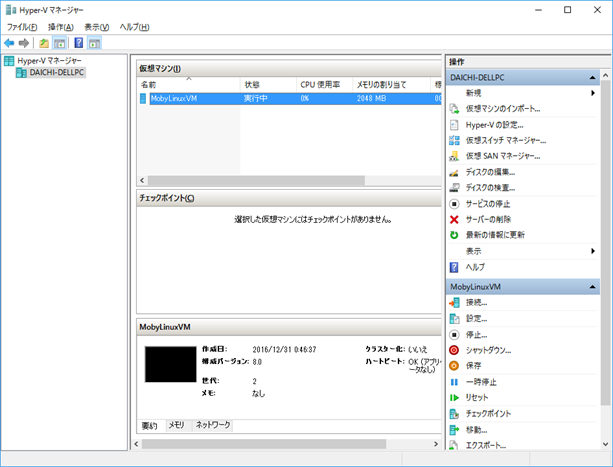
さらに Hyper-V マネージャを起動すると、以下の様に MobyLinuxVM が表示される。これらが表示されない場合はセットアップ後にしばらく待つ。
f:id:waritohutsu:20161231020006p:plain

次に、PowerShell ISE を起動し、以下の様にコマンドが実行されるか確認する。

PS C:\Windows\System32\WindowsPowerShell\v1.0> docker info
Containers: 0
 Running: 0
 Paused: 0
 Stopped: 0
Images: 0
Server Version: 1.12.5
Storage Driver: aufs
 Root Dir: /var/lib/docker/aufs
 Backing Filesystem: extfs

Docker for Windows のインストールが完了していることを確認後、以下のコマンドを利用して nginx の Web サーバを起動し、プロセス一覧から実行中であることを確認する。

PS C:\Windows\System32\WindowsPowerShell\v1.0> docker run -d -p 80:80 --name webserver nginx
docker : Unable to find image 'nginx:latest' locally
発生場所 行:1 文字:1
+ docker run -d -p 80:80 --name webserver nginx
+ ~~~~~~~~~~~~~~~~~~~~~~~~~~~~~~~~~~~~~~~~~~~~~
    + CategoryInfo          : NotSpecified: (Unable to find ...latest' locally:String) [], RemoteException
    + FullyQualifiedErrorId : NativeCommandError
 
latest: 
Pulling from library/nginx
75a822cd7888: Pulling fs layer
0aefb9dc4a57: Pulling fs layer
046e44ee6057: Pulling fs layer
046e44ee6057: 
Verifying Checksum
046e44ee6057: Download complete
0aefb9dc4a57: 
Verifying Checksum
0aefb9dc4a57: Download complete
75a822cd7888: 
Download complete
75a822cd7888: 
Pull complete
0aefb9dc4a57: 
Pull complete
046e44ee6057: 
Pull complete
Digest: sha256:fab482910aae9630c93bd24fc6fcecb9f9f792c24a8974f5e46d8ad625ac2357
Status: Downloaded newer image for nginx:latest
1f0fa6a7e1433102f52437e192f8b9579a8721405fc17a47553016f5fec52b33

PS C:\Windows\System32\WindowsPowerShell\v1.0> docker ps
CONTAINER ID        IMAGE               COMMAND                  CREATED             STATUS              PORTS                         NAMES
1f0fa6a7e143        nginx               "nginx -g 'daemon off"   10 minutes ago      Up 10 minutes       0.0.0.0:80->80/tcp, 443/tcp   webserver

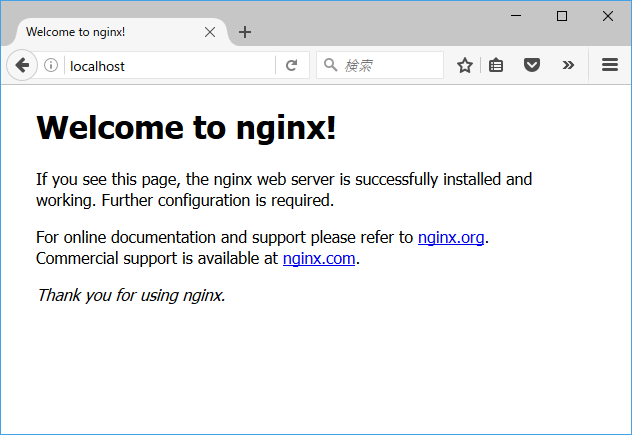
最後にブラウザからアクセスすることで正常に Docker のイメージが実行されていることを確認する。
f:id:waritohutsu:20161231020037p:plain

CentOS on Microsoft Azure で mdadm を利用した大容量領域の作成

はじめに

Microsoft Azure の IaaS(仮想マシン)で RDB を構築したくなるケースが往々にして存在すると思うが、この際に課題となりやすいのが「仮想マシンのディスク一本あたり上限サイズが 1TB 」という点だ。昨今(というか一昔前でも)の RDB なら 1TB ではサイズが足りないのが正直なところだろう。今回はこうした課題に対応するため、Microsoft Azure の IaaS 上で複数ディスクを束ねて一つの大きな論理ボリュームに見せる方法を紹介する。
Microsoft Azure の IaaS 上」と前置きしたが、実際には「複数 1TB 容量ディスクを接続された Linux OS でどの様に大きな論理ボリュームを作成するか?」が主題となる認識だ。Linux 上で本要件を実現する技術としては LVM と MDADM が存在するものの Azure Storage secrets and Linux I/O optimizations に以下の記載が存在する。

Software RAID

If you want to scale out on the number of IOPS that a single disk can provide, you will need to use some kind of software RAID configuration at the LINUX file system level.
 I tested both MD and LVM and we found that, at least in Azure, MD (MDADM) outperform LVM since it scales much better. As you can read in the details on software RAID later
 in this post, it is recommended to use 64KB for the “chunk” parameter. Since Azure already take care of disk replication (3 copies) for high-availability, as explained
 in the previous “Azure disk resiliency & high-availability” section, it is recommended to use RAID-0 striping configuration (no parity). Before proceeding with software
 RAID configuration using MDADM, you will need to do some preparation steps, which are create partitions on newly added data disks, format and mount. The complete procedure
 is described at the following link:

Configure Software RAID on Linux

http://azure.microsoft.com/en-us/documentation/articles/virtual-machines-linux-configure-raid

One important factor to consider, in the context of software RAID, is the CPU power: the higher the number of cores, the better will be the scalability factor on using
 multiple disks, with a significant advantage of Intel-bases D-SERIES VM SKUs over AMD-based A-SERIES ones.

上記によれば Microsoft Azure 上でテストした限り、LVM よりも MDADM の方が性能がスケールするとある。また、chunk サイズを 64KB とし、ソフトウェア RAID であるために RAID-0 (可用性は Microsoft Azure ストレージ側に頼る)を利用することを推奨されていることが分かる。
今回は上記を踏まえて CentOS 7.2 を利用した大容量領域の作成を行う。

MDADM 領域の作成

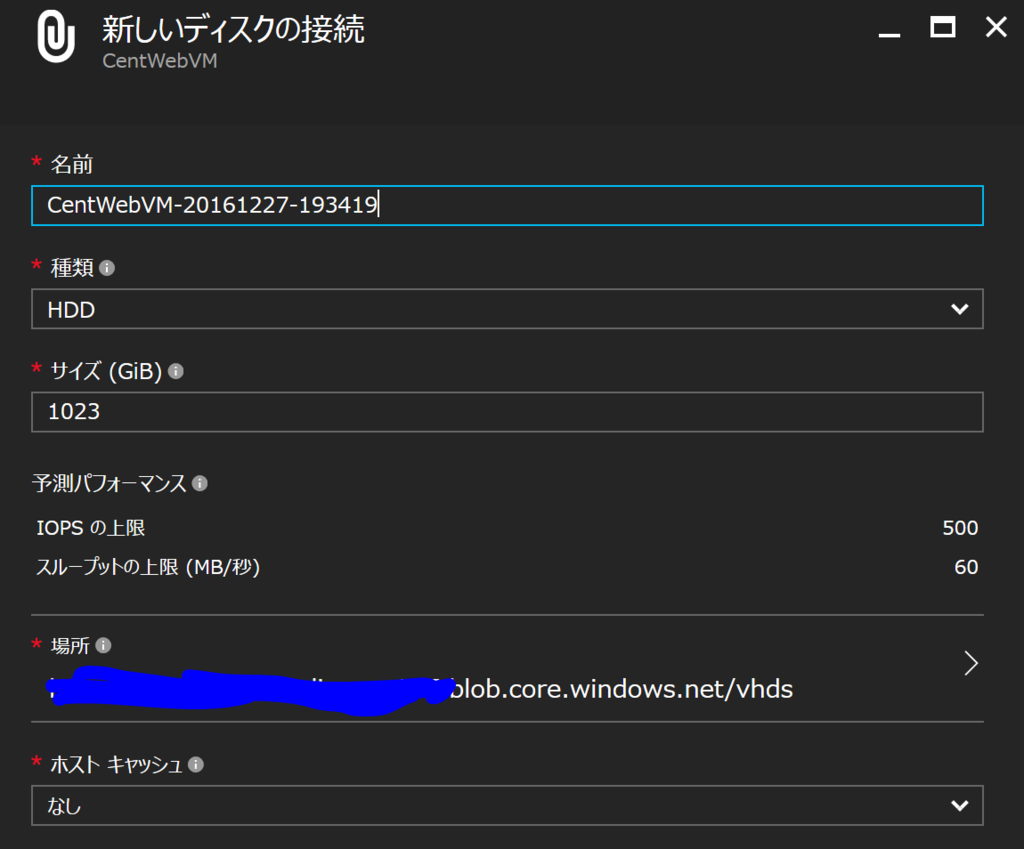
こちらは特に解説は不要だと思うが、以下のように選択した仮想マシンから [新しいディスクの接続] を選択し、以下のように [ホストキャッシュ] を [なし] にしてディスクを N 本(今回は 2 本)追加する。
f:id:waritohutsu:20161227193627p:plain

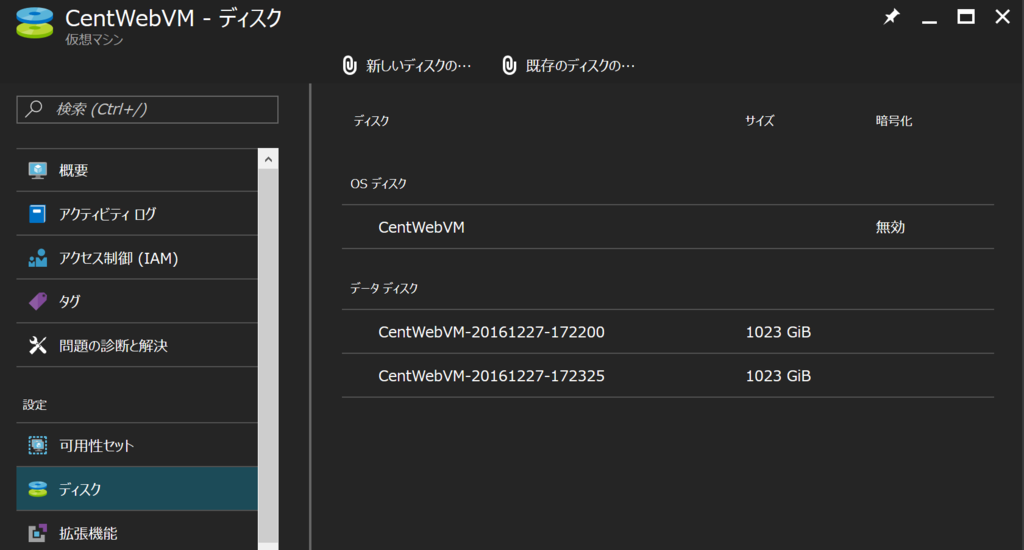
以下の様な画面になっていればディスク追加は完了だ。
f:id:waritohutsu:20161227193509p:plain

ここからは Linux 仮想マシンSSH でログインした後の作業となる。まずはログイン後、管理者としてログインしなおして mdadm のインストールを行ってみる。

[azureuser@XXXXXXXXX ~]$ sudo su -
[root@XXXXXXXXX ~]# yum install mdadm
Loaded plugins: fastestmirror, langpacks
Loading mirror speeds from cached hostfile
Package mdadm-3.4-14.el7.x86_64 already installed and latest version
Nothing to do

ご覧の様に Microsoft Azure 上で作成する CentOS 7.2 の標準環境では mdadm モジュールが既存でインストール済の様だ。次に、以下のように接続ディスクの確認を行う。

[root@XXXXXXXXX ~]# ls /dev/sd*
/dev/sda  /dev/sda1  /dev/sdb  /dev/sdb1  /dev/sdc  /dev/sdd

上記のうち /dev/sda は OS ディスク領域、/dev/sdb は SSD の一時ディスク領域となる(今回仮想マシンを D シリーズで作成したために存在する)。管理ポータルから接続したディスクは /dev/sdc, /dev/sdd だ。ここで念のため /dev/sdb 領域を確認してみる。

[root@XXXXXXXXX ~]# df -h
Filesystem      Size  Used Avail Use% Mounted on
/dev/sda1        30G  1.6G   29G   6% /
devtmpfs        1.7G     0  1.7G   0% /dev
tmpfs           1.7G     0  1.7G   0% /dev/shm
tmpfs           1.7G  8.3M  1.7G   1% /run
tmpfs           1.7G     0  1.7G   0% /sys/fs/cgroup
/dev/sdb1       6.8G   32M  6.4G   1% /mnt/resource
tmpfs           345M     0  345M   0% /run/user/1000

[root@XXXXXXXXX ~]# ls /mnt/resource/
DATALOSS_WARNING_README.txt  lost+found
[root@XXXXXXXXX ~]# cat /mnt/resource/DATALOSS_WARNING_README.txt
WARNING: THIS IS A TEMPORARY DISK.

Any data stored on this drive is SUBJECT TO LOSS and THERE IS NO WAY TO RECOVER IT.

Please do not use this disk for storing any personal or application data.

For additional details to please refer to the MSDN documentation at :
http://msdn.microsoft.com/en-us/library/windowsazure/jj672979.aspx

上記のように「一時領域だから保存データおかないでね!リカバリする方法ないよ!!」と明記されている。こちらはデータベースの一時領域等で利用しよう。

ここで漸く論理ボリュームの作成に入る。まず、以下の手順を /dev/sdc, /dev/sdd(さらにディスクを接続済ならその分も)に対して実行し、パーティションを作成する。

[root@XXXXXXXXX ~]# fdisk /dev/sdc
Welcome to fdisk (util-linux 2.23.2).

Changes will remain in memory only, until you decide to write them.
Be careful before using the write command.

Device does not contain a recognized partition table
Building a new DOS disklabel with disk identifier 0xe67aee68.

The device presents a logical sector size that is smaller than
the physical sector size. Aligning to a physical sector (or optimal
I/O) size boundary is recommended, or performance may be impacted.

Command (m for help): n
Partition type:
   p   primary (0 primary, 0 extended, 4 free)
   e   extended
Select (default p): p
Partition number (1-4, default 1): 1
First sector (2048-2145386495, default 2048):
Using default value 2048
Last sector, +sectors or +size{K,M,G} (2048-2145386495, default 2145386495):
Using default value 2145386495
Partition 1 of type Linux and of size 1023 GiB is set

Command (m for help): w
The partition table has been altered!

Calling ioctl() to re-read partition table.
Syncing disks.

上記を実行することで /dev/sdc1, /dev/sdd1 の論理ボリュームが作成されている。こちらを用いて以下のように論理ボリュームを束ねた新規ボリュームを作成する。この際、冒頭で記載した chunk サイズを 64K にすることに注意して欲しい。

[root@XXXXXXXXX ~]# mdadm --create /dev/md127 --level 0 --raid-devices 2 /dev/sdc1 /dev/sdd1 -c 64
mdadm: Defaulting to version 1.2 metadata
mdadm: array /dev/md127 started.

更にこちらを ext4ファイルシステムでフォーマットする。

[root@XXXXXXXXX ~]# mkfs -t ext4 /dev/md127
mke2fs 1.42.9 (28-Dec-2013)
Filesystem label=
OS type: Linux
Block size=4096 (log=2)
Fragment size=4096 (log=2)
Stride=16 blocks, Stripe width=32 blocks
134070272 inodes, 536280576 blocks
26814028 blocks (5.00%) reserved for the super user
First data block=0
Maximum filesystem blocks=2684354560
16366 block groups
32768 blocks per group, 32768 fragments per group
8192 inodes per group
Superblock backups stored on blocks:
        32768, 98304, 163840, 229376, 294912, 819200, 884736, 1605632, 2654208,
        4096000, 7962624, 11239424, 20480000, 23887872, 71663616, 78675968,
        102400000, 214990848, 512000000

Allocating group tables: done
Writing inode tables: done
Creating journal (32768 blocks): done
Writing superblocks and filesystem accounting information: done

上記の領域を blkid コマンドを利用して UUID を確認し、/etc/fstab に作成したマウントポイント(以下の /mnt/data )を追記し、barrier 無効(barrier=0)としてマウント情報を記載する。

[root@XXXXXXXXX ~]# blkid
/dev/sda1: UUID="0177d0ac-2605-4bfb-9873-5bdefea12fe2" TYPE="xfs"
/dev/sdb1: UUID="beab1720-9779-4fb0-9c6a-2b53bf861873" TYPE="ext4"
/dev/sdc1: UUID="b09c7a9a-b577-c937-cb1f-075432fd1bab" UUID_SUB="e6775322-8a2c-74e8-d3a1-f7bb8d391f78" LABEL="XXXXXXXXX:127" TYPE="linux_raid_member"
/dev/sdd1: UUID="b09c7a9a-b577-c937-cb1f-075432fd1bab" UUID_SUB="b378d3d5-0611-d3ed-d02f-0b4005316319" LABEL="XXXXXXXXX:127" TYPE="linux_raid_member"
/dev/md127: UUID="488685aa-4434-483f-b773-fa737ea270c6" TYPE="ext4"

[root@XXXXXXXXX ~]# mkdir /mnt/data
[root@XXXXXXXXX ~]# vi /etc/fstab
[root@XXXXXXXXX ~]# cat /etc/fstab
#
# /etc/fstab
# Created by anaconda on Wed Oct 26 19:33:38 2016
#
# Accessible filesystems, by reference, are maintained under '/dev/disk'
# See man pages fstab(5), findfs(8), mount(8) and/or blkid(8) for more info
#
UUID=0177d0ac-2605-4bfb-9873-5bdefea12fe2 /                       xfs     defaults        0 0
UUID=488685aa-4434-483f-b773-fa737ea270c6 /mnt/data               ext4    defaults,barrier=0        0 2

実際にマウントして情報を確認する。

[root@XXXXXXXXX ~]# mount -a
[root@XXXXXXXXX ~]# df -h
Filesystem      Size  Used Avail Use% Mounted on
/dev/sda1        30G  1.6G   29G   6% /
devtmpfs        1.7G     0  1.7G   0% /dev
tmpfs           1.7G     0  1.7G   0% /dev/shm
tmpfs           1.7G  8.3M  1.7G   1% /run
tmpfs           1.7G     0  1.7G   0% /sys/fs/cgroup
/dev/sdb1       6.8G   32M  6.4G   1% /mnt/resource
tmpfs           345M     0  345M   0% /run/user/1000
/dev/md127      2.0T   81M  1.9T   1% /mnt/data

上記で 2.0T の領域が作成されていることが確認できたと思う。