normalian blog

Let's talk about Microsoft Azure, ASP.NET and Java!

Replace configuration files with environment variables on VSTS tasks

I believe you definitely want to replace values of some files in your projects with environments variables when you setup Visual Studio Team Services Build/Release processes. There are some ways to replace the values, and I will introduce to use e "Replace Tokens" published in Marketplace.

How to use "Replace Tokens" on VSTS

Input "Replace Tokens" into search box when you add new tasks in your VSTS Build/Release process and click "Install" to initialize it.
f:id:waritohutsu:20180406070531p:plain

After adding "Replace Tokens" task in your process, change "Root directory" and "Target files" to specify which files you want to change. In below example, I specify *.xml files in my "SFwithASPNetApp" project.
f:id:waritohutsu:20180406070730p:plain

And finally refer below a part of Service Fabric ServiceManifest.xml. This xml file uses "Build.Repository.Name" and "Build.BuildId" environment variables to specify Docker image name.

  <CodePackage Name="Code" Version="1.0.0">
    <EntryPoint>
      <!-- Follow this link for more information about deploying Windows containers to Service Fabric: https://aka.ms/sfguestcontainers -->
      <ContainerHost>
        <ImageName>mynormalianregister.azurecr.io/#{Build.Repository.Name}#:#{Build.BuildId}#</ImageName>
      </ContainerHost>
    </EntryPoint>

The Docker image name will replace from "mynormalianregister.azurecr.io/#{Build.Repository.Name}#:#{Build.BuildId}#" into "mynormalianregister.azurecr.io/us-customer-demo-projects:111" in this case.

Note that you must put "}#" not "}" as suffix token.

How to override values of environment variables on VSTS tasks

As you know VSTS can use environment variables in VSTS Build and Release tasks. It's really useful to dynamically change values of build and release process like below, but you should sometimes wants to override even in running tasks.
f:id:waritohutsu:20180329072459p:plain

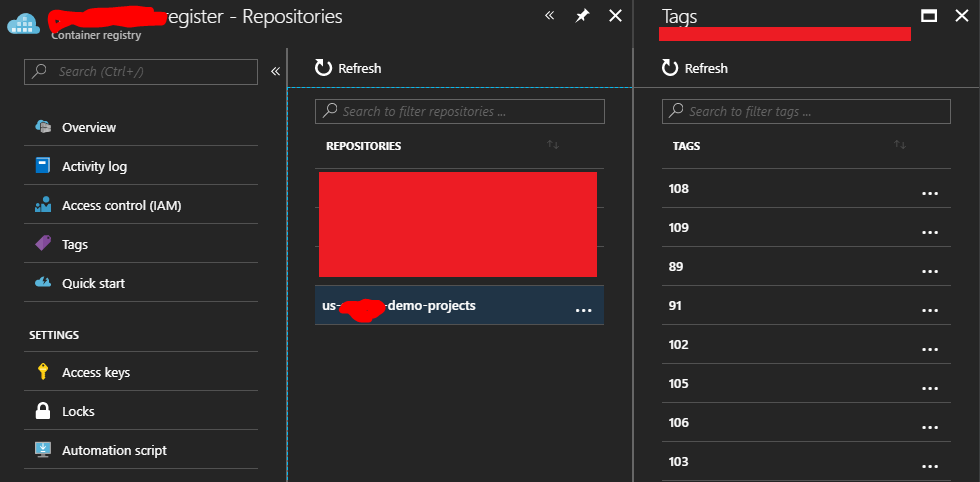
I have built Windows Docker images on with VSTS build tasks by specifying its name as $(Build.Repository.Name), the actual name is "US-XXXXXX-Demo-Projects", and I store them into Azure Container Registry. But unfortunately, Azure Container Registry stores Docker images as lowercase letters like below.
f:id:waritohutsu:20180329092859p:plain

As this result, you need to change Docker image name from $(Build.Repository.Name), change repository name itself or override environment variable. This article shows how to override the value.

How to override environment variable values on VSTS tasks

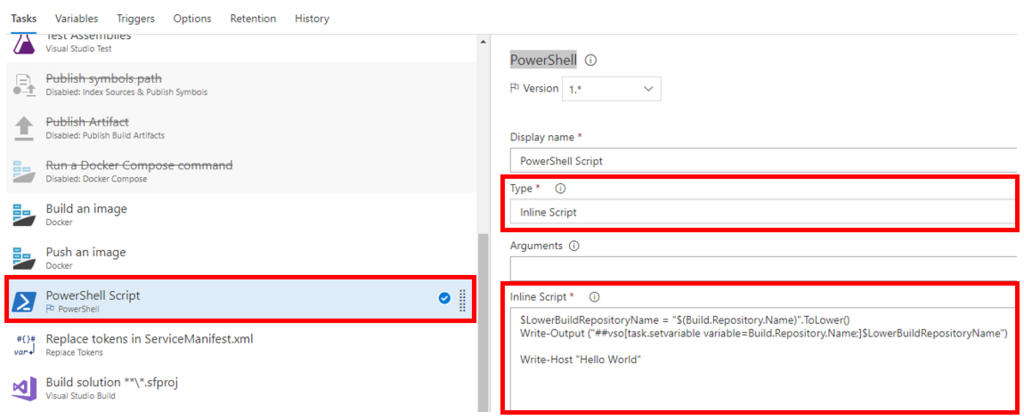
You need to add "PowerShell" tasks into your build process, specify its "Type" as "Inline Script" and edit "Inline Script" like below.
f:id:waritohutsu:20180329073438p:plain

$LowerBuildRepositoryName = "$(Build.Repository.Name)".ToLower()
Write-Output ("##vso[task.setvariable variable=Build.Repository.Name;]$LowerBuildRepositoryName")

Write-Host "Build.Repository.Name variable updates"

You can override any variables as you like to edit the inline script.

What is workaround when you got error message "failure in a Windows system call: No hypervisor is present on this system." on Service Fabric Explorer

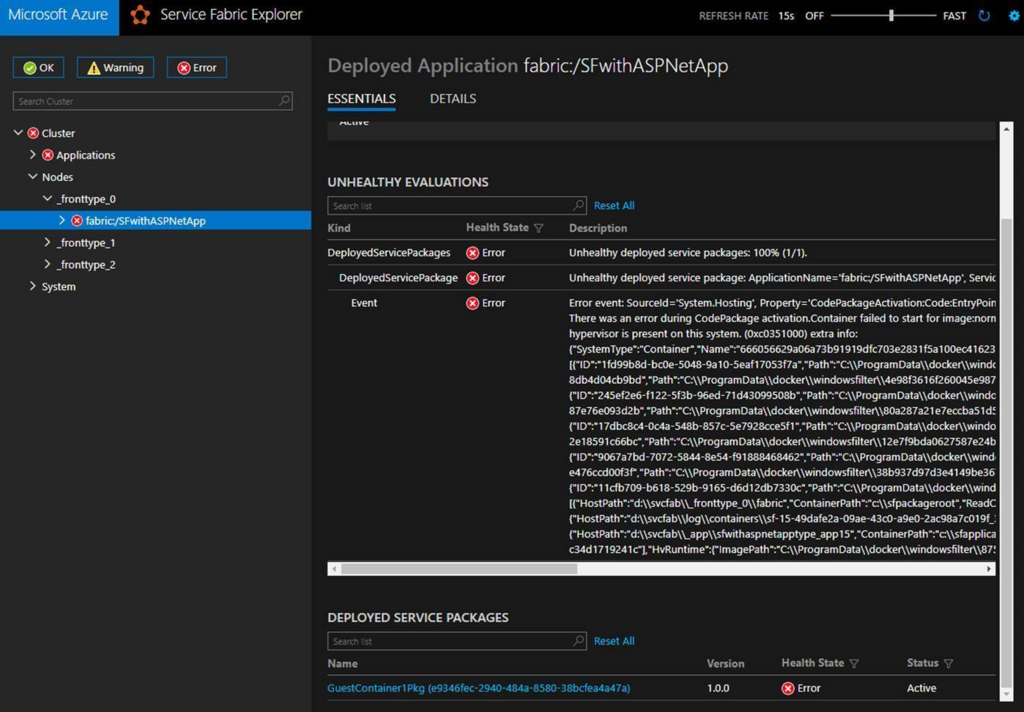
As you know, we can deploy Docker Container images into Service Fabric clusters, but you need to note when you specify "Instance Size" of Service Fabric when you use Windows Container images. You will get below error messages if you don't specify "Ev3" or "Dv3" for Azure SKUs even though you use "hyperv isolation mode".

There was an error during CodePackage activation.Container failed to start for image:"your container image".azurecr.io/"your image name":"your tag name". container 4ef6c4ec64f3006db9f5cbe9541dcb77994ccd1ac8d018180b5d08ba0cf95803 encountered an error during CreateContainer: failure in a Windows system call: No hypervisor is present on this system. (0xc0351000) extra info: {"SystemType":"Container","Name":"4ef6c4ec64f3006db9f5cbe9541dcb77994ccd1ac8d018180b5d08ba0cf95803","Owner":"docker","IsDummy":false,"IgnoreFlushesDuringBoot":true,"LayerFolderPath":"C:\\ProgramData\\docker\\windowsfilter\\4ef6c4ec64f3006db9f5cbe9541dcb77994ccd1ac8d018180b5d08ba0cf95803","Layers":[{"ID":"1fd99b8d-bc0e-5048-9a10-5eaf17053f7a","Path":"C:\\ProgramData\\docker\\windowsfilter\\b8452e48f79716c4f811a2c80d3f32d4a37c9fb98fb179c6cffce7f0beed1e66"},{"ID":"758bc832-f0e5-55a8-a2ca-8db4d04cb9bd","Path":"C:\\ProgramData\\docker\\windowsfilter\\4e98f3616f260045e987e017b3894dcfa250c7f595997110c9900b02488e05f3"},{"ID":"91a87634-6f3e-59a9-9578-33049cc2ebaa","Path":"C:\\ProgramData\\docker\\windowsfilter\\f18e514d9d6c1d8d892856392b96f939d9f992cc7395d0b2d6f05e22216ac737"},{"ID":"245ef2e6-f122-5f3b-96ed-71d43099508b","Path":"C:\\ProgramData\\docker\\windowsfilter\\715c1bdc318c7b012e2f70d3798f4e1e79a96d2fa165bac377f7540030f1a1a6"},{"ID":"22fbc57d-ea4d-552b-9b3a-87e76e093d2b","Path":"C:\\ProgramData\\docker\\windowsfilter\\80a287a21e7eccba51d5110e25517639351e87f52067a7df382edcdaf312138b"},{"ID":"a451ab3e-a3fd-5db9-8c91-7d69034cd20a","Path":"C:\\ProgramData\\docker\\windowsfilter\\94c121ca13cfde5bf579f36687d5405d0487ad972dd18ff8f598870aa3a72b73"},{"ID":"17dbc8c4-0c4a-548b-857c-5e7928cce5f1","Path":"C:\\ProgramData\\docker\\windowsfilter\\9e9fa399255bb3ba2717dcdd6ca06d493fa189c6d6a0276d0713f2a524dd3d2a"},{"ID":"20a857ef-13bb-55cf-8a67-2e18591c66bc","Path":"C:\\ProgramData\\docker\\windowsfilter\\12e7f9bda0627587e24bb4d5a3fb91c3ed9b6b6943ac1d35244afac547796dd1"},{"ID":"6d4958bb-c89f-5390-9420-5ddaff8ef0ca","Path":"C:\\ProgramData\\docker\\windowsfilter\\a4f9f68812499ffdaed2e84a6b84d8d878286f4d726b91bb7970b618f1d8dd65"},{"ID":"9067a7bd-7072-5844-8e54-f91888468462","Path":"C:\\ProgramData\\docker\\windowsfilter\\7efa7258bfec74a13dc8bbd93d4d0bc108ac6443ae0691198ff6a9a692c703f7"},{"ID":"edf15855-a46a-593c-a2c2-e476ccd00f3f","Path":"C:\\ProgramData\\docker\\windowsfilter\\38b937d97d3e4149be3671ae411441b9e839e2e0e40c5f626479357a0de8da00"},{"ID":"b4b0754d-1b7f-5413-ad1c-63616d0c72ff","Path":"C:\\ProgramData\\docker\\windowsfilter\\8753c8e07b95e6d80767dd39ace29e6e1108992ec72e46140ba990287272f418"},{"ID":"11cfb709-b618-529b-9165-d6d12db7330c","Path":"C:\\ProgramData\\docker\\windowsfilter\\d4a3ef41985c9ed1d7308f1f8603e8527154104bd7b308fed9f731f863d29314"}],"HostName":"4ef6c4ec64f3","MappedDirectories":[{"HostPath":"d:\\svcfab\\log\\containers\\sf-15-aa4017f4-24d0-437a-b7b5-a48db8717a13_3b9b217e-374e-48ea-8ee5-ccf597e47d34","ContainerPath":"c:\\sffabriclog","ReadOnly":false,"BandwidthMaximum":0,"IOPSMaximum":0},{"HostPath":"d:\\svcfab\\_fronttype_0\\fabric","ContainerPath":"c:\\sfpackageroot","ReadOnly":true,"BandwidthMaximum":0,"IOPSMaximum":0},{"HostPath":"c:\\program files\\microsoft service fabric\\bin\\fabric\\fabric.code","ContainerPath":"c:\\sffabricbin","ReadOnly":true,"BandwidthMaximum":0,"IOPSMaximum":0},{"HostPath":"d:\\svcfab\\_app\\sfwithaspnetapptype_app15","ContainerPath":"c:\\sfapplications\\sfwithaspnetapptype_app15","ReadOnly":false,"BandwidthMaximum":0,"IOPSMaximum":0}],"SandboxPath":"C:\\ProgramData\\docker\\windowsfilter","HvPartition":true,"EndpointList":["a118be34-14d8-48df-87be-2abaf0f40160"],"HvRuntime":{"ImagePath":"C:\\ProgramData\\docker\\windowsfilter\\8753c8e07b95e6d80767dd39ace29e6e1108992ec72e46140ba990287272f418\\UtilityVM"},"Servicing":false,"AllowUnqualifiedDNSQuery":true,"DNSSearchList":"SFwithASPNetApp"}
f:id:waritohutsu:20180328054928p:plain

Refer to Create an Azure Service Fabric container application | Microsoft Docs and watch the note. Next, confirm your ApplicationManifest.xml file in your Service Fabric project. It should be specified as "hyperv" isolation mode in attribute of "ContainerHostPolicies " tag if you have hyperv role enabled.

  <ServiceManifestImport>
    <ServiceManifestRef ServiceManifestName="GuestContainer1Pkg" ServiceManifestVersion="1.0.5" />
    <ConfigOverrides />
    <Policies>
      <ContainerHostPolicies CodePackageRef="Code" Isolation="hyperv">
        <RepositoryCredentials AccountName="your account name" Password="your password" PasswordEncrypted="false"/>
        <PortBinding ContainerPort="80" EndpointRef="GuestContainer1TypeEndpoint"/>
      </ContainerHostPolicies>
    </Policies>
  </ServiceManifestImport>
  <DefaultServices>

This error is caused by "you are running hyperV container on a machine that does not have hyperv role enabled", so you probably need to recreate your Service Fabric cluster as "Ev3" or "Dv3" instance size, because it might not be able to change SKU into different series.

How to setup VSTS Private Agent to build Windows Server ver 1709 base Docker images

Do you know Windows had breaking changes for their virtualization technologies and I referred about that in Windows Container Version Compatibility | Microsoft Docs. This change will cause an error when you will build Windows Server ver 1709 base Docker images on VSTS build tasks.
Unfortunately, VSTS probably doesn't offer Hosted which are available to build Windows Server ver 1709 base Docker images. As far as I have checked, there are some "Hosted Agent" in Microsoft-hosted agents for VSTS | Microsoft Docs like below.

It was failed when I built my Windows Server ver 1709 base Docker images on VSTS build tasks, so you also need to setup your Private Agent for building Windows Server ver 1709 base Docker images. You can setup the VM following this article!

Step by Step to step Windows Server version 1709 based VM as Private Agent

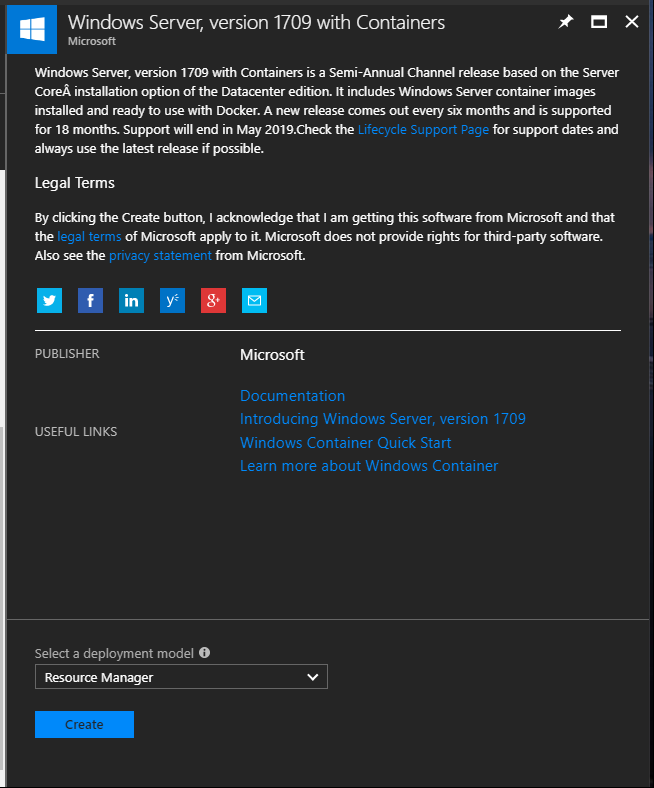
You need to create new Virtual Machine on Azure Portal. Choose "Windows Server, version 1709 with Containers" for base VM, because it contains "docker.exe" command. But keep in mind the image doesn't contain "docker-compose".
f:id:waritohutsu:20180323034702p:plain
You don't need to add special settings when you create VMs, but don't setup Network Security Group as completely closed to enable accessible VSTS service.

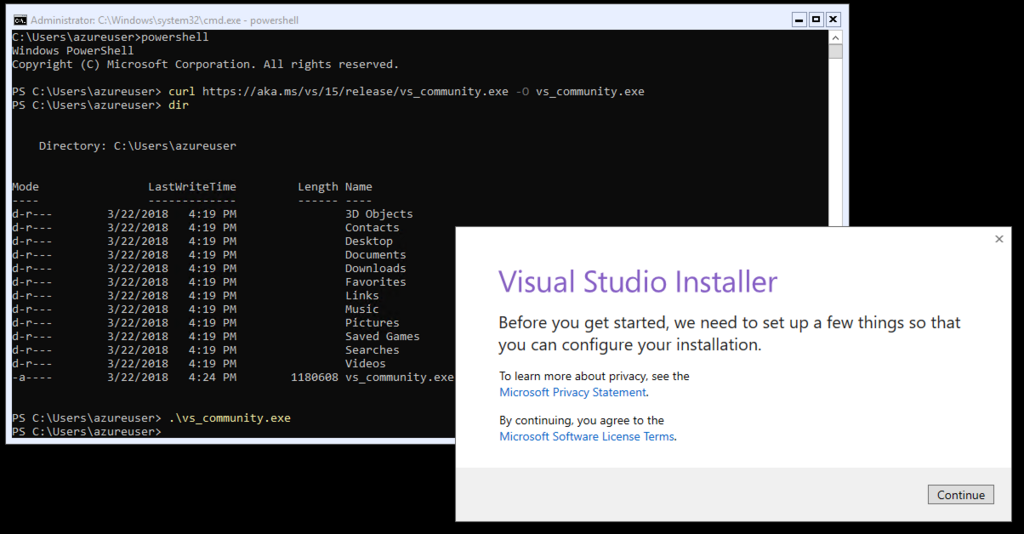
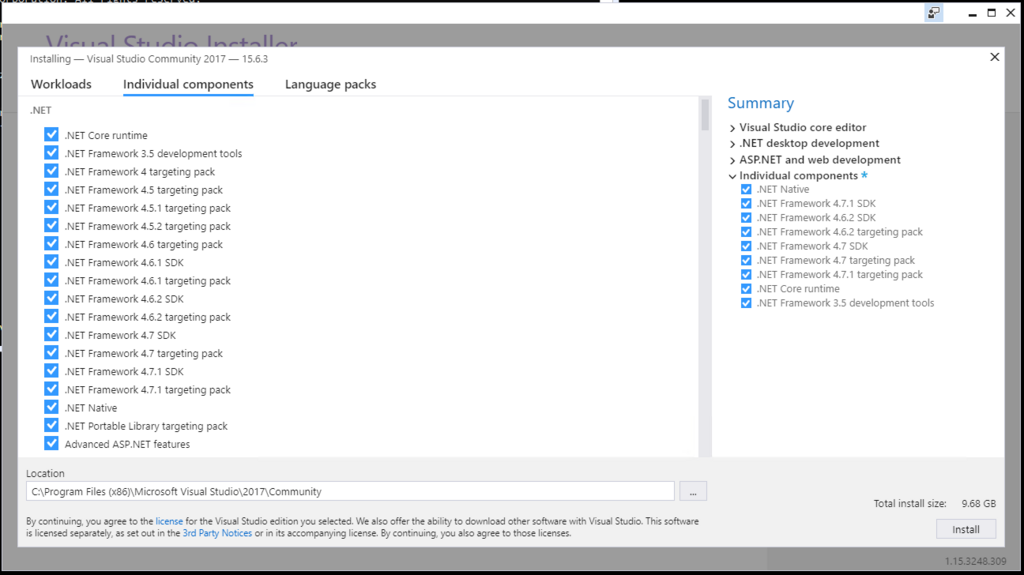
Access the VM using Remote Desktop and install Visual Studio 2017 into the VM, because the VM doesn't contain MSBuild and other commands for VSTS Build/Release processes. Follow below commands.


C:\Users\azureuser>powershell
Windows PowerShell
Copyright (C) Microsoft Corporation. All rights reserved.

PS C:\Users\azureuser> curl https://aka.ms/vs/15/release/vs_community.exe -O vs_community.exe
PS C:\Users\azureuser> dir


    Directory: C:\Users\azureuser


Mode                LastWriteTime         Length Name
----                -------------         ------ ----
d-r---        3/22/2018   4:19 PM                3D Objects
d-r---        3/22/2018   4:19 PM                Contacts
d-r---        3/22/2018   4:19 PM                Desktop
d-r---        3/22/2018   4:19 PM                Documents
d-r---        3/22/2018   4:19 PM                Downloads
d-r---        3/22/2018   4:19 PM                Favorites
d-r---        3/22/2018   4:19 PM                Links
d-r---        3/22/2018   4:19 PM                Music
d-r---        3/22/2018   4:19 PM                Pictures
d-r---        3/22/2018   4:19 PM                Saved Games
d-r---        3/22/2018   4:19 PM                Searches
d-r---        3/22/2018   4:19 PM                Videos
-a----        3/22/2018   4:24 PM        1180608 vs_community.exe

PS C:\Users\azureuser> .\vs_community.exe

f:id:waritohutsu:20180323040104p:plain

I chose below settings in my case, but change the settings for your environment if you need.
f:id:waritohutsu:20180323040219p:plain
f:id:waritohutsu:20180323040228p:plain

After Visual Studio installation has completed, add MSBuild execution folder path into PATH environment variable like below.

PS C:\Users\azureuser> setx /M PATH "%PATH%;C:\Program Files (x86)\Microsoft Visual Studio\2017\Community\MSBuild\15.0\B
in"

SUCCESS: Specified value was saved.
PS C:\Users\azureuser> 

Next, you also need to add "docker-compose" to build with it, because this base VM contains only just "docker" command. Follow below commands to install it.

PS C:\> [Net.ServicePointManager]::SecurityProtocol = [Net.SecurityProtocolType]::Tls12
PS C:\> Invoke-WebRequest "https://github.com/docker/compose/releases/download/1.20.0/docker-compose-Windows-x86_64.exe" -UseBasicParsing -OutFile $Env:ProgramFiles\docker\docker-compose.exe
PS C:\>

Finally, you need to setup VSTS Private Agent. Refer to How to setup your CentOS VMs as VSTS Private Agent - normalian blog to pick up "access token" for setup Private Agent. Note you need to setup user account of this Private Agent as "NT AUTHORITY\SYSTEM".

PS C:\agent> .\config.cmd

>> Connect:

Enter server URL > https://"your vsts account name".visualstudio.com
Enter authentication type (press enter for PAT) >
Enter personal access token > ****************************************************
Connecting to server ...

>> Register Agent:

Enter agent pool (press enter for default) > "Your Agent Pool Name"
Enter agent name (press enter for VSTSPAVM01) >
Scanning for tool capabilities.
Connecting to the server.
Successfully added the agent
Testing agent connection.
Enter work folder (press enter for _work) >
2018-03-18 05:09:24Z: Settings Saved.
Enter run agent as service? (Y/N) (press enter for N) > Y
Enter User account to use for the service (press enter for NT AUTHORITY\NETWORK SERVICE) > NT AUTHORITY\SYSTEM
Granting file permissions to 'NT AUTHORITY\SYSTEM'.
Service vstsagent.daisami-online.VSTSPAVM01 successfully installed
Service vstsagent.daisami-online.VSTSPAVM01 successfully set recovery option
Service vstsagent.daisami-online.VSTSPAVM01 successfully configured
Service vstsagent.daisami-online.VSTSPAVM01 started successfully
PS C:\agent>

Now, you can choose your Private Agent in your VSTS Build/Release processes.

Note: What will be error messages if you haven't complete docker-compose

You will get "##[error]Unhandled: Failed which: Not found docker: null" message from your VSTS build task.

2018-03-17T21:07:37.4182183Z ##[section]Starting: Build an image
2018-03-17T21:07:37.4186946Z ==============================================================================
2018-03-17T21:07:37.4187316Z Task         : Docker
2018-03-17T21:07:37.4187693Z Description  : Build, tag, push, or run Docker images, or run a Docker command. Task can be used with Docker or Azure Container registry.
2018-03-17T21:07:37.4188244Z Version      : 0.3.10
2018-03-17T21:07:37.4188534Z Author       : Microsoft Corporation
2018-03-17T21:07:37.4188879Z Help         : [More Information](https://go.microsoft.com/fwlink/?linkid=848006)
2018-03-17T21:07:37.4189247Z ==============================================================================
2018-03-17T21:07:37.6890544Z ##[error]Unhandled: Failed which: Not found docker: null
2018-03-17T21:07:37.6953107Z ##[section]Finishing: Build an image

Note: What will be error messages if you build Windows Server ver 1709 images with "Hosted VS2017" agent

You will get "The following Docker images are incompatible with the host operating system: [microsoft/aspnet:4.7.1-windowsservercore-1709]. Update the Dockerfile to specify a different base image." message from your VSTS build task.

2018-03-17T21:02:41.2336315Z 
2018-03-17T21:02:41.2336964Z Build FAILED.
2018-03-17T21:02:41.4137038Z 
2018-03-17T21:02:41.4138305Z "D:\a\1\s\Trunk\SFwithASPNetApp\SFwithASPNetApp.sln" (default target) (1) ->
2018-03-17T21:02:41.4139002Z "D:\a\1\s\Trunk\SFwithASPNetApp\docker-compose.dcproj" (default target) (3) ->
2018-03-17T21:02:41.4139575Z (DockerComposeBuild target) -> 
<b>2018-03-17T21:02:41.4141190Z   C:\Program Files (x86)\Microsoft Visual Studio\2017\Enterprise\MSBuild\Sdks\Microsoft.Docker.Sdk\build\Microsoft.Docker.targets(111,5): error : The following Docker images are incompatible with the host operating system: [microsoft/aspnet:4.7.1-windowsservercore-1709]. Update the Dockerfile to specify a different base image. See http://aka.ms/DockerToolsTroubleshooting for more details. [D:\a\1\s\Trunk\SFwithASPNetApp\docker-compose.dcproj]</b>
2018-03-17T21:02:41.4142524Z 
2018-03-17T21:02:41.4142996Z     0 Warning(s)
2018-03-17T21:02:41.4143435Z     1 Error(s)
2018-03-17T21:02:41.4143702Z 
2018-03-17T21:02:41.4144142Z Time Elapsed 00:14:00.47
2018-03-17T21:02:43.2578358Z ##[error]Process 'msbuild.exe' exited with code '1'.
2018-03-17T21:02:44.0944814Z ##[section]Finishing: Build solution
2018-03-17T21:02:44.1143215Z ##[section]Starting: Post Job Cleanup
2018-03-17T21:02:44.1300074Z Cleaning any cached credential from repository: US-Crackle-Demo-Projects (Git)
2018-03-17T21:02:44.1413004Z ##[command]git remote set-url origin https://daisami-online.visualstudio.com/_git/US-Crackle-Demo-Projects
2018-03-17T21:02:44.3340613Z ##[command]git remote set-url --push origin https://daisami-online.visualstudio.com/_git/US-Crackle-Demo-Projects
2018-03-17T21:02:44.3757483Z ##[section]Finishing: Post Job Cleanup
2018-03-17T21:02:44.4763369Z ##[section]Finishing: Job

Note: What will be error messages if you setup Private Agent account as "NT AUTHORITY\NETWORK SERVICE"

Your VM can't access " //./pipe/docker_engine: " and the build tasks will be failed.

DockerGetServiceReferences:
docker-compose -f "C:\agent\_work\1\s\Trunk\SFwithASPNetApp\docker-compose.yml" -f "C:\agent\_work\1\s\Trunk\SFwithASPNetApp\docker-compose.override.yml" -p dockercompose13733567670188849996 --no-ansi config
C:\Program Files (x86)\Microsoft Visual Studio\2017\Community\MSBuild\Sdks\Microsoft.Docker.Sdk\build\Microsoft.VisualStudio.Docker.Compose.targets(195,5): Error MSB4018: The "GetServiceReferences" task failed unexpectedly.
C:\Program Files (x86)\Microsoft Visual Studio\2017\Community\MSBuild\Sdks\Microsoft.Docker.Sdk\build\Microsoft.VisualStudio.Docker.Compose.targets(195,5): error MSB4018: The "GetServiceReferences" task failed unexpectedly. [C:\agent\_work\1\s\Trunk\SFwithASPNetApp\docker-compose.dcproj]
C:\Program Files (x86)\Microsoft Visual Studio\2017\Community\MSBuild\Sdks\Microsoft.Docker.Sdk\build\Microsoft.VisualStudio.Docker.Compose.targets(195,5): error MSB4018: Microsoft.Docker.Utilities.CommandLineClientException: error during connect: Get http://%2F%2F.%2Fpipe%2Fdocker_engine/v1.30/version: open //./pipe/docker_engine: Access is denied. In the default daemon configuration on Windows, the docker client must be run elevated to connect. This error may also indicate that the docker daemon is not running.. [C:\agent\_work\1\s\Trunk\SFwithASPNetApp\docker-compose.dcproj]
C:\Program Files (x86)\Microsoft Visual Studio\2017\Community\MSBuild\Sdks\Microsoft.Docker.Sdk\build\Microsoft.VisualStudio.Docker.Compose.targets(195,5): error MSB4018: [C:\agent\_work\1\s\Trunk\SFwithASPNetApp\docker-compose.dcproj]
C:\Program Files (x86)\Microsoft Visual Studio\2017\Community\MSBuild\Sdks\Microsoft.Docker.Sdk\build\Microsoft.VisualStudio.Docker.Compose.targets(195,5): error MSB4018: For more troubleshooting information, go to http://aka.ms/DockerToolsTroubleshooting ---> Microsoft.Docker.Utilities.CommandLineClientException: error during connect: Get http://%2F%2F.%2Fpipe%2Fdocker_engine/v1.30/version: open //./pipe/docker_engine: Access is denied. In the default daemon configuration on Windows, the docker client must be run elevated to connect. This error may also indicate that the docker daemon is not running. [C:\agent\_work\1\s\Trunk\SFwithASPNetApp\docker-compose.dcproj]

References

Add this comment at 8/8/2018 I found an article below. Refer this if your environment doesn't work well.
stackoverflow.com

How to build ASP.NET Framework Docker images on VSTS build tasks

As you know, Visual Studio Team Services offers to build Docker image tasks and Visual Studio offers Docker support. But there are some tips when you build ASP.NET Framework Docker images with VSTS build tasks. This post shows how to setup that.

You must note your OS versions of Docker images, because you must need to setup Private Agent if your base OS version is Windows Server version 1709. Refer below article at first if you need.
normalian.hatenablog.com

What's happened if you build ASP.NET Framework Docker images with default settings

You can choose "Add - Docker Support" like below if you have setup "Visual Studio Tools for Docker" in your machine. The tool is really useful and it will generate below Dockerfile in your ASP.NET Framework application.

FROM microsoft/aspnet:4.7.1-windowsservercore-1709
ARG source
WORKDIR /inetpub/wwwroot
COPY ${source:-obj/Docker/publish} .

Last "COPY" command line is a little bit tricky, because copy sources directory will change with ${source} variable value. The directory will be ${source} variable value if the value is set, but the directory will be obj/Docker/publish if ${source} variable isn't set.

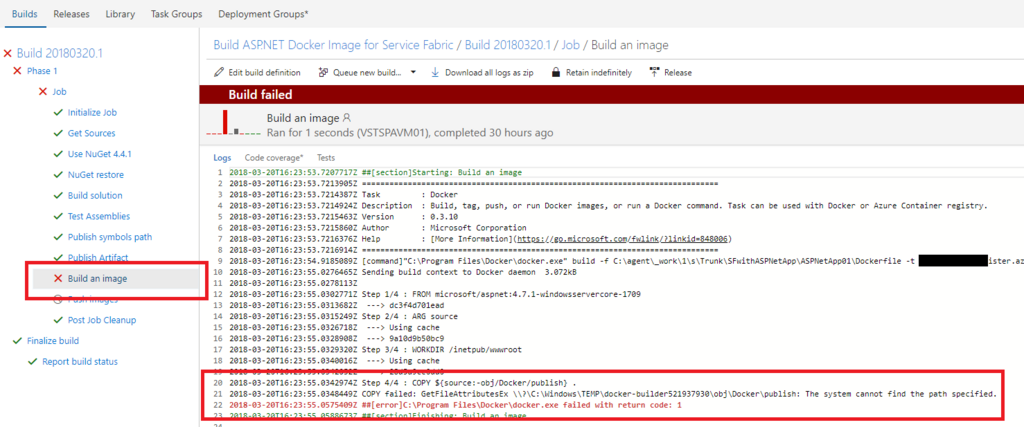
This Dockerfile should work on your machine, but it won't work on VSTS build tasks like below.

2018-03-20T16:23:53.7207717Z ##[section]Starting: Build an image
2018-03-20T16:23:53.7213905Z ==============================================================================
2018-03-20T16:23:53.7214387Z Task         : Docker
2018-03-20T16:23:53.7214924Z Description  : Build, tag, push, or run Docker images, or run a Docker command. Task can be used with Docker or Azure Container registry.
2018-03-20T16:23:53.7215463Z Version      : 0.3.10
2018-03-20T16:23:53.7215860Z Author       : Microsoft Corporation
2018-03-20T16:23:53.7216376Z Help         : [More Information](https://go.microsoft.com/fwlink/?linkid=848006)
2018-03-20T16:23:53.7216914Z ==============================================================================
2018-03-20T16:23:54.9185089Z [command]"C:\Program Files\Docker\docker.exe" build -f C:\agent\_work\1\s\Trunk\SFwithASPNetApp\ASPNetApp01\Dockerfile -t xxxxxxxxxxxxxxxxxxxister.azurecr.io/yyyyyyyyyyy-demo-projects:80 C:\agent\_work\1\s\Trunk\SFwithASPNetApp\ASPNetApp01
2018-03-20T16:23:55.0276465Z Sending build context to Docker daemon  3.072kB
2018-03-20T16:23:55.0278113Z 
2018-03-20T16:23:55.0302771Z Step 1/4 : FROM microsoft/aspnet:4.7.1-windowsservercore-1709
2018-03-20T16:23:55.0313682Z  ---> dc3f4d701ead
2018-03-20T16:23:55.0315249Z Step 2/4 : ARG source
2018-03-20T16:23:55.0326718Z  ---> Using cache
2018-03-20T16:23:55.0328908Z  ---> 9a10d9b50bc9
2018-03-20T16:23:55.0329320Z Step 3/4 : WORKDIR /inetpub/wwwroot
2018-03-20T16:23:55.0340016Z  ---> Using cache
2018-03-20T16:23:55.0342052Z  ---> 28d5a9cc0dd0
2018-03-20T16:23:55.0342974Z Step 4/4 : COPY ${source:-obj/Docker/publish} .
2018-03-20T16:23:55.0348449Z COPY failed: GetFileAttributesEx \\?\C:\Windows\TEMP\docker-builder521937930\obj\Docker\publish: The system cannot find the path specified.
2018-03-20T16:23:55.0575409Z ##[error]C:\Program Files\Docker\docker.exe failed with return code: 1
2018-03-20T16:23:55.0588673Z ##[section]Finishing: Build an image

f:id:waritohutsu:20180322072636p:plain

What is workaround of the issue?

You need to setup both Visual Studio and VSTS in this case. Please follow below steps .

Setup in your ASP.NET Framework project
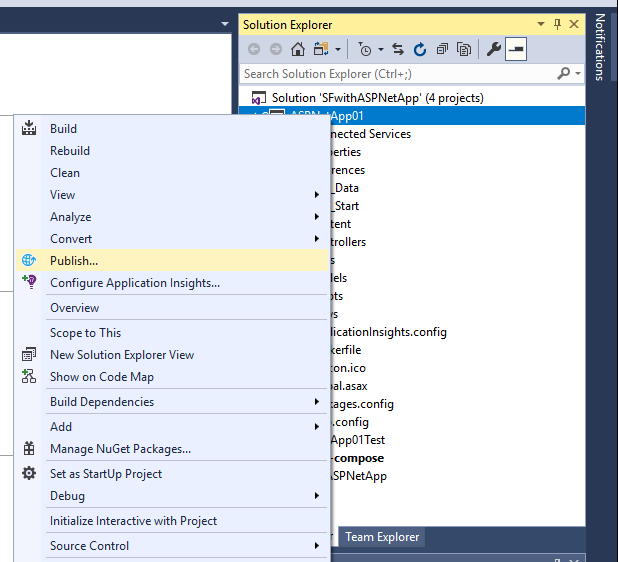
At first you need to setup new pubxml file in your ASP.NET Framework project to ensure output binaries into "obj\Docker\publish" directory, so choose "Publish" from right click menu of your ASP.NET Framework project like below.
f:id:waritohutsu:20180322065235p:plain

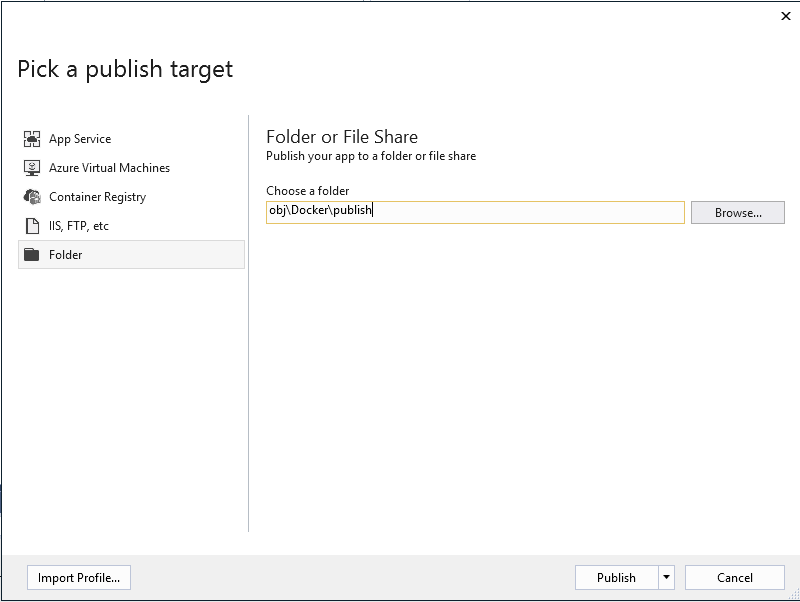
Choose "Folder" as target and edit "Choose a folder" as "obj\Docker\publish" like below.
f:id:waritohutsu:20180322065321p:plain

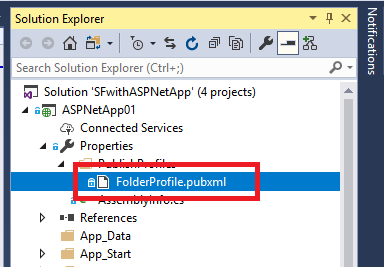
After setup the pubxml file, you can find it in your ASP.NET Framework like below. In this case, the filename is "FolderProfile.pubxml".
f:id:waritohutsu:20180322065556p:plain

Setup in your VSTS tasks
You need to update "Build Solution" tasks at first. Please note to add "/p:PublishProfile=FolderProfile.pubxml" and remove "/p:WebPublishMethod=Package".

  • "MSBuild Arguments" - before change
/p:DeployOnBuild=true /p:WebPublishMethod=Package /p:PackageAsSingleFile=true /p:SkipInvalidConfigurations=true /p:PackageLocation="$(build.artifactstagingdirectory)\\"
  • "MSBuild Arguments" - after change
/p:DeployOnBuild=true /p:PackageAsSingleFile=true /p:SkipInvalidConfigurations=true /p:PackageLocation="$(build.artifactstagingdirectory)\\" /p:PublishProfile=FolderProfile.pubxml 

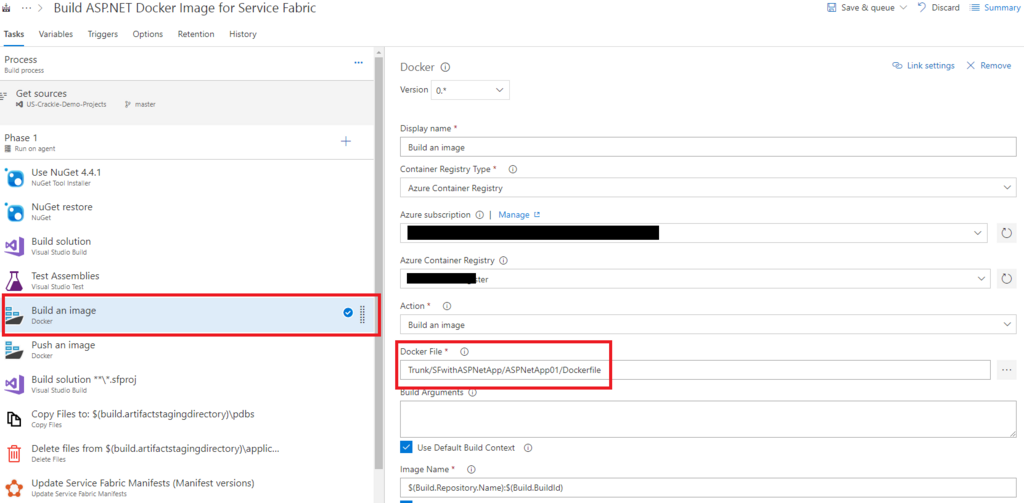
After setup "Build Solution" tasks correctly, you can just add "Build an Image" task and specify "Docker file" correctly like below.
f:id:waritohutsu:20180322071044p:plain

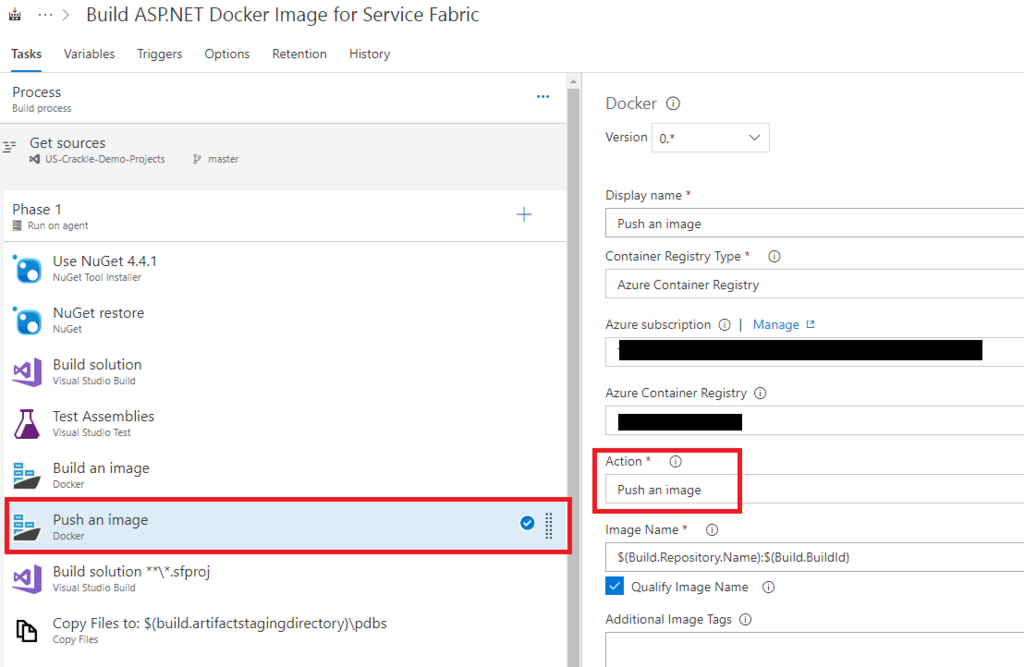
And you also need to add "Push an image" to store your Docker images into some registries. Note to specify as "Push an Image" not "Push images" like below.
f:id:waritohutsu:20180322071438p:plain

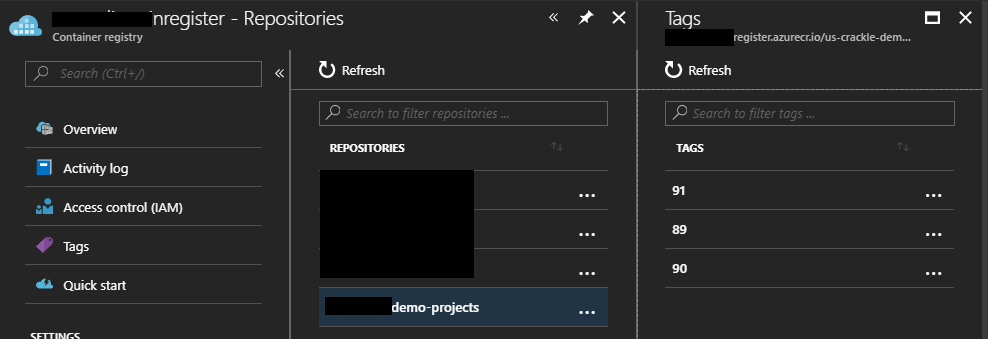
You can find your Docker images in your Container registry if the build process on VSTS work correctly.
f:id:waritohutsu:20180322071616p:plain

What is workaround when you got error messages "There was an error during download.Failed" while downloading container images

As you know, Service Fabric is one of implementations to offer Microservice Architecture provided by Microsoft. Of course, it can be deployed Docker Images both Windows and Linux base images, but you should note "Operating System" of Service Fabric cluster matches with Docker images when you want to deploy Docker images. There might be some reasons of error messages "There was an error during download.Failed" like below when you got the messages while deploying your images.
f:id:waritohutsu:20180317111137p:plain

It's caused by some reasons and it should be one of below.

  1. URL of your Docker image is invalid
  2. The authentication info of your Docker repository account is invalid
  3. There is virtualization mechanism mismatch between base OS of Docker images and operating system version of your Service Fabric cluster

No.1 and No.2 are trivial and not so difficult to fix it, but it's not easy to clarify when you got the message caused by No.3. In this article, I will dig into cause of No.3.

Docker container base images need to match the version of the host its running on. Unfortunately Windows made a breaking change where container images are not compatible across hosts like below article.
docs.microsoft.com
You need to specify your Service Fabric cluster "Operating System" based on your Docker image base OS like below image.
f:id:waritohutsu:20180317110812p:plain

  • You must specify "WindowsServer 2016-Datacenter-with-Containers" as Service Fabric cluster Operation System if your base OS is "Windows Server 2016"
  • You must specify "WindowsServerSemiAnnual Datacenter-Core-1709-with-Containers" as Service Fabric cluster Operation System if your base OS is "Windows Server version 1709"

Example to match OS Versions

It's important to match your Service Fabric cluster "Operating System" and base OS version specified in Dockerfile "FROM" keyword. And I put ServiceManifest and ApplicationManifest.xml just in case.

Example - part of Dockerfile

# This base OS for "WindowsServer 2016-Datacenter-with-Containers"
#FROM microsoft/aspnetcore-build:2.0.5-2.1.4-nanoserver-sac2016 AS base
# This base OS for "WindowsServerSemiAnnual Datacenter-Core-1709-with-Containers"
FROM microsoft/aspnetcore:2.0-nanoserver-1709 AS base
WORKDIR /app
EXPOSE 80

# This base OS for "WindowsServer 2016-Datacenter-with-Containers"
#FROM microsoft/aspnetcore-build:2.0.5-2.1.4-nanoserver-sac2016 AS build
# This base OS for "WindowsServerSemiAnnual Datacenter-Core-1709-with-Containers"
FROM microsoft/aspnetcore-build:2.0-nanoserver-1709 AS build
WORKDIR /src
COPY *.sln ./
COPY NetCoreWebApp/NetCoreWebApp.csproj NetCoreWebApp/
RUN dotnet restore
COPY . .
WORKDIR /src/NetCoreWebApp
RUN dotnet build -c Release -o /app

FROM build AS publish
RUN dotnet publish -c Release -o /app

FROM base AS final
WORKDIR /app
COPY --from=publish /app .
ENTRYPOINT ["dotnet", "NetCoreWebApp.dll"]


Example - part of ApplicationManifest.xml

  <ServiceManifestImport>
    <ServiceManifestRef ServiceManifestName="GuestContainer1Pkg" ServiceManifestVersion="1.0.0" />
    <ConfigOverrides />
    <Policies>
      <ContainerHostPolicies CodePackageRef="Code">
        <RepositoryCredentials AccountName="Username of your Container registry" Password="password of your Container registry" PasswordEncrypted="false"/>
        <PortBinding ContainerPort="80" EndpointRef="GuestContainer1TypeEndpoint"/>
      </ContainerHostPolicies>
    </Policies>
  </ServiceManifestImport>

Example - part of ServiceManifest.xml

    <EntryPoint>
      <!-- Follow this link for more information about deploying Windows containers to Service Fabric: https://aka.ms/sfguestcontainers -->
      <ContainerHost>
        <ImageName>"Username of your Container registry".azurecr.io/sample/helloworldapp:latest</ImageName>
      </ContainerHost>
    </EntryPoint>

How to pass values generated on VSTS processes into other build/release tasks

When you deploy templates with some linked templates, the linked templates should be stored public or limited access wtih SAS token. But this sometimes makes difficult to setup CI/CD pipeline on Visual Studio Team Service(VSTS). You can understand how to setup this with this article and GitHub - normalian/ARMTemplate-SASToken-InVSTS-Sample.
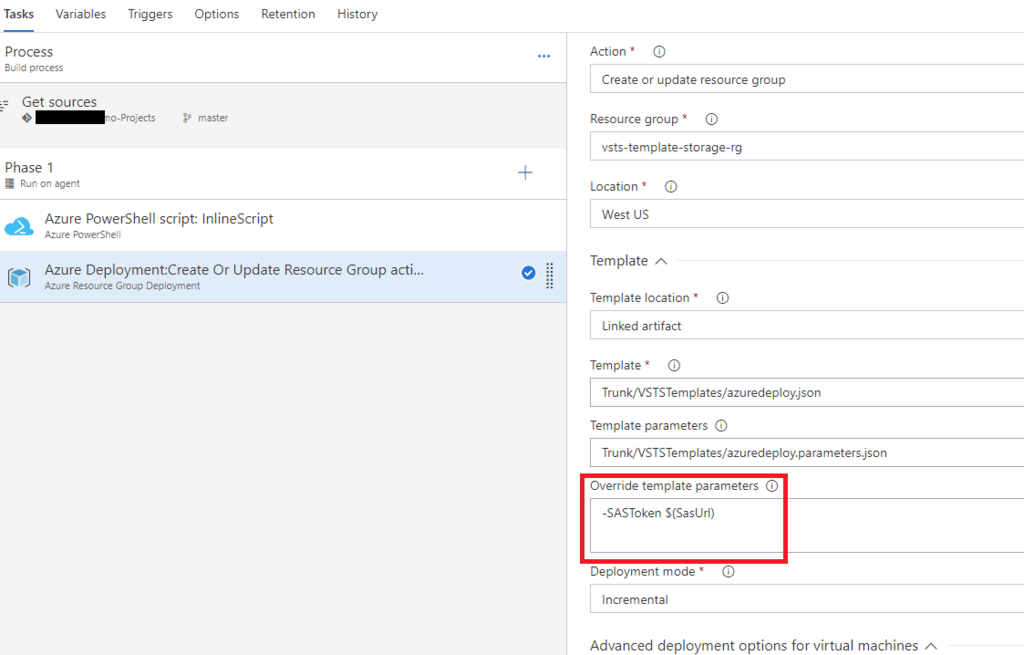
You can generate SAS token with VSTS task in build process and pass the value with VSTS variables, and you can also override ARM template parameters with VSTS tasks. This is key concepts of this article.

In VSTS Build Process

Create "Azure PowerShell script" task and "Azure Deployment: Create Or Update Resource Group Action" like below.
f:id:waritohutsu:20180311085121p:plain

Azure PowerShell script: inline Script – inline script
Edit "Azure PowerShell script" task like below.
f:id:waritohutsu:20180311085327p:plain

$context = New-AzureStorageContext -StorageAccountName 'your storage account name' -StorageAccountKey 'your storage access key'
$sasUrl = New-AzureStorageContainerSASToken -Container templates -Permission rwdl -Context $context 
Write-Output ("##vso[task.setvariable variable=SasUrl;]$sasUrl")

You can store generated values with VSTS variables like above.

Azure Resource Group Deployment - Override template parameters
Edit "Azure Deployment: Create Or Update Resource Group Action" like below.
f:id:waritohutsu:20180311085500p:plain

-SASToken $(SasUrl)

Part of ARM template

Now you can use SAS token to specify your linked templates like below. Refer this sample if you need.

    "variables": {
      "sharedTemplateUrl": "[concat('https://'your storage account name'.blob.core.windows.net/templates/blank-azuredeploy.json', parameters('SASToken') )]",
      "sharedParametersUrl": "[concat('https://'your storage account name'.blob.core.windows.net/templates/blank-azuredeploy.parameters.json', parameters('SASToken'))]"
    },