normalian blog

Let's talk about Microsoft Azure, ASP.NET and Java!

WebApps の Web ジョブで Java アプリを稼働させる

WebApps には簡易な定期処理を実行することができる Web ジョブと呼ばれる機能が提供されており、Web ジョブでバックグラウンド タスクを実行するバッチ処理の実行方法が記載されているが、今回は Java アプリケーションを実行する方法を紹介する。

前提知識として、Web ジョブ自体は WebApps のインスタンス上で動作するため、WebApps にバンドルされている実行ファイル( 今回紹介する Java とか )は利用可能だ。2015年8月現在では WebApps には以下の JDK がインストールされている。
f:id:waritohutsu:20150818165625p:plain

Web ジョブ デプロイ用の zip ファイルの作成

上記のうち、こちらに対し、以下のディレクトリ構造を持つ zip ファイルを作成する。

run.zip
└─bin
   │  run.bat
   │
   └─com
       └─mydoman
               Main.class

こちらに格納した run.bat, Main.class の元となる Main.java はそれぞれ以下になる。

  • run.bat
set JAVA_HOME=D:\Program Files\Java\jdk1.8.0_25
"%JAVA_HOME%"\bin\java com.mydoman.Main
package com.mydoman;

import java.io.File;

public class Main {
	public static void main(String[] args) {
		String path = new File(".").getAbsoluteFile().getParent();
		System.out.println("current folder is " + path);
	}
}

管理ポータルでのデプロイ

管理ポータルから作成済みの WebApps を選択し、設定から Web ジョブを選んで新規に作成する。この際に上記の zip ファイルを Web ジョブに格納し、オンデマンドで実行する。
実行後は管理ポータルでログを確認できるが、以下のような実行結果になっているはずだ。

[08/18/2015 06:00:31 > 5b618a: SYS INFO] Status changed to Initializing
[08/18/2015 06:00:31 > 5b618a: SYS INFO] Run script 'run.bat' with script host - 'WindowsScriptHost'
[08/18/2015 06:00:31 > 5b618a: SYS INFO] Status changed to Running
[08/18/2015 06:00:31 > 5b618a: INFO] 
[08/18/2015 06:00:31 > 5b618a: INFO] D:\local\Temp\jobs\triggered\HelloJavaJob\wq4oddg2.nbr>set JAVA_HOME=D:\Program Files\Java\jdk1.8.0_25 
[08/18/2015 06:00:31 > 5b618a: INFO] 
[08/18/2015 06:00:31 > 5b618a: INFO] D:\local\Temp\jobs\triggered\HelloJavaJob\wq4oddg2.nbr>"D:\Program Files\Java\jdk1.8.0_25"\bin\java com.mydoman.Main 
[08/18/2015 06:00:31 > 5b618a: INFO] current folder is D:\local\Temp\jobs\triggered\HelloJavaJob\wq4oddg2.nbr
[08/18/2015 06:00:31 > 5b618a: SYS INFO] Status changed to Success

上記を確認すればわかるが、D ドライブの Web ジョブ専用の領域で実行されていることがわかる。

まとめ

  • Web ジョブで Java は利用できるが、jar を自分でまとめて放り込む必要あり
  • .NET 違って Web ジョブの SDK はない

Micrsoft Azure の Web Apps で WildFly を稼働させる

随分と長い間 JDK 7 縛りにあって半泣きになっていた Web Apps だが、ARM から設定すると Azure Web Apps で JDK 8 と Tomcat 8 が使えるようになっていた で記載されている通り、Web Apps で JDK 8 と Tomcat 8 が使えるようになった。更に、直近では以下のように管理ポータルからも JDK 8 と Tomcat 8 が利用可能となっている。
f:id:waritohutsu:20150809111510p:plain

以前に Web Apps で JDK8 の利用を試みた際は、Tomcat 起動時に JDK8 がネットワークインターフェースの一覧を取得する Win32 API をたたいておりエラーが発生して利用できなかった。Tomcat8/JDK8 が利用できるため、どうやら JDK 8 向けの対応が完了したらしい*1
ここで気になったのが 2015年8月時点での Web Apps では WildFly が利用できるのではないかという点だ。なぜなら、JDK7&WildFly on Web Apps の利用時もネットワークインターフェース一覧を取得する Win32 API を叩く際のエラーが発生していたためだ。
確認した結果、以下の様に WildFly on Web Apps の稼働が確認でき、Web Apps 上で JavaEE7 を利用した Java アプリを存分に稼働できることが分かった。今回はこちらの設定方法を紹介する。
f:id:waritohutsu:20150809111525p:plain

設定手順

Web Apps には WildFly のパッケージは同梱されていないので、WildFly のダウンロードサイトから取得する必要がある。Web Apps では curl コマンドが仕込まれているので、Kudu のコンソールにて以下を実行して WildFly のパッケージを取得し、パッケージの中身を展開する。ファイル名のバージョンは適宜変更すること。

D:\home>cd site\wwwroot

D:\home\site\wwwroot>curl -O http://download.jboss.org/wildfly/9.0.1.Final/wildfly-9.0.1.Final.zip

D:\home\site\wwwroot>unzip wildfly-9.0.1.Final.zip

次に D:\home\site\wwwroot\web.config を作成して以下を記載する。

<?xml version="1.0" encoding="UTF-8"?>
<configuration>
    <system.webServer>
        <handlers>
            <add name="httpPlatformHandler" path="*" verb="*" 
                 modules="httpPlatformHandler" resourceType="Unspecified" />
        </handlers>
        <httpPlatform processPath="D:\home\site\wwwroot\wildfly-9.0.1.Final\bin\standalone.bat" arguments="-Djboss.http.port=%HTTP_PLATFORM_PORT%" startupTimeLimit="60">
            <environmentVariables>
                <environmentVariable name="JAVA_OPTS" value="-Djava.net.preferIPv4Stack=true" />
            </environmentVariables>
        </httpPlatform>
    </system.webServer>
</configuration>

WildFly が利用する HTTP ポートを HTTP_PLATFORM_PORT 環境変数にて設定し、httpPlatformHandler のプロセス起動待ち時間を60秒に設定している点に注意してほしい。WildFlyEJB コンテナを持つ JavaEE サーバであるため、Tomcat や Jetty に比べるとプロセスの起動に時間がかかる。そのため、startupTimeLimit デフォルトの 10秒では WildFly のプロセス起動に失敗する場合がある。

注意点

  • 2015年8月時点ではデフォルトの %JAVA_HOME% が JDK7 になっているので、JDK8 を利用する場合は管理ポータルで JDK8 を有効化する等、設定を見直すこと
  • WildFly 自体は利用できるが、HttpPlatformHandler は単一ポートの HTTP トラフィックしか流してくれないので JMX や管理ポータルに疎通できない

*1:念のため Kudu 経由で ipconfig をしたら相変わらず Access is denied とでたので、JDK 向けに特殊な処理をしているらしい

仮想ネットワークに参加した Worker ロールの Java アプリに ILB 経由で通信する

前回記載した Eclipse を利用して Worker ロールの Java アプリを仮想ネットワークに参加させる - 割と普通なブログ
の記事では Worker ロールの Java アプリを仮想ネットワークに配置したが、疎通自体はクラウドサービスの FQDN(xxxx.cloudapp.net)でアクセスするため「閉域」での疎通ではなかった。
今回は前回の記事を一歩進めて、閉域での通信をする Azure 内部負荷分散 (ILB) を利用する方法を紹介する。

設定ファイルの編集

Worker ロール(はもちろん Web ロールを含むクラウドサービス)を仮想マシンに参加させ、ILB の設定をする場合は ServiceConfiguration.cscfg と ServiceDefinition.csdef の作成が必要になる。記載例は以下になる。

  • ServiceConfiguration.cscfg
<?xml version="1.0" encoding="UTF-8"?>
<ServiceConfiguration
	xmlns="http://schemas.microsoft.com/ServiceHosting/2008/10/ServiceConfiguration"
	osFamily="4" osVersion="*" serviceName="AzureDeploymentProject">
	<Role name="WorkerRole1">
		<Instances count="2" />
		<ConfigurationSettings>
		</ConfigurationSettings>
		<Certificates>
		</Certificates>
	</Role>
	<NetworkConfiguration>
		<VirtualNetworkSite name="java-vnet" />
		<AddressAssignments>
			<InstanceAddress roleName="WorkerRole1">
				<Subnets>
					<Subnet name="Subnet-Tomcat" />
				</Subnets>
			</InstanceAddress>
		</AddressAssignments>
		<LoadBalancers>
			<LoadBalancer name="Tomcat-ILB">
				<FrontendIPConfiguration
					staticVirtualNetworkIPAddress="10.0.0.200" subnet="Subnet-Tomcat"
					type="private" />
			</LoadBalancer>
		</LoadBalancers>
	</NetworkConfiguration>
</ServiceConfiguration>

LoadBalancer タグ内で、ロードバランサ-を定義していることが分かると思う。

  • ServiceDefinition.csdef
<?xml version="1.0" encoding="utf-8" standalone="no"?>
<ServiceDefinition xmlns="http://schemas.microsoft.com/ServiceHosting/2008/10/ServiceDefinition" name="AzureDeploymentProject">
	<WorkerRole name="WorkerRole1" vmsize="Small">
		<Startup>
			<!-- Sample startup task calling startup.cmd from the role's approot folder -->
			<Task commandLine="util/.start.cmd .startup.cmd" executionContext="elevated" taskType="simple"/>
		</Startup>
		<Runtime executionContext="elevated">
			<EntryPoint>
				<!-- Sample entry point calling run.cmd from the role's approot folder -->
				<ProgramEntryPoint commandLine="run.cmd" setReadyOnProcessStart="true"/>
			</EntryPoint>
		</Runtime>
		<Imports>
		</Imports>
		<Endpoints>
			<!-- <InputEndpoint localPort="8080" name="http" port="8080" protocol="tcp"/> -->
			<InputEndpoint loadBalancer="Tomcat-ILB" localPort="8080" name="internal-http" port="8080" protocol="tcp"/>
		</Endpoints>
	</WorkerRole>
</ServiceDefinition>

こちらでは、InputEndpoint タグのに ServiceConfiguration.cscfg で定義したロードバランサを割り当てている。

Microsoft Azure(Worker ロール)上にデプロイ

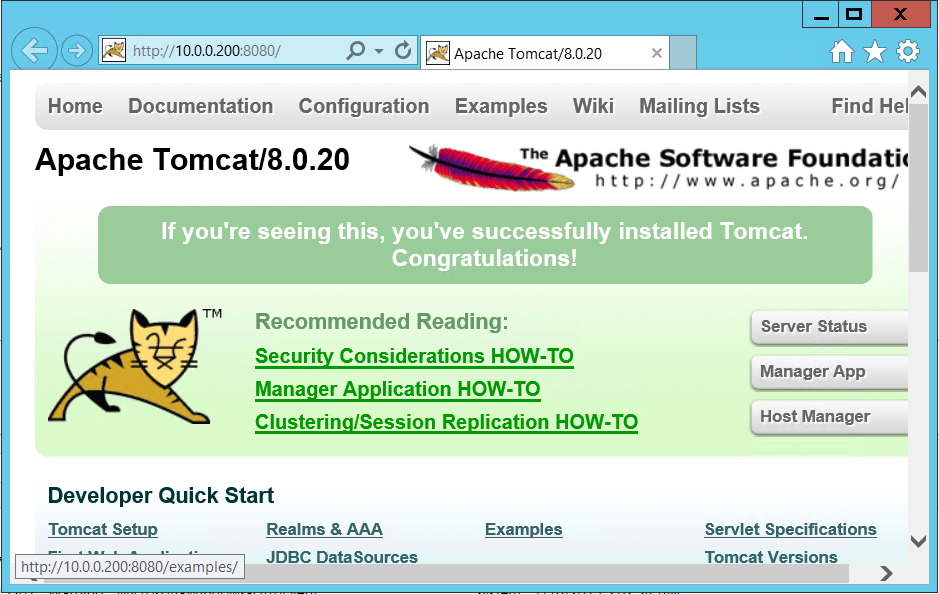
仮想ネットワーク上に Windows Server 2012 R2 のインスタンスを配置し、ILB に対して疎通を確認する。以下の画面が表示されれば対応は完了だ。
f:id:waritohutsu:20150716160840p:plain

Eclipse を利用して Worker ロールの Java アプリを仮想ネットワークに参加させる

Azure Eclipse Plugin を利用した Worker ロールで稼働する Java アプリは単独で動かしている例が多いので、仮想ネットワークにも参加させる方法を記載する。事前準備としては以下が実施済みなことを前提とする。

  • 仮想ネットワークが作成済み
  • Azure Deployment Project を Eclipse 上で作成済み

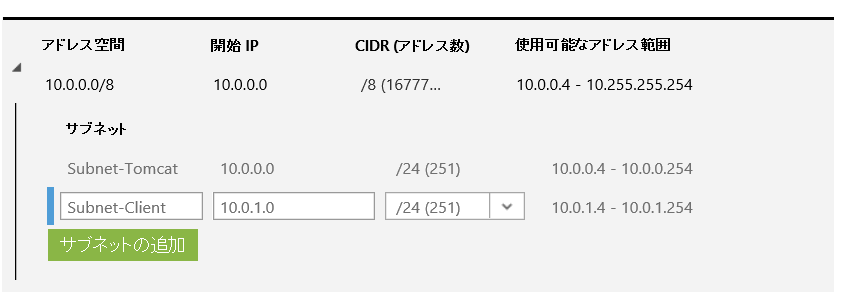
以下の仮想ネットワークを例として扱う。

f:id:waritohutsu:20150716150110p:plain

設定ファイルの編集

Worker ロール(はもちろん Web ロールを含むクラウドサービス)を仮想マシンに参加させる場合、ServiceConfiguration.cscfg に仮想マシンの構成情報を記載する。以下が記載例となるので、参考にして欲しい。

  • ServiceConfiguration.cscfg
<?xml version="1.0" encoding="UTF-8"?><ServiceConfiguration xmlns="http://schemas.microsoft.com/ServiceHosting/2008/10/ServiceConfiguration" osFamily="4" osVersion="*" serviceName="AzureDeploymentProject">
	<Role name="WorkerRole1">
		<Instances count="2"/>
		<ConfigurationSettings>
		</ConfigurationSettings>
		<Certificates>
		</Certificates>
	</Role>
	<NetworkConfiguration>
		<VirtualNetworkSite name="java-vnet"/>
		<AddressAssignments>
			<InstanceAddress roleName="WorkerRole1">
				<Subnets>
					<Subnet name="Subnet-Tomcat"/>
				</Subnets>
			</InstanceAddress>
		</AddressAssignments>
	</NetworkConfiguration>
</ServiceConfiguration>

上記で NetworkConfiguration タグ内に記載している内容が追記内容となる。NetworkConfiguration タグの name 属性に仮想ネットワーク名、Subnet タグの name 属性にサブネット名を記載することで構成可能だ。

デプロイと確認

ServiceConfiguration.cscfg 設定ファイルを作成後、右クリックから Azure > Deploy to Azure Cloud を選択してウィザードに従ってデプロイする。設定がうまくいっていれば、以下の様に仮想マシン内に Worker ロールのインスタンスが配置されていることが確認できる。
f:id:waritohutsu:20150716150131p:plain

Eclipse を利用して Spring Boot アプリを Microsoft Azure にデプロイする

既に id:okazuki さんが Spring Bootを使ってHello world(Thymeleafの使用からwar化してAzureデプロイまで) でまとめている情報と一部重複するが、Spring Boot のアプリケーションを Microsoft Azure にデプロイするまでの手順を紹介する。

まず、前提として Spring Boot の公式ドキュメント にも記載があるが、 Spring Boot には以下 2 パターンの実行形式が存在する。

  • 組み込み Tomcat を含むポータブル実行形式の jar として稼働する
  • war 形式のファイルとして作成し、通常通り Tomcat にデプロイする

id:okazuki さんは両方の形式を試され、Microsoft Azure の WebApps を利用した Spring Boot の稼働方法だ。私の記事では、Spring Boot アプリを Eclipse Plugin を利用して Worker ロールにデプロイする方法を紹介する。

Spring Boot アプリの作成

簡単なサンプルは id:okazuki さんの記事を見ながらが確実だと思うが、Spring Boot の Quick Start サンプルを参考にアプリケーションを作成して Spring Boot の jar を war に変更する手順 を確認すれば対応可能だ。念のため以下にアプリケーションの情報を記載する。

<project xmlns="http://maven.apache.org/POM/4.0.0" xmlns:xsi="http://www.w3.org/2001/XMLSchema-instance"
	xsi:schemaLocation="http://maven.apache.org/POM/4.0.0 http://maven.apache.org/xsd/maven-4.0.0.xsd">
	<modelVersion>4.0.0</modelVersion>

	<groupId>com.mydomain</groupId>
	<artifactId>HelloSpringboot</artifactId>
	<version>0.0.1-SNAPSHOT</version>
	<packaging>war</packaging>

	<name>HelloSpringboot</name>
	<url>http://maven.apache.org</url>

	<properties>
		<project.build.sourceEncoding>UTF-8</project.build.sourceEncoding>
	</properties>
	<parent>
		<groupId>org.springframework.boot</groupId>
		<artifactId>spring-boot-starter-parent</artifactId>
		<version>1.2.5.RELEASE</version>
	</parent>

	<build>
		<plugins>
			<plugin>
				<groupId>org.apache.maven.plugins</groupId>
				<artifactId>maven-compiler-plugin</artifactId>
				<version>3.1</version>
				<configuration>
					<source>1.7</source>
					<target>1.7</target>
				</configuration>
			</plugin>
		</plugins>
	</build>

	<dependencies>
		<dependency>
			<groupId>org.springframework.boot</groupId>
			<artifactId>spring-boot-starter-web</artifactId>
		</dependency>
		<dependency>
			<groupId>org.springframework.boot</groupId>
			<artifactId>spring-boot-starter-tomcat</artifactId>
			<scope>provided</scope>
		</dependency>
		<dependency>
			<groupId>junit</groupId>
			<artifactId>junit</artifactId>
			<version>3.8.1</version>
			<scope>test</scope>
		</dependency>
	</dependencies>
</project>
package com.mydomain.HelloSpringboot;

import org.springframework.boot.SpringApplication;
import org.springframework.boot.autoconfigure.SpringBootApplication;
import org.springframework.boot.builder.SpringApplicationBuilder;
import org.springframework.boot.context.web.SpringBootServletInitializer;

@SpringBootApplication
public class Application extends SpringBootServletInitializer {

	@Override
	protected SpringApplicationBuilder configure(
			SpringApplicationBuilder application) {
		return application.sources(Application.class);
	}

	public static void main(String[] args) throws Exception {
		SpringApplication.run(Application.class, args);
	}

}
  • SampleController.java
package com.mydomain.HelloSpringboot;

import org.springframework.web.bind.annotation.RequestMapping;
import org.springframework.web.bind.annotation.RestController;

@RestController
public class SampleController {
	@RequestMapping("/")
	public String home() {
		return "Spring Boot での日本語文字列返し。(/ω\)イヤン";
	}

}

上記のアプリケーションは Tomcat 7 以上であれば動作可能だ( Spring Boot は Servlet 3 系の API を利用しているため、Tomcat 7 以上が必要)。まずはローカルで動作を確認をお勧めする。

Microsoft Azure(Worker ロール)上にデプロイ

Azure Toolkit for Eclipse を利用して Spring Boot アプリケーションを Worker ロールにデプロイする。新規に Azure Deployment Project を作成する。事前準備として以下を行うこと。

  • Spring Boot のプロジェクトに対して mvn package を辞しして war ファイルを作成し、ROOT.war にリネームする
  • ローカルに Tomcat ( v7 以上)をダウンロードし、%TOMCAT_HOME%\webapps\ROOT フォルダを削除する(削除しないと Tomcat デフォルトの ROOT が表示されてしまう

次にプロジェクトを右クリックしてプロパティを選択し、Azure > Roles から既存の WorkerRole1 を選択して Edit ボタンを押下する。
f:id:waritohutsu:20150715183108p:plain

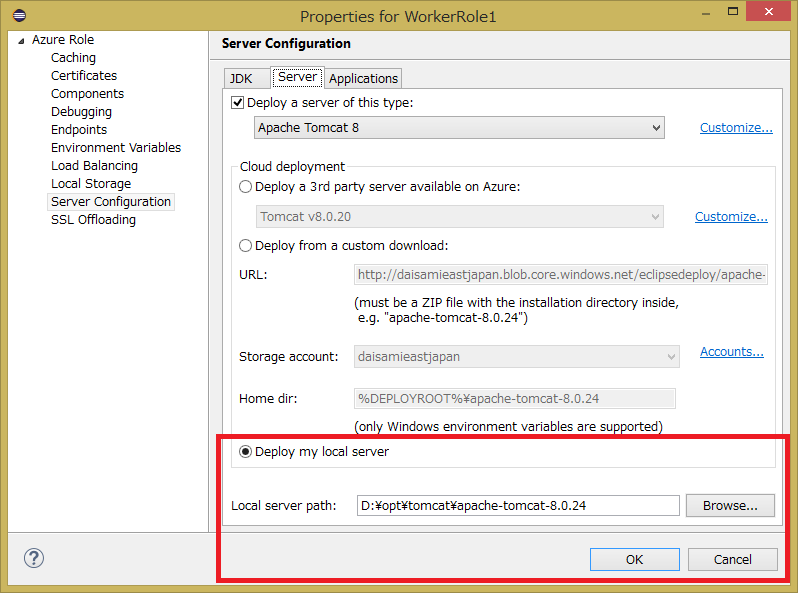
Server Configuration から Deploy my local server を選択し、ローカルに存在する Tomcat を選択する( ROOT フォルダ削除済みのものを選択すること )。
f:id:waritohutsu:20150715183120p:plain

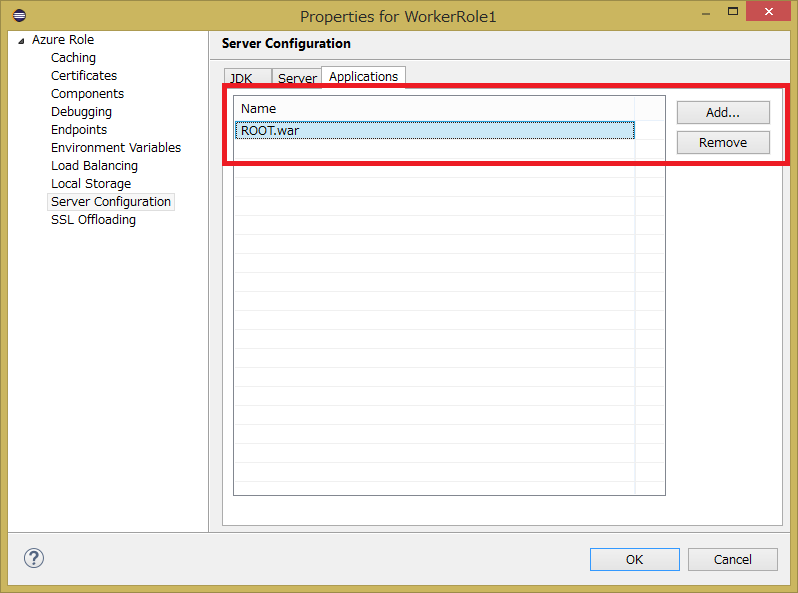
既存の HelloWorld.war を削除し、事前に用意した Spring Boot の ROOT.war を選択する。この際、ダイアログからエラーメッセージが表示される場合があるが無視しても問題ない。
f:id:waritohutsu:20150715183135p:plain

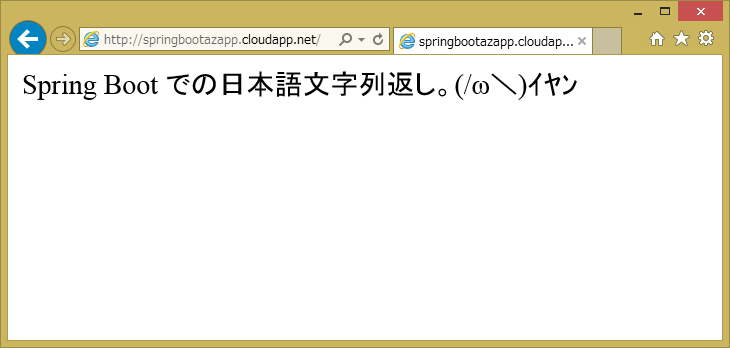
以上を完了後、Spring Boot のアプリケーションを 右クリックから Azure > Deploy to Azure Cloud を選択してウィザードに従ってデプロイすれば手順は完了だ。以下の画面が表示されれば完了だ。
f:id:waritohutsu:20150715183145p:plain

Application Insights for Java の JavaEE 対応

Microsoft Azure 上でアプリに対して運用監視を行うサービスとして定評のある Application Insights が Java SDK に対応 したことはご存じの方も多いと思う。今回は新たに JavaEE 向けに追加機能が提供されたので紹介する。
また、今回利用したサンプルは https://github.com/normalian/JavaEEAppInsigtsApp に配置しているので参照してほしい。

利用方法

インターセプタとして提供されるため 0.9.6 以上のバージョンの applicationinsights-web.jar を参照する(以下は pom.xml の記載例)。

<dependency>
	<groupId>com.microsoft.azure</groupId>
	<artifactId>applicationinsights-web</artifactId>
	<version>0.9.6</version>
</dependency>

上記の jar に含まれるクラスのうち、以下を利用する。

まずは beans.xml に以下の様な記載をし、インターセプタを有効化する。

<?xml version="1.0" encoding="UTF-8"?>
<beans xmlns="http://java.sun.com/xml/ns/javaee" xmlns:xsi="http://www.w3.org/2001/XMLSchema-instance"
	xsi:schemaLocation="http://java.sun.com/xml/ns/javaee http://java.sun.com/xml/ns/javaee/beans_1_0.xsd">
	<interceptors>
		<class>com.microsoft.applicationinsights.web.javaee.RequestNameInterceptor</class>
	</interceptors>
</beans>

次に RequestName アノテーションを以下の様に監視対象のクラスに付与する。

package com.domain.mavenjavaeeapp1.action;

import com.domain.mavenjavaeeapp1.dto.IndexViewDto;
import com.microsoft.applicationinsights.web.javaee.RequestName;

import javax.enterprise.context.RequestScoped;
import javax.inject.Inject;
import javax.inject.Named;

@RequestScoped
@Named
public class IndexAction {

	@Inject
	IndexViewDto indexViewDto;

	@RequestName
	public String do1(String arg) {
		System.out.println("IndexAction#do1(" + arg + ") = "
				+ indexViewDto.getName());
		return "/index.xhtml";
	}

	public String do2() {
		return "0";
	}
}

参考となるが、利用する画面は以下になる。

<?xml version='1.0' encoding='UTF-8' ?>
<!DOCTYPE html PUBLIC "-//W3C//DTD XHTML 1.0 Transitional//EN" "http://www.w3.org/TR/xhtml1/DTD/xhtml1-transitional.dtd">
<html xmlns="http://www.w3.org/1999/xhtml"
	xmlns:h="http://java.sun.com/jsf/html">
<h:head>
	<script type="text/javascript">
	//<![CDATA[
    var appInsights=window.appInsights||function(config){
        function s(config){t[config]=function(){var i=arguments;t.queue.push(function(){t[config].apply(t,i)})}}var t={config:config},r=document,f=window,e="script",o=r.createElement(e),i,u;for(o.src=config.url||"//az416426.vo.msecnd.net/scripts/a/ai.0.js",r.getElementsByTagName(e)[0].parentNode.appendChild(o),t.cookie=r.cookie,t.queue=[],i=["Event","Exception","Metric","PageView","Trace"];i.length;)s("track"+i.pop());return config.disableExceptionTracking||(i="onerror",s("_"+i),u=f[i],f[i]=function(config,r,f,e,o){var s=u&&u(config,r,f,e,o);return s!==!0&&t["_"+i](config,r,f,e,o),s}),t
    }({
        instrumentationKey:"your key"
    });
    
    window.appInsights=appInsights;
    appInsights.trackPageView();
  //]]>
</script>
	<title>Facelet Title</title>
</h:head>
<h:body>
	<span>hello Facelets</span>
	<h:form>
		<div>
			名前を入力して下さい
			<h:inputText value="#{indexViewDto.name}" />
		</div>
		<h:commandButton value="button"
			action="#{indexAction.do1('some argument')}" />
	</h:form>
</h:body>
</html>

結果

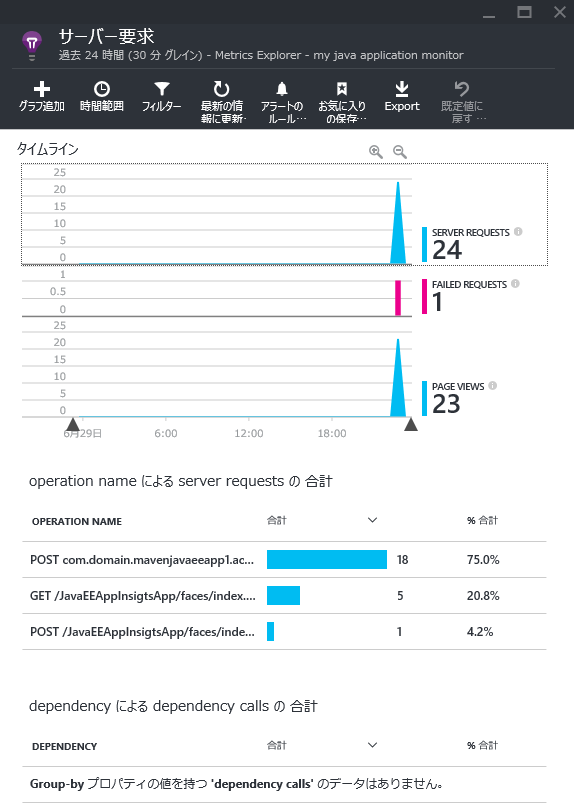
上記のアプリケーションに対してブラウザアクセスを行い、"button" のボタンを押下することで以下の様にアクセスされたアクション/HTTPメソッドが確認できる。
f:id:waritohutsu:20150629232426p:plain

Windows 上で WildFly 8.x 実行時に "java.net.BindException: Address already in use" が発生する

WildFly 8.x, "java.net.BindException: Address already in use" on fresh install in windows Vista/7/8 の記事に記載があるが、WindowsVista, 7, 8 )で WildFly 8.x 実行時に "java.net.BindException: Address already in use" が発生する場合がある。

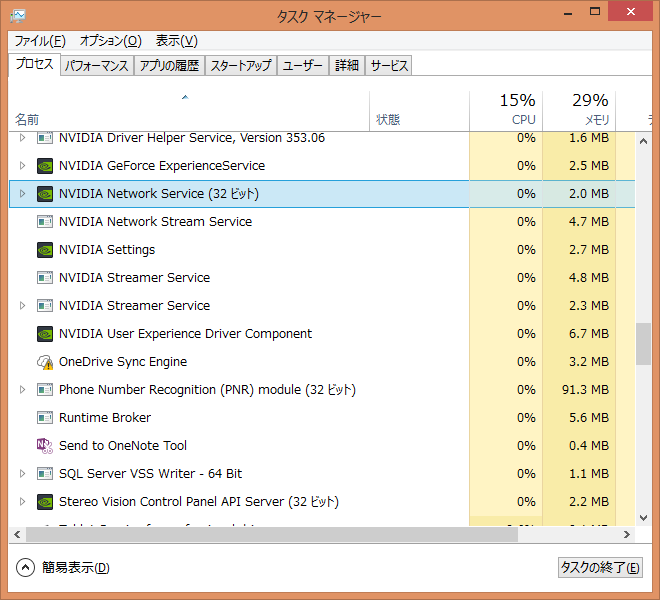
普通は「Tomcat を起動しっぱなしだった」や「JBoss AS や別バージョンの WildFly を起動しっぱなしだった」が原因だが、どうやら NVIDIA Network Service が問題らしい。WindowsVista, 7, 8 )で NVIDIA を利用しており、WildFly 8.x を利用する場合は以下のプロセスを停止することで暫定対策ができる。
f:id:waritohutsu:20150605143726p:plain