normalian blog

Let's talk about Microsoft Azure, ASP.NET and Java!

Upload Camera images into Azure Blob Storage by PowerApps

As you know, PowerApps offers a bunch of useful features to build up powerful applications easily. It's also possible to retrieve Microsoft Azure Platform not only Power Platform. You can acquire knowledge how upload images token by Camera into Azure Blob Storage. Here are steps to build up it.

  1. Azure Storage setup on Azure Portal
  2. Create Connection for Azure Storage on PowerApps Studio for Web
  3. Create apps by using the Connection on PowerApps Studio for Web

Azure Storage setup on Azure Portal

At first, open Azure Portal. Create Azure Storage account or choose existing one to utilize for PowerApps. Create new container to store images from PowerApps like below. The new container name is "images" in this example.
f:id:waritohutsu:20200315071807p:plain

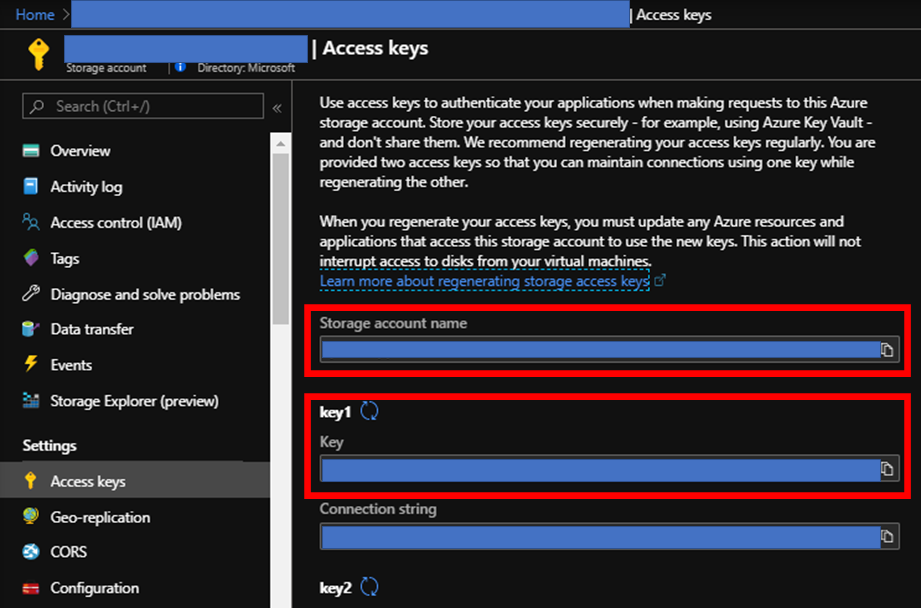
Pick up and save "Storage account name" and "Key1" into notepad to make "Connection" on PowerApps.
f:id:waritohutsu:20200315071903p:plain

Create new Connection for Azure Storage on PowerApps Studio for Web

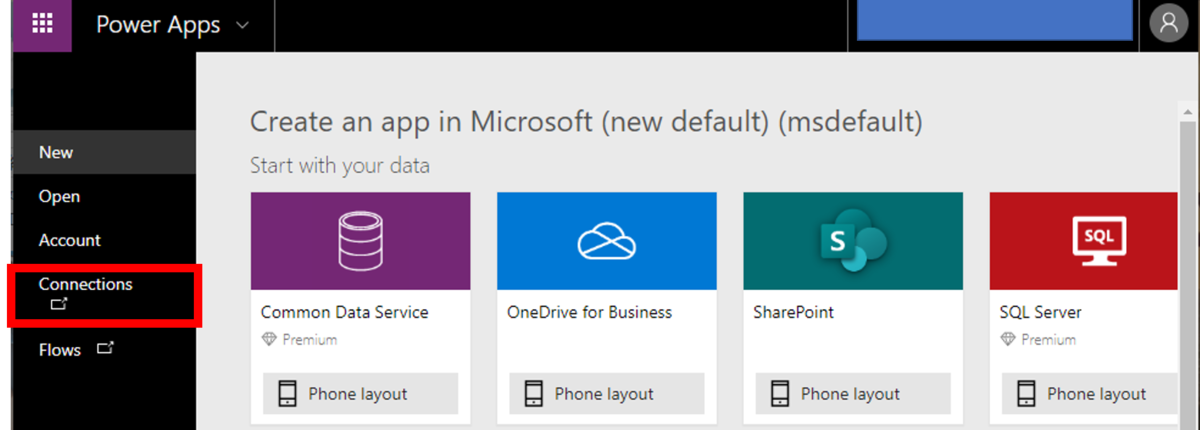
Next, open PowerApps Studio for Web. Choose "Connection" from left menus. You need to create new connection for Azure Storage at first.
f:id:waritohutsu:20200315072200p:plain

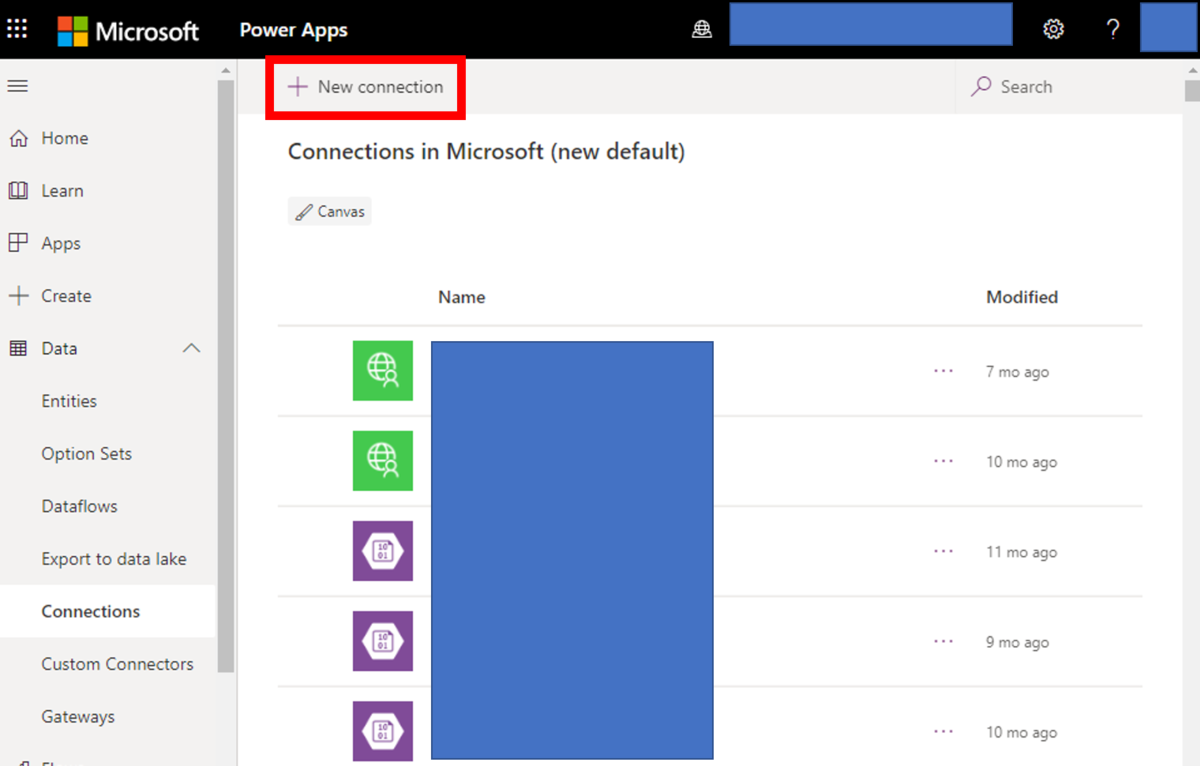
You will find listed connections which someone has already created like below. Choose "New connection" to create newly your Azure Storage connection.
f:id:waritohutsu:20200315072327p:plain

Find "Azure Blob Storage" by using search box like below and click "+" button.
f:id:waritohutsu:20200315072450p:plain

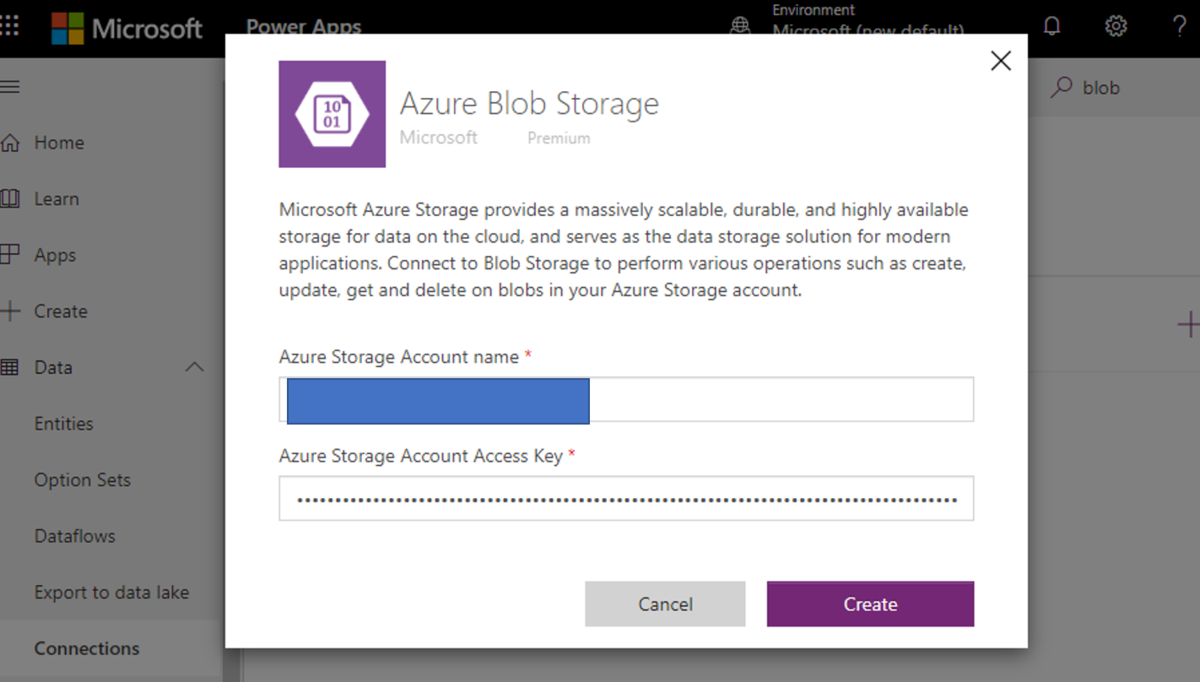
Put "Storage account name" and "key" into inputboxes to complete this steps.
f:id:waritohutsu:20200315072558p:plain

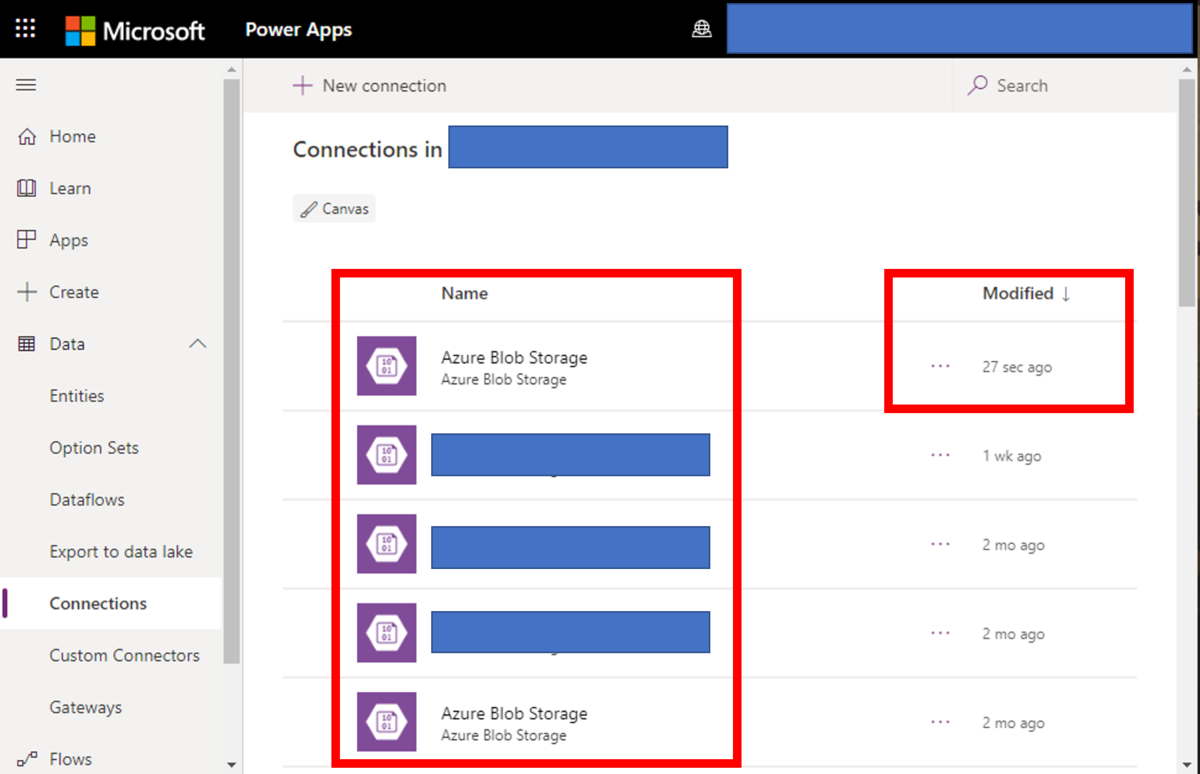
This isn't mandatory, but I also recommend to change your connection name to find easily in later. Find you connection by sorting with "Modifed" like below.
f:id:waritohutsu:20200315072728p:plain

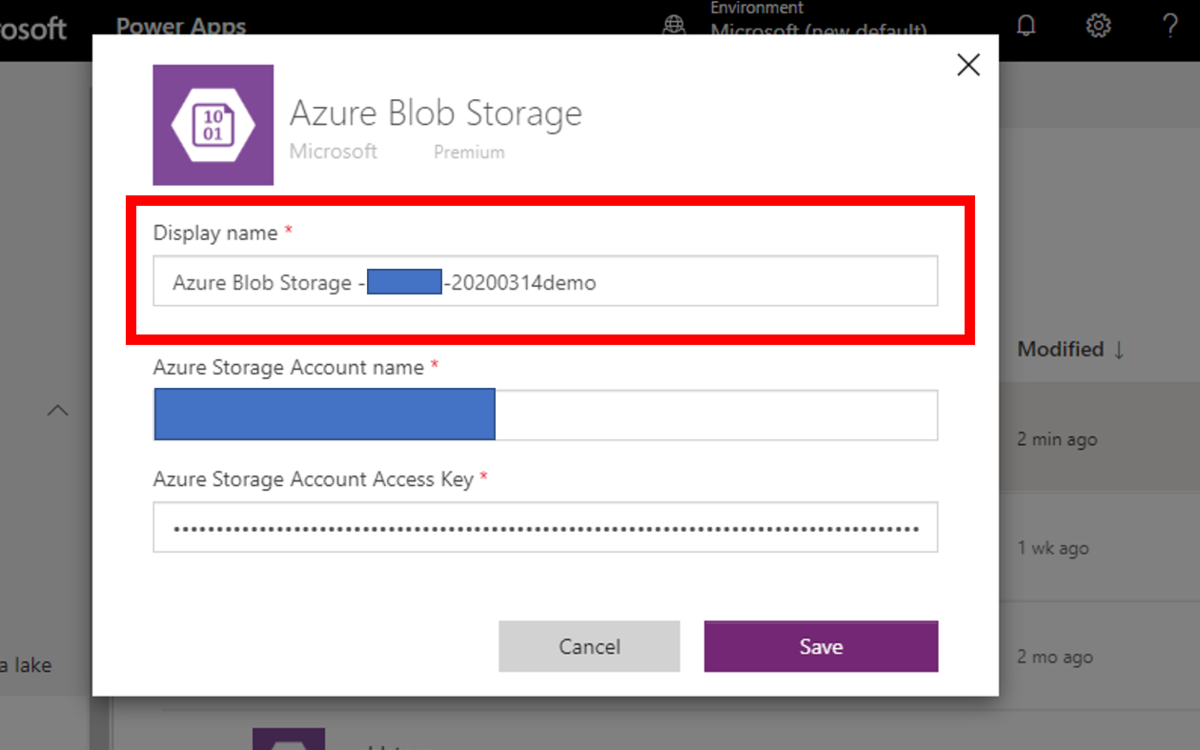
You can change your connection name like here.
f:id:waritohutsu:20200315072808p:plain
Now, you have completed to make new connection for Azure Blob Storage.

Create apps by using the Connection on PowerApps Studio for Web

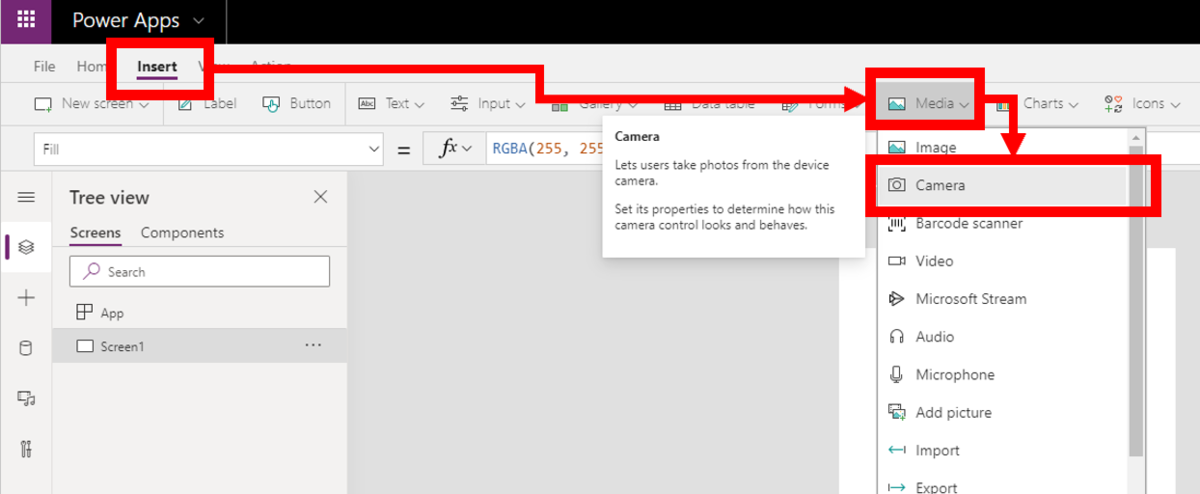
Open PowerApps Studio for Web and choose to create Blank new app as first. Insert "Camera" control by choosing "Insert -> Media -> Camera" like below.
f:id:waritohutsu:20200315073135p:plain

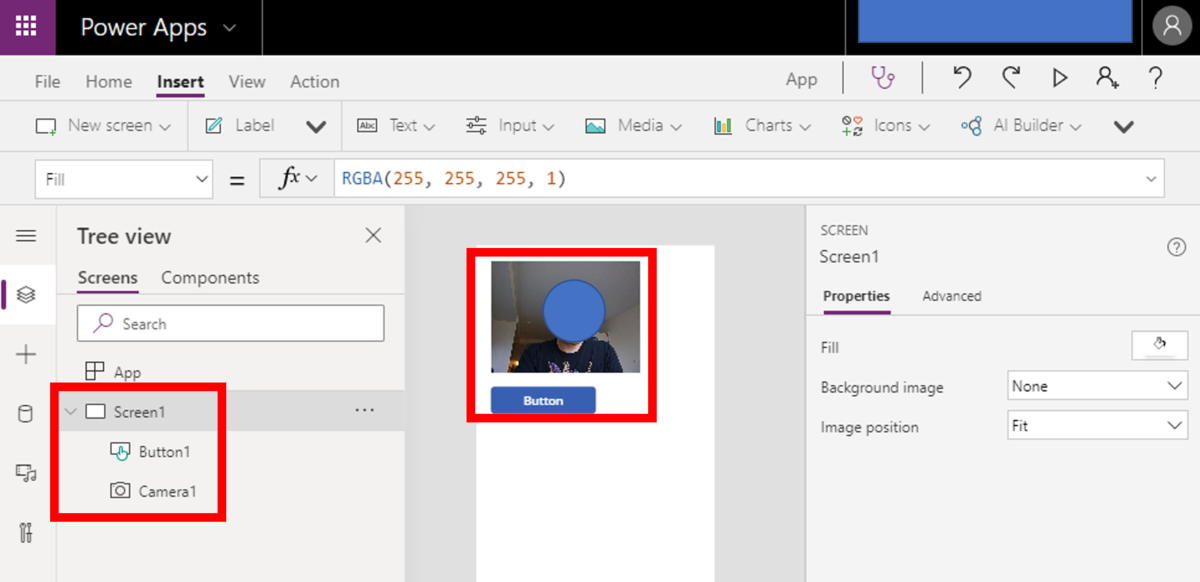
Insert new button into your app. You will find two controls as "Camera1" and "Button1" like below.
f:id:waritohutsu:20200315073401p:plain

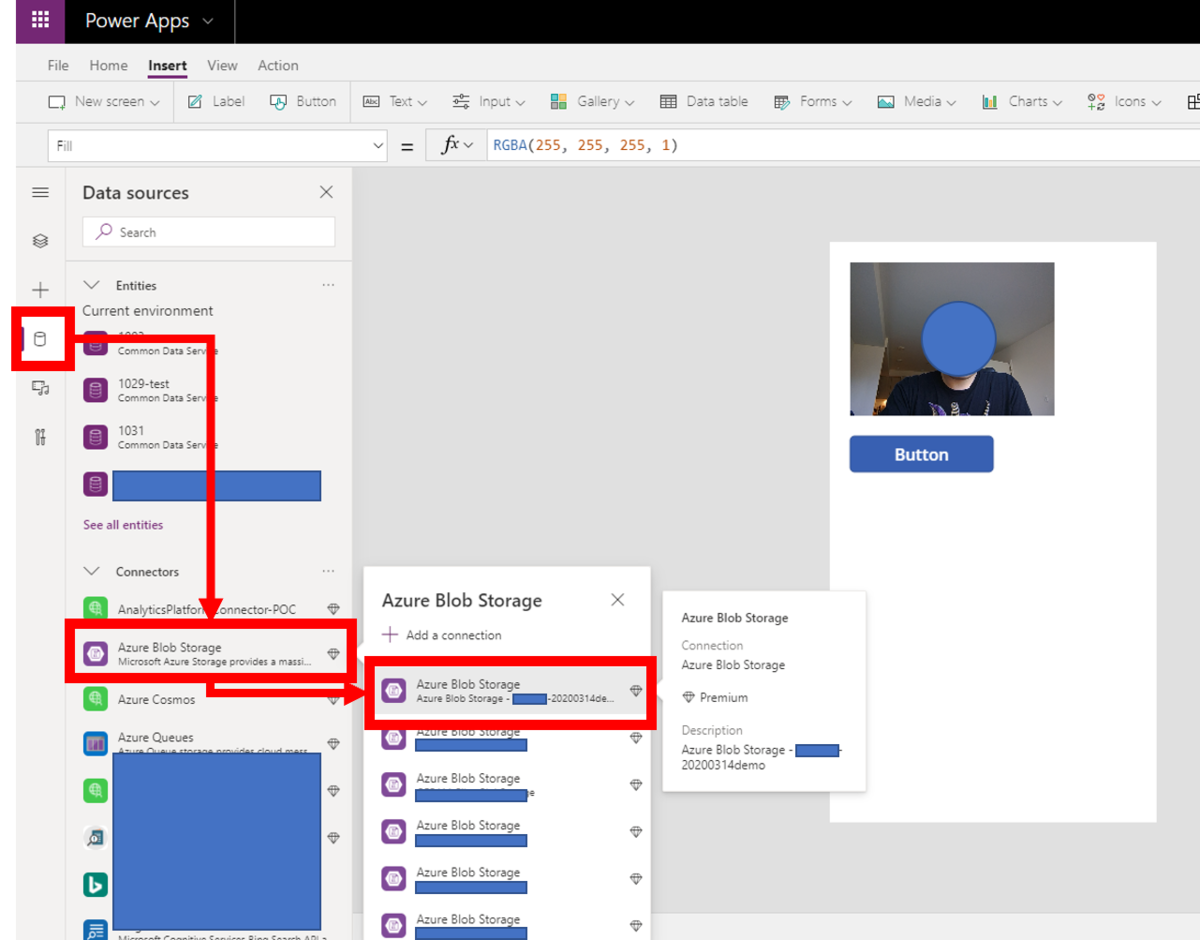
Next, add your connection for Azure Blob Storage. Choose an icon from left side and find your connection by following step an image below.
f:id:waritohutsu:20200315074037p:plain

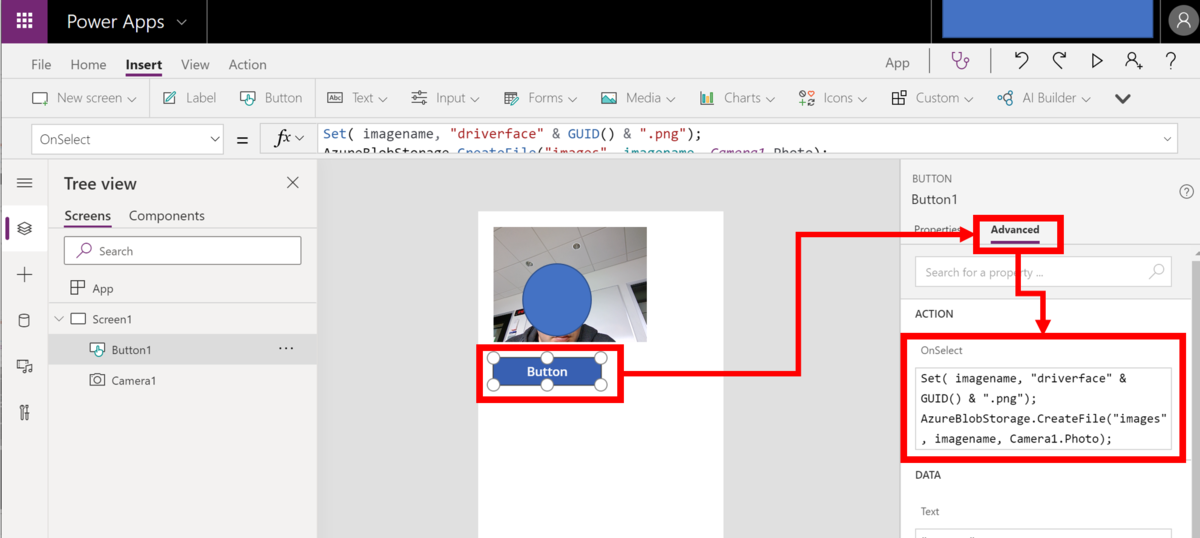
Put formulas into "OnSelect" action on Button control by following an image below.
f:id:waritohutsu:20200315074500p:plain

Set( imagename, "driverface" & GUID() & ".png");
AzureBlobStorage.CreateFile("images", imagename, Camera1.Photo);

Run your PowerApps

Run your application and click button, so you can find images on Azure Portal like below.
f:id:waritohutsu:20200315074725p:plain

Create Excel based simple apps with PowerApps

PowerApps support for various types of data sources. Of course, it's possible to connect with on-premise resources by using On-Premise Data Gateway not only Microsoft Azure data sources. In this article, you can acquire knowledge to build up simple applications to edit Excel files on OneDrive.

Create Excel file and upload it into OneDrive

Create Excel file to utilize in your PowerApps with reference to an image below. Please note to enable "My table has headers" when you create a table on the Excel file.
f:id:waritohutsu:20200311052129p:plain

Change your "Table Name" like below. This name will be used on PowerApps.
f:id:waritohutsu:20200311052342p:plain

Upload this Excel file into your OneDrive.
f:id:waritohutsu:20200311052627p:plain

Steps to generate Excel based apps

Go to https://preview.create.powerapps.com/studio/# and choose "Connections".
f:id:waritohutsu:20200311053206p:plain

Choose "New connection".
f:id:waritohutsu:20200311053332p:plain

Choose "OneDrive for Business" and click "Create" to authorize with your OneDrive for Business account.
f:id:waritohutsu:20200311053608p:plain

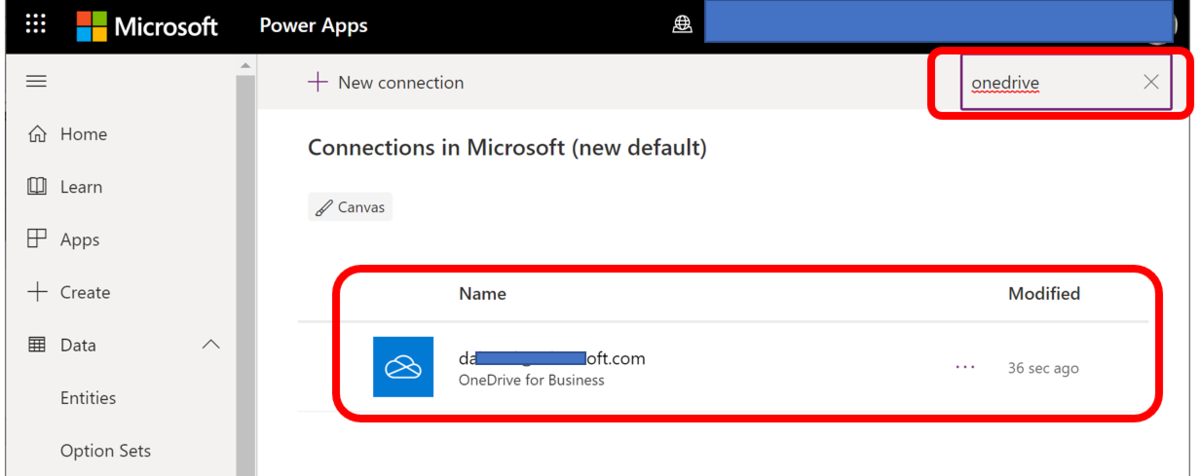
Confirm your connection like below.
f:id:waritohutsu:20200311053837p:plain

Next, go to "New" tab and choose "Phone layout" on OneDrive for Business.
f:id:waritohutsu:20200311054136p:plain

Choose OneDrive for Business connection which you have created just before. Next, choose your Excel file on OneDrive for Business account like below.
f:id:waritohutsu:20200311054554p:plain

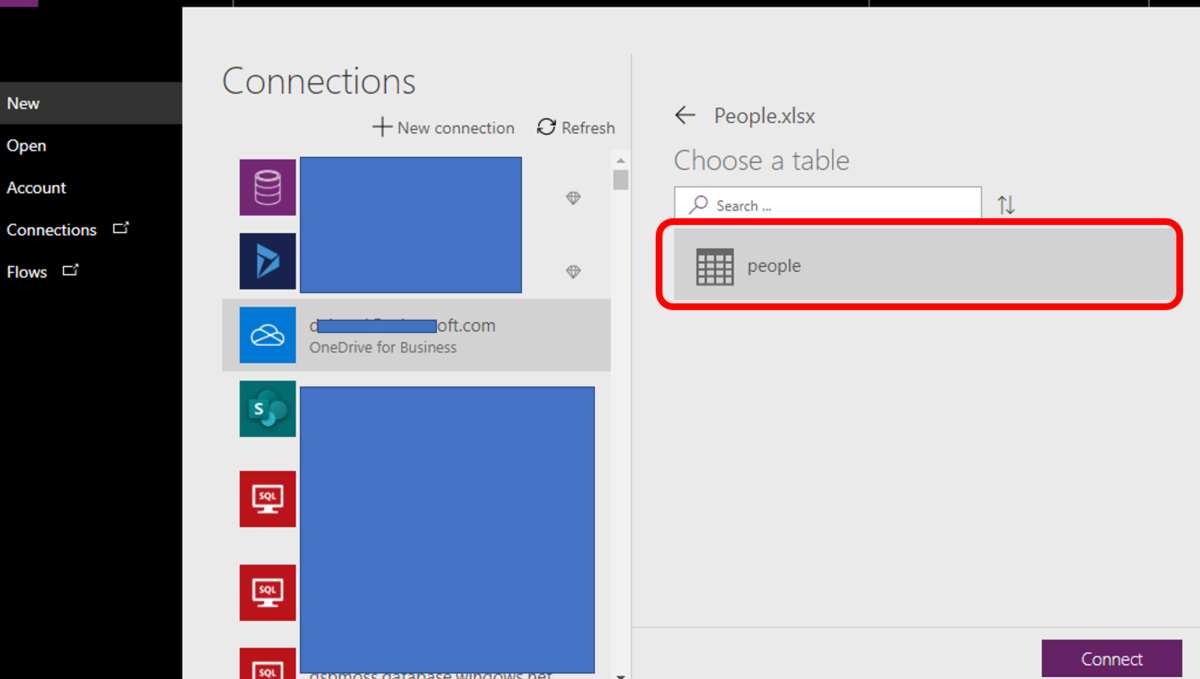
Choose a table in your Excel file.
f:id:waritohutsu:20200311054732p:plain

It takes a few minutes to generate your app based on your table. You will find app below.
f:id:waritohutsu:20200311055011p:plain

Update your PowerApps application

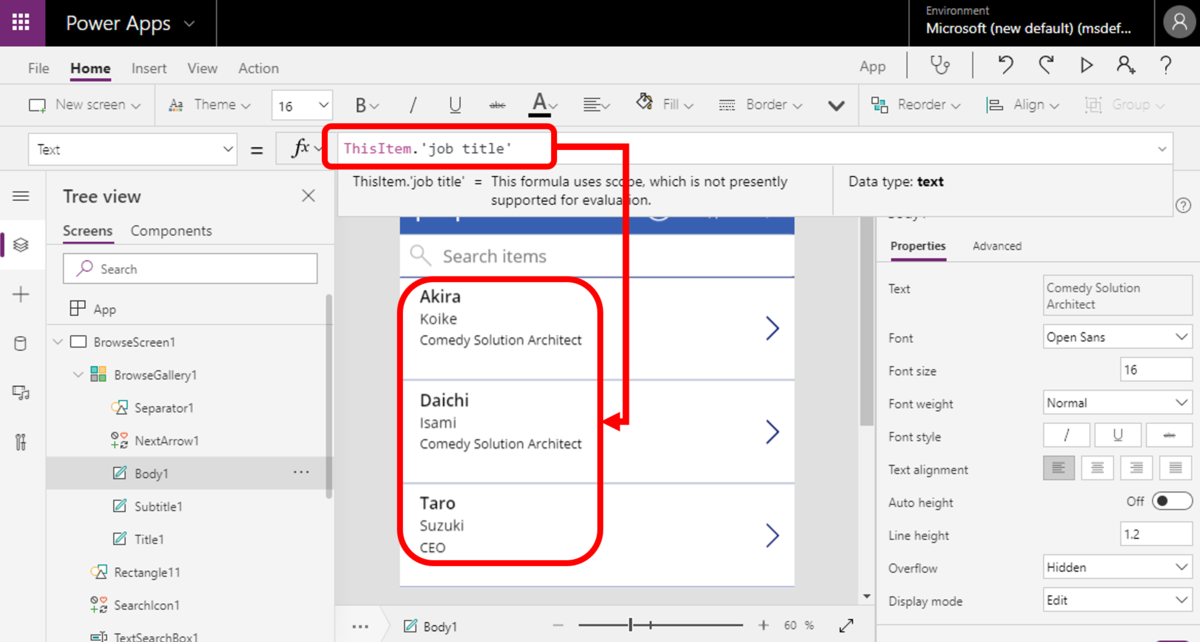
Choose "company name" area and find formula like below.
f:id:waritohutsu:20200311055251p:plain

Update a column from "company" to "job title". This change will be immediately effected into your app like below.
f:id:waritohutsu:20200311055440p:plain

How to update texts on TextInput with button clicks on PowerApps

I believe it might be first challenge to update text of TextInput because it's a little bit far from intuition steps. Most easiest way to understand how to build up this is to test for yourself. Here is an one of simplest articles to describe the steps.

Simple steps how to update text on TextInput

Open https://create.powerapps.com/studio/ and choose "Blacnk App" by following an image below.
f:id:waritohutsu:20200309052838p:plain

Choose "Insert > Text -> Text Input" to put TextInput control on your app.
f:id:waritohutsu:20200309053016p:plain

Choose "Insert > Button" to put Button Control on your app.
f:id:waritohutsu:20200309053210p:plain

You can find two controls on Screen1 like below.
f:id:waritohutsu:20200309053305p:plain

You need to utilize variable to update the text. Click your InputText control, choose "Advanced" and update Data - Default as variable name - ex. "val01" like below. You can avoid error at this time because this error will be fixed after Button control setup.
f:id:waritohutsu:20200309053431p:plain

Click your button control, choose "Advance" and update "OnSelect" formula like below.
f:id:waritohutsu:20200309054422p:plain

Reset(TextInput1);
UpdateContext({val01 : "hello"});

Debug to update text on TextInput

Execute this test apps and click button, and you can confirm behavior below.
f:id:waritohutsu:20200309054803p:plain

How Hybrid Runbook Worker work on Azure Automation in practice

I believe many Azure developers have already utilized Azure Automation to automate your management, operation and other tasks to avoid human effort. Azure Automation is fully PaaS feature on Azure, but some cases you might need to integrate its workflow with on-premise or other cloud VMs. You can utilize Hybrid Runbook Worker feature on Azure Automation to integrate Azure Automation built-in environment and other platforms.
docs.microsoft.com

Enable Hybrid Runbook Worker

You can enable both Windows and Linux platform into Hybrid Runbook Worker, but I will talk about only Windows in this post. Please refer to Azure Automation Linux Hybrid Runbook Worker | Microsoft Docs if you need.

At first, prepare your Windows Server 2012 or later machine at first, and follow steps Azure Automation Windows Hybrid Runbook Worker | Microsoft Docs.

I have followed the simplest way to setup Hybrid Runbook Worker. You need to download "New-OnPremiseHybridWorker.ps1" script from PowerShell Gallery | New-OnPremiseHybridWorker 1.6 and execute a command below as administrator on your Windows Server machine. It will take a few minutes to complete.

PS C:\Users\xxxxuser> Install-Script -Name New-OnPremiseHybridWorker	

Next, you execute commands below. This will also take a few minutes.

PS C:\Users\xxxxuser> New-OnPremiseHybridWorker.ps1 -AutomationAccountName <NameofAutomationAccount> -AAResourceGroupName <NameofResourceGroup> -OMSResourceGroupName <NameofOResourceGroup> -HybridGroupName <NameofHRWGroup>  -SubscriptionId <AzureSubscriptionId> -WorkspaceName <NameOfLogAnalyticsWorkspace>
Importing necessary modules...
     Required version 6.13.1 of AzureRM is installed...
Pulling Azure account credentials...
Connecting with the Following Parameters
Accessing Azure Automation Account named demo-automation in region southcentralus...
Referencing existing OMS Workspace named automaiton-demo-workspace in region westus...
Warning: Your Automation account and OMS workspace are in different regions and will not be compatible for future linking.
Downloading and installing the Microsoft Monitoring Agent...
Waiting for agent registration to complete...
Registering the hybrid runbook worker...

WorkspaceName and OMSResourceGroupName are optional parameters for Log Analytics and create them automatically if you don't specify them, but you need specify them if Log Analytics is unavailable in Azure Automation account region. You will get error messages below if you try to enable Hybrid Runbook Worker without putting WorkspaceName and OMSResourceGroupName in Analytics unavailable regions.

PS C:\Users\xxxxuser> New-OnPremiseHybridWorker.ps1 -AutomationAccountName <NameofAutomationAccount>  -OMSResourceGroupName <NameofOResourceGroup> -HybridGroupName <NameofHRWGroup>  -SubscriptionId <AzureSubscriptionId>
Importing necessary modules...
     Successfully installed version 6.13.1 of AzureRM...
Pulling Azure account credentials...
Connecting with the Following Parameters
Accessing Azure Automation Account named demo-automation in region southcentralus...
Creating new OMS Workspace named hybridWorkspace6163 in region westcentralus...
New-AzureRmOperationalInsightsWorkspace : HTTP Status Code: BadRequest
Error Message: New workspaces cannot be created in this region
Request Id: 28545988-a1b4-4b3e-b9bc-a0076b3bd05a
Timestamp (Utc):10/06/2019 19:03:53
At C:\Program Files\WindowsPowerShell\Scripts\New-OnPremiseHybridWorker.ps1:300 char:18
+ ... Workspace = New-AzureRmOperationalInsightsWorkspace -Location $OmsLoc ...
+                 ~~~~~~~~~~~~~~~~~~~~~~~~~~~~~~~~~~~~~~~~~~~~~~~~~~~~~~~~~
    + CategoryInfo          : CloseError: (:) [New-AzureRmOperationalInsightsWorkspace], CloudException
    + FullyQualifiedErrorId : Microsoft.Azure.Commands.OperationalInsights.NewAzureOperationalInsightsWorkspaceCommand

You can find your hybrid work group like below after completion the command.
f:id:waritohutsu:20191007054704p:plain

Run Runbooks on a Hybrid Runbook Worker

Refer to Run runbooks on Azure Automation Hybrid Runbook Worker | Microsoft Docs. As example, I have created new Runbook on Azure Automation like below.

$pwd = pwd
write-output $pwd 

$data = Get-Content -Path "C:\opt\localfile-01.txt" -Encoding UTF8
write-output $data 

Next, I create a new text file at C:\opt\localfile-01.txt on Azure VM enabled Hybrid Runbook Worker like below.
f:id:waritohutsu:20191007055049p:plain

Run this runbook on Azure Automation on Azure Portal. You can choose your hybrid worker as "Run Settings" like below.
f:id:waritohutsu:20191007055224p:plain

As a result, you can confirm the outputs like below.
f:id:waritohutsu:20191007055322p:plain

This means your runbook scripts will be executed at temporary folder and it's possible to utilize on-premise assets.

How to get started with Azure Lighthouse to manage Azure resources across Azure AD tenants

I believe some of Azure users might worry about how to manage Azure resources across Azure AD tenants. It should be an important topic especially Azure CSP users, because CSP subscription management is on the assumption of Azure AD tenants per customer.
Today, you can retrieve Azure resources across Azure AD tenants by using Azure Lighthouse.

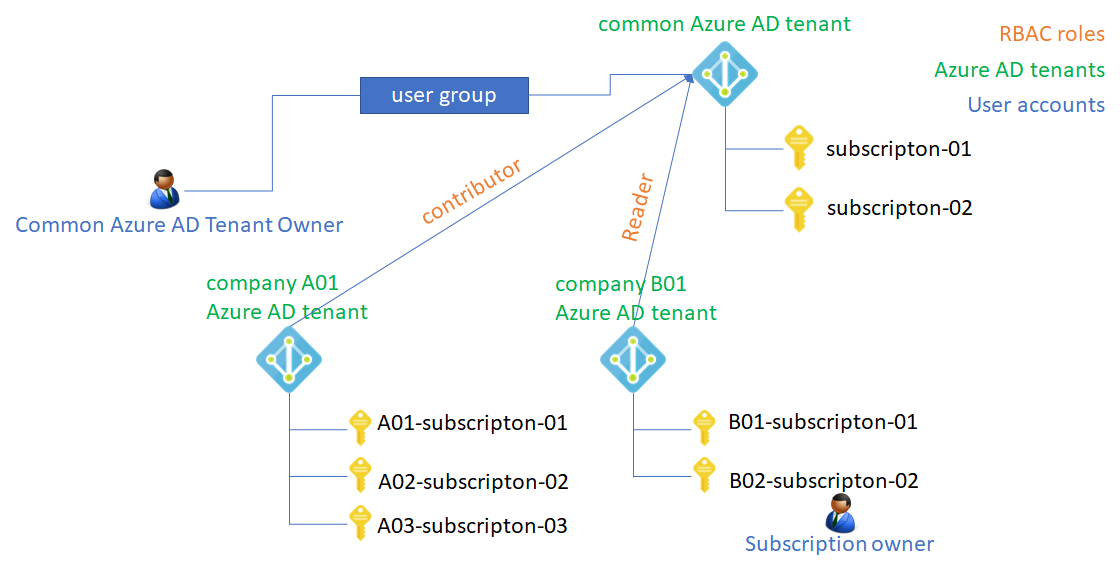
Overview to enable Azure Lighthouse

Here are steps to enable Azure Lighthouse

  • Common Azure AD Tenant Owner:
    • Step1 : Create common Azure AD tenant – optional
    • Step2 : Create user group on common Azure AD tenant and add user accounts into the user group
  • Subscription Owner:
    • Step3 : modify ARM Template
    • Step4 : Run PowerShell command to enable Azure Lighthouse
  • Common Azure AD Tenant Owner:
    • Step 5: Retrieve Azure resources across Azure AD tenants
  • Subscription Owner:
    • Step 6 : Delete offer

f:id:waritohutsu:20191002022252p:plain

You," Common Azure AD Tenant Owner", need to create a user group into the "common Azure AD tenant" - most of cases this Azure AD tenant should be owned by System Integrators or others. User accounts in the user group can retrieve Azure resources across Azure AD tenants via common Azure AD tenant.
In next, you, Subscription Owner, need to update an ARM template and execute powershell commands to enable Azure Lighthouse.
Let's get into details each steps.

Step1 : Create common Azure AD tenant – optional

This step is optional if you want to utilize existing Azure AD tenant as common Azure AD tenant. Refer to
Create an Azure Active Directory tenant | Microsoft Docs to create new Azure AD tenant.
You need to pick up "Directory ID" by reference to an image below.
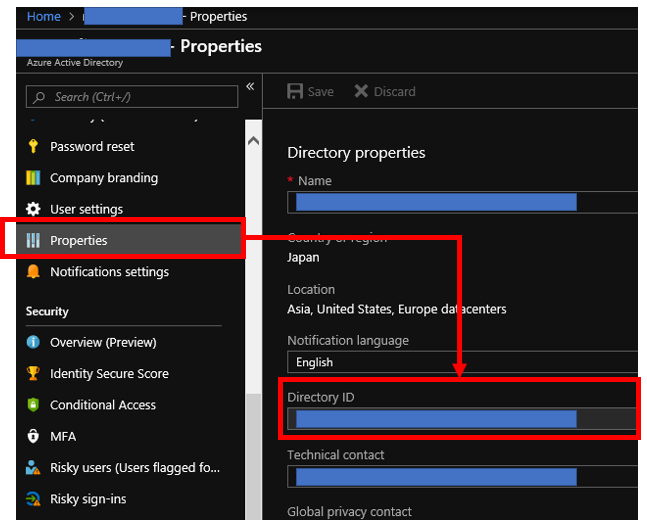
f:id:waritohutsu:20190922091703p:plain

Step2 : Create user group on common Azure AD tenant and add user accounts into the user group

Open your common Azure AD tenant on Azure portal. Choose "Groups" from left side menus and push create "New group" button. Now, you can create new user group on Azure AD tenant by reference below.
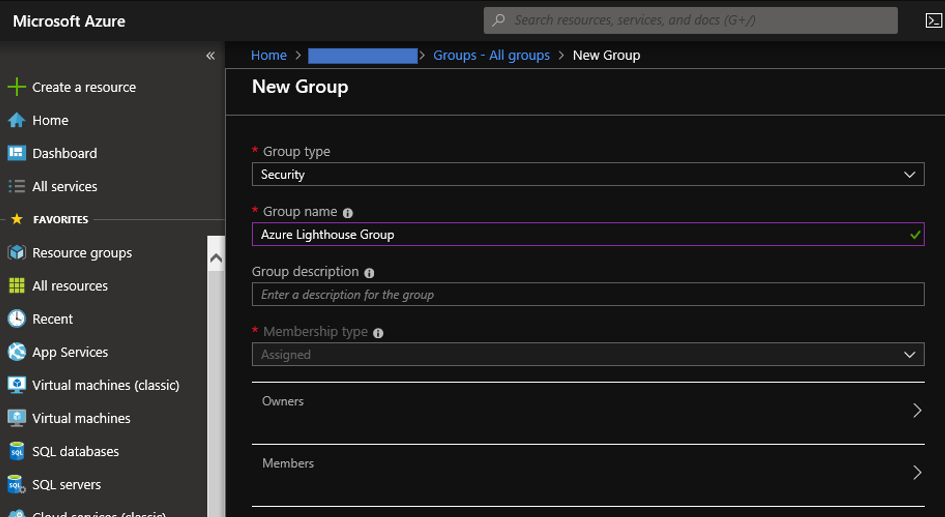
f:id:waritohutsu:20190922090826p:plain
You need to pick up "Object ID" of this user group by following below. This ID will be used to enable Azure Lighthouse.
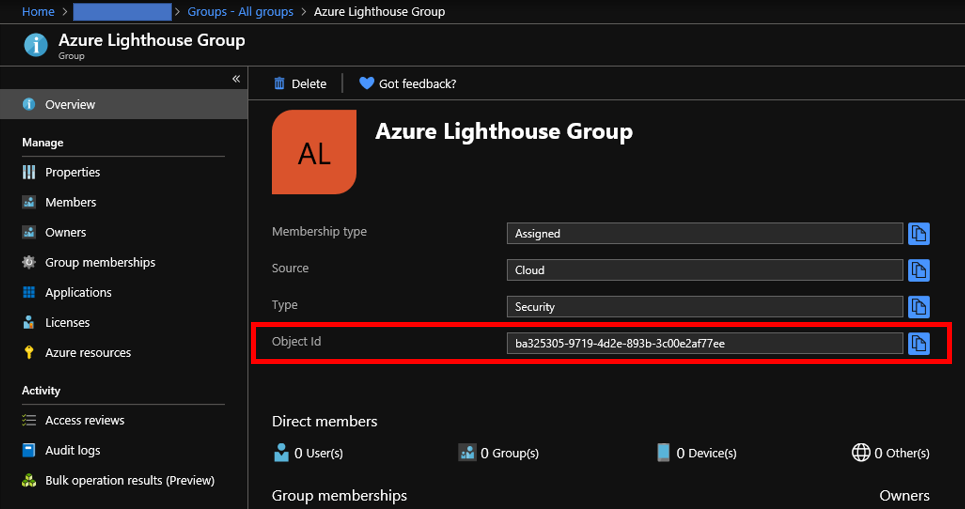
f:id:waritohutsu:20190922091036p:plain

You can complete this step by adding users to relish Azure Lighthouse like below.
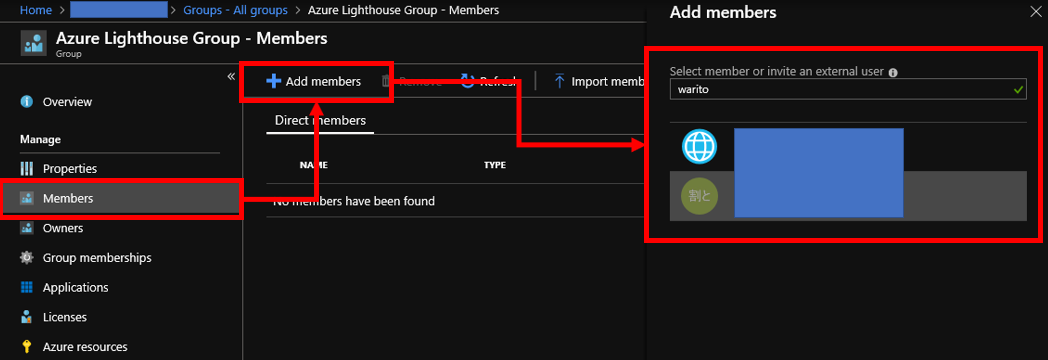
f:id:waritohutsu:20190922091423p:plain

Step3 : modify ARM Template

You need to update an ARM Template file with picked up IDs in previous steps - Object ID and Directory ID like below. You can find RBAC Role IDs with Built-in roles for Azure resources | Microsoft Docs. You can choose "Contributor", "Reader" or others depending on requirements of subscription owners.
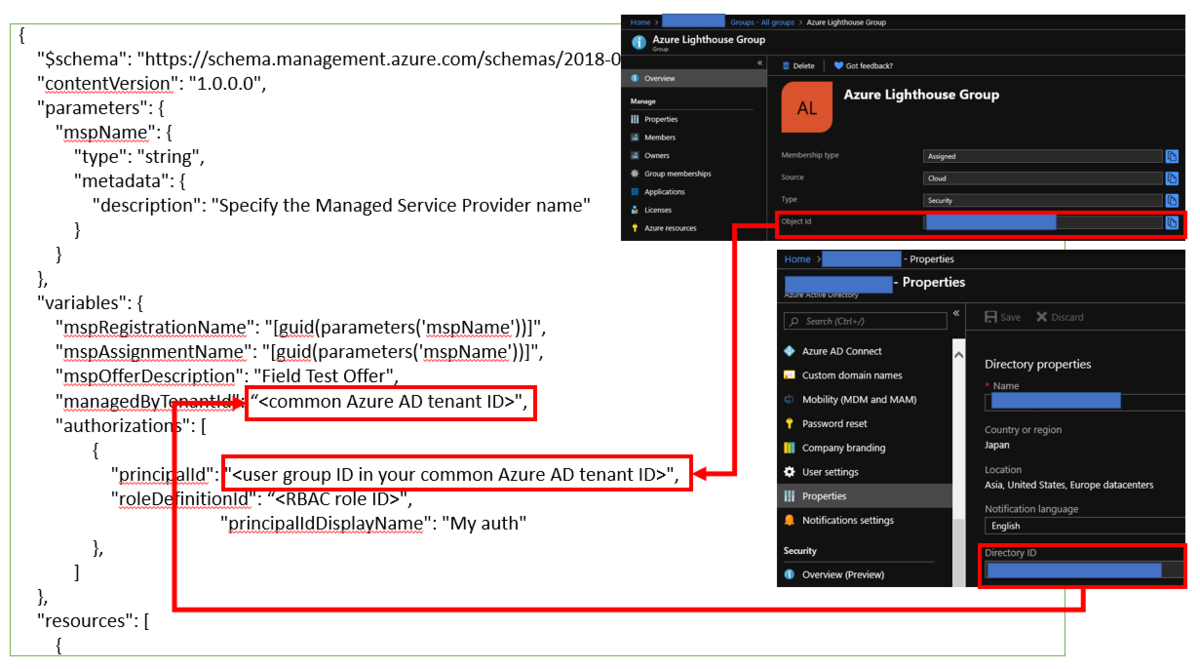
f:id:waritohutsu:20190922092544p:plain

Save texts below as a JSON file and update parameters by following instructions above.

{
    "$schema": "https://schema.management.azure.com/schemas/2018-05-01/subscriptionDeploymentTemplate.json#",
    "contentVersion": "1.0.0.0",
    "parameters": {
        "mspName": {
            "type": "string",
            "metadata": {
                "description": "Specify the Managed Service Provider name"
            }
        }        
    },
    "variables": {
        "mspRegistrationName": "[guid(parameters('mspName'))]",
        "mspAssignmentName": "[guid(parameters('mspName'))]",
        "mspOfferDescription": "Field Test Offer",
        "managedByTenantId": "<common Azure AD tenant ID>",
        "authorizations": [
                {
                    "principalId": "<user group ID in your common Azure AD tenant ID>",
                    "roleDefinitionId": "<RBAC role ID>",
		    "principalIdDisplayName": "My auth"
                },
            ]
    },
    "resources": [
        {
            "type": "Microsoft.ManagedServices/registrationDefinitions",
            "apiVersion": "2019-06-01",
            "name": "[variables('mspRegistrationName')]",
            "properties": {
                "registrationDefinitionName": "[parameters('mspName')]",
                "description": "[variables('mspOfferDescription')]",
                "managedByTenantId": "[variables('managedByTenantId')]",
                "authorizations": "[variables('authorizations')]"
            }
        },
        {
            "type": "Microsoft.ManagedServices/registrationAssignments",
            "apiVersion": "2019-06-01",
            "name": "[variables('mspAssignmentName')]",
            "dependsOn": [
                "[resourceId('Microsoft.ManagedServices/registrationDefinitions/', variables('mspRegistrationName'))]"
            ],
            "properties": {
                "registrationDefinitionId": "[resourceId('Microsoft.ManagedServices/registrationDefinitions/', variables('mspRegistrationName'))]"
            }
        }
    ],
    "outputs": {
        "mspName": {
            "type": "string",
            "value": "[concat('Managed by', ' ', parameters('mspName'))]"
        },
        "authorizations": {
            "type": "array",
            "value": "[variables('authorizations')]"
        }
    }
}

Step4 : Run PowerShell command to enable Azure Lighthouse

Make sure that you have already installed "Azure PowerShell module". Install "Azure PowerShell module" with reference to Install Azure PowerShell with PowerShellGet | Microsoft Docs if you haven't installed it.

Now, you can enable Azure Lighthouse by execution commands below. Please change "subscription id" and ARM Template json file name depending on your environments.

Connect-AzAccount
Get-AzSubscription 

$subscription = Get-AzSubscription -SubscriptionId "your subscription ID"
Select-AzSubscription -Subscription $subscription

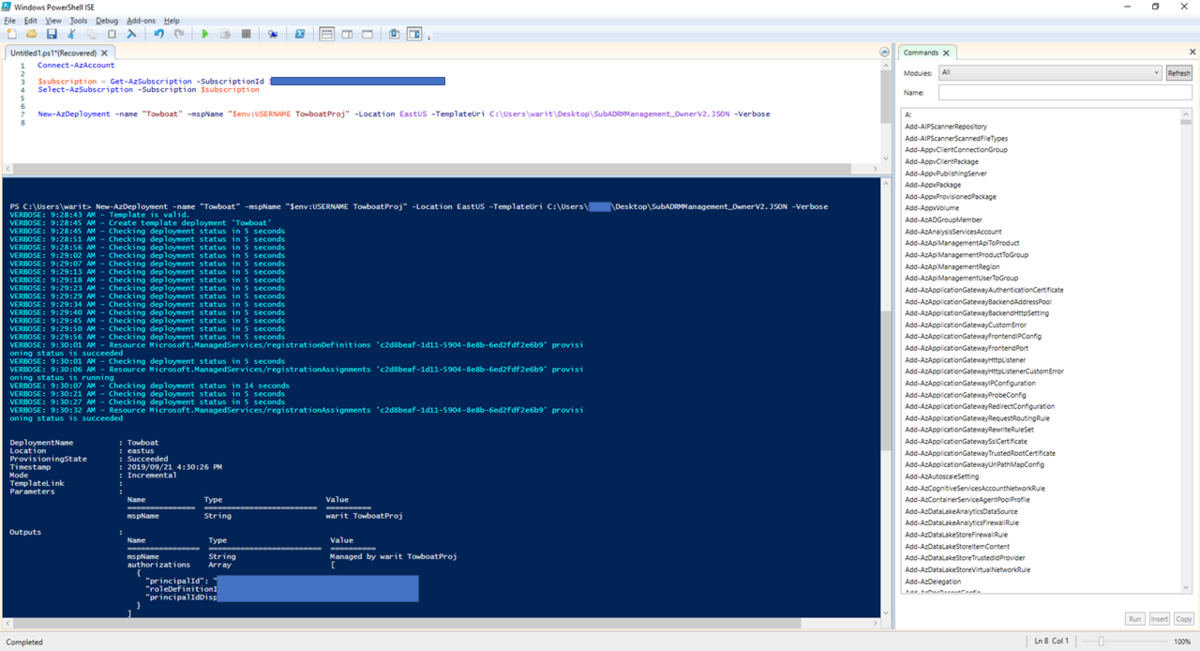
New-AzDeployment -name "Towboat" -mspName "$env:USERNAME TowboatProj" -Location EastUS -TemplateUri C:\Users\myuser\Desktop\azurelighthousesetup.JSON -Verbose

Here is an image when I have tried to run the commands. It takes a few minutes to complete the command and it takes about 10 or 20 minutes to enable Azure Lighthouse on Azure Portal.
f:id:waritohutsu:20190922093533p:plain

Step 5: Retrieve Azure resources across Azure AD tenants

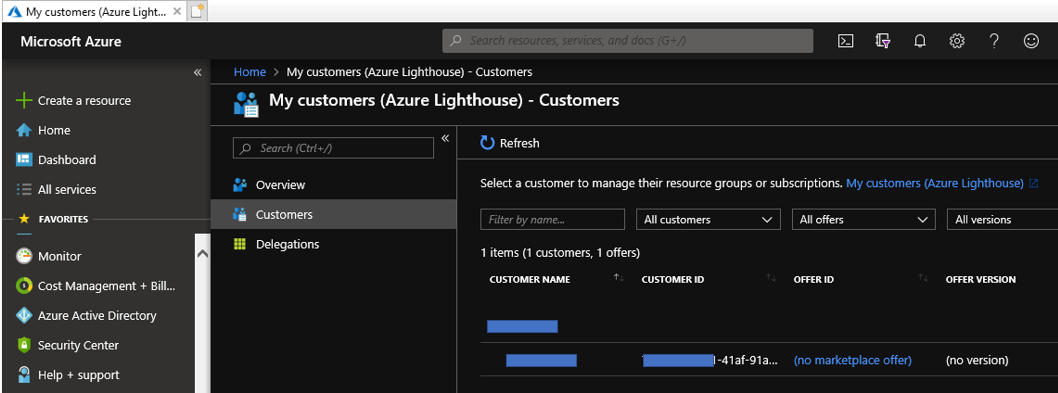
Find "My customers (Azure Lighthouse)" menu on Azure Portal and choose "customers" from left side menu. Now, you can find subscriptions in other Azure AD tenants like below.
f:id:waritohutsu:20190922093950p:plain

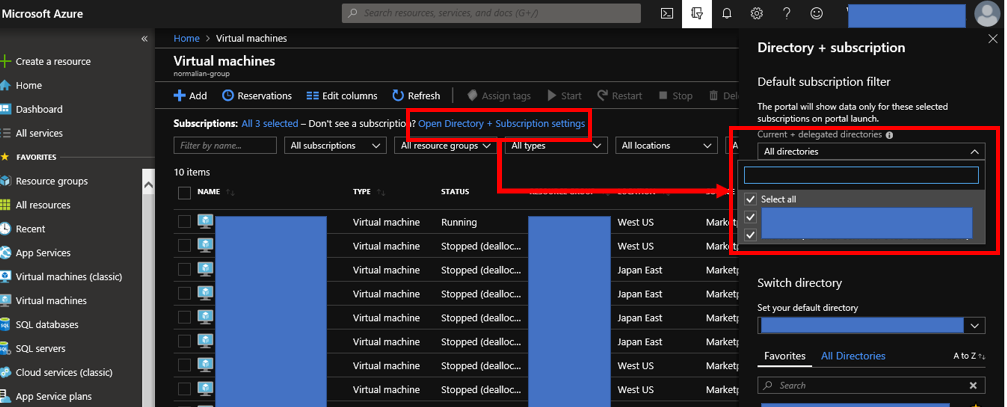
As an example to enjoy an feature of Azure Lighthouse, you can enable to retrieve Azure VMs across Azure AD tenants like below.
f:id:waritohutsu:20190922094308p:plain

Step 6: Delete offer

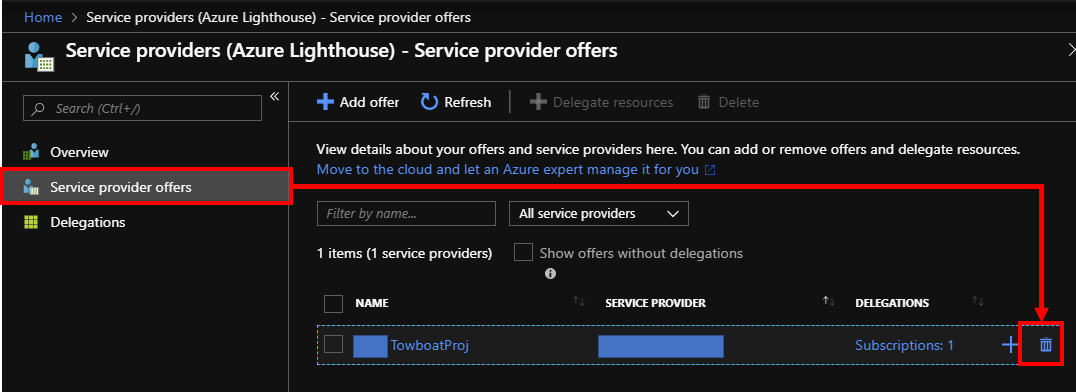
Choose "Service providers (Azure Lighthouse) " on Azure Portal with "Subscription owner" account. Select "Service provider offers" from left side menus. Delete offers by clicking trash box icons.
f:id:waritohutsu:20191002023110p:plain

Whose accounts you can invite into EA Portal as administrator role?

As you know, you can utilize Azure EA Portal to create new Azure subscriptions to charge from your EA contract. Microsoft will send an invitation mail to an account which your company has own. The account will be invited as Enterprise Administrator. Refer to an article below if you need to confirm each role on EA Portal.
normalian.hatenablog.com

Next, you need to invite accounts as new administrator roles. You have to confirm which account types are available to be invited, because there are two account types below.
  • Microsoft Account
    • This account type is also called as "Personal Account"
    • Microsoft manages this account type
    • This account type isn't one of Microsoft Azure resources
    • You could create Microsoft Account by using your corporate mail address such like yyyy@normalian.xyz in past, but you can do that no longer
  • Work or School Account

You need to utilize these accounts on EA Portal. You can find "Auth Level" menu on EA Portal below and choose a proper option to invite new administrators.
f:id:waritohutsu:20190602074000p:plain

Difference of Auth Level on EA Portal

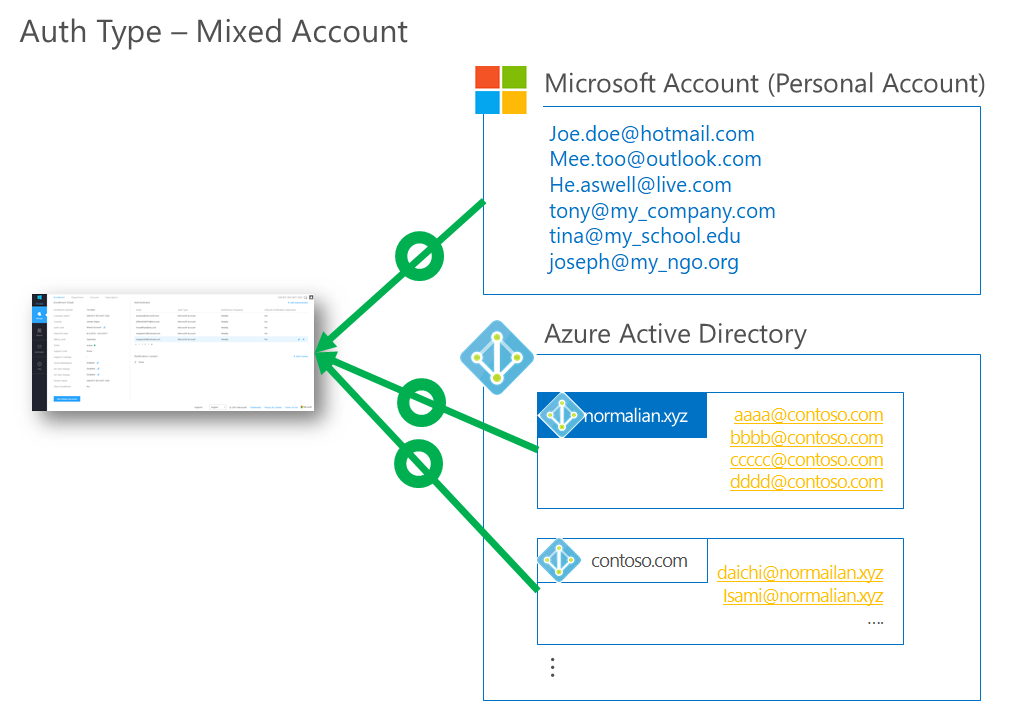
There are four types of "Auth Level" you can choose. Assume your organization has "normalian.xyz" Azure Active Direcotry tenant and here are diagrams which account types you can invite.
f:id:waritohutsu:20190602074345p:plain

f:id:waritohutsu:20190602074450p:plain

f:id:waritohutsu:20190602074608p:plain

f:id:waritohutsu:20190602074640p:plain

Other tips

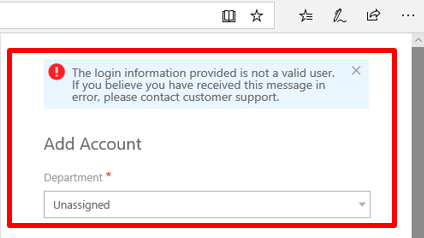
#1 You will find error messages below if you choose wrong Auth Level. Change proper Auth Level option to invite your accounts.
f:id:waritohutsu:20190602080002p:plain

#2 Wizard to add new administrators will be changed like below.
f:id:waritohutsu:20190602080152p:plain

#3 There is no effect for your existing administrator accounts even if you will change "Auth Level" after inviting the accounts.

#4 It seems to take a little bit time to reflect change of Auth Level, because it sometimes failed to invite new accounts just after changing Auth Level.

Where can you get Azure EA Onboarding Guide?

Almost of all EA Portal users complain about EA Portal because they can't find its manual, but you can download EA Portal manual from there.
You can download "Azure EA onboarding Guide" just following an image below.
f:id:waritohutsu:20190531161214p:plain

Now, you can retrieve the manual on your machine.
f:id:waritohutsu:20190531161411p:plain