How to get started with Azure Lighthouse to manage Azure resources across Azure AD tenants
I believe some of Azure users might worry about how to manage Azure resources across Azure AD tenants. It should be an important topic especially Azure CSP users, because CSP subscription management is on the assumption of Azure AD tenants per customer.
Today, you can retrieve Azure resources across Azure AD tenants by using Azure Lighthouse.
Overview to enable Azure Lighthouse
Here are steps to enable Azure Lighthouse
- Common Azure AD Tenant Owner:
- Step1 : Create common Azure AD tenant – optional
- Step2 : Create user group on common Azure AD tenant and add user accounts into the user group
- Subscription Owner:
- Step3 : modify ARM Template
- Step4 : Run PowerShell command to enable Azure Lighthouse
- Common Azure AD Tenant Owner:
- Step 5: Retrieve Azure resources across Azure AD tenants
- Subscription Owner:
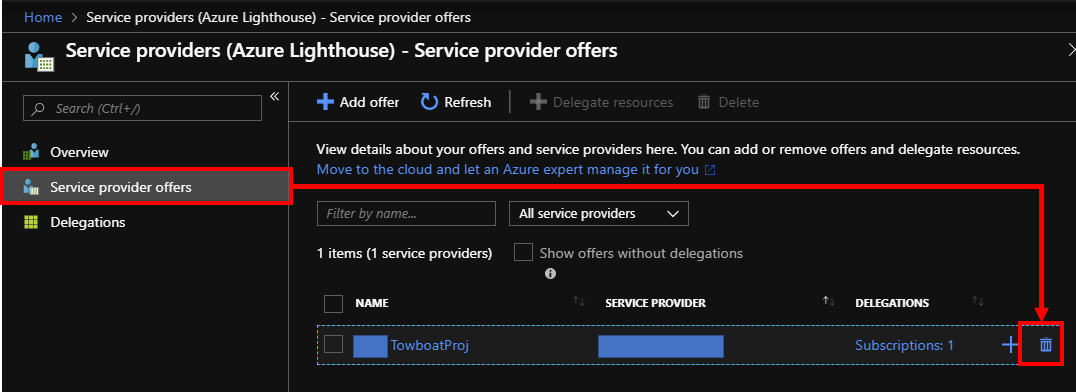
- Step 6 : Delete offer
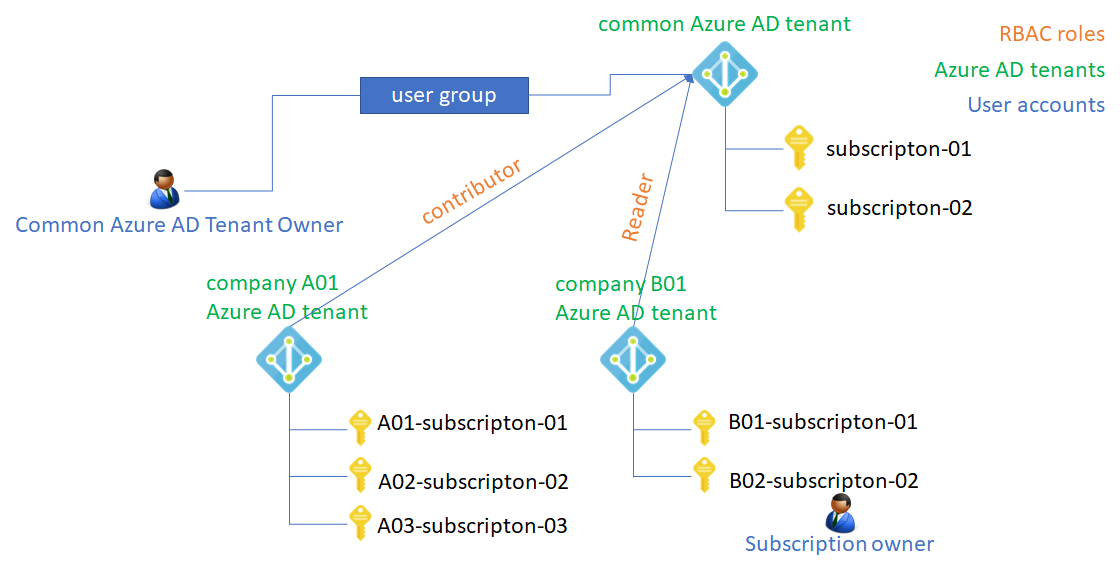
You," Common Azure AD Tenant Owner", need to create a user group into the "common Azure AD tenant" - most of cases this Azure AD tenant should be owned by System Integrators or others. User accounts in the user group can retrieve Azure resources across Azure AD tenants via common Azure AD tenant.
In next, you, Subscription Owner, need to update an ARM template and execute powershell commands to enable Azure Lighthouse.
Let's get into details each steps.
Step1 : Create common Azure AD tenant – optional
This step is optional if you want to utilize existing Azure AD tenant as common Azure AD tenant. Refer to
Create an Azure Active Directory tenant | Microsoft Docs to create new Azure AD tenant.
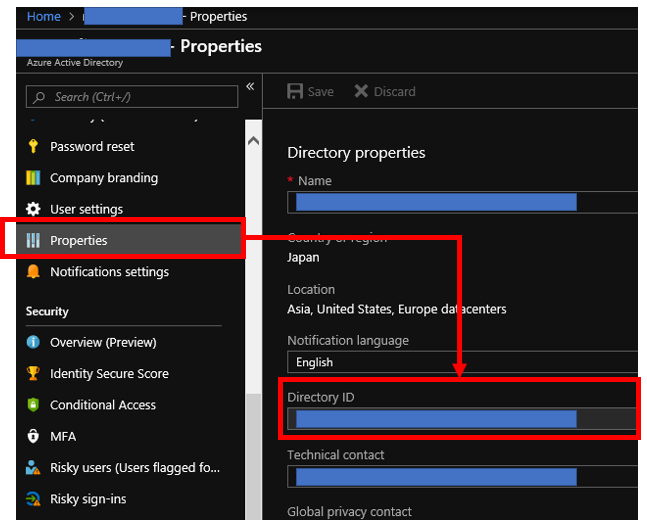
You need to pick up "Directory ID" by reference to an image below.
Step2 : Create user group on common Azure AD tenant and add user accounts into the user group
Open your common Azure AD tenant on Azure portal. Choose "Groups" from left side menus and push create "New group" button. Now, you can create new user group on Azure AD tenant by reference below.
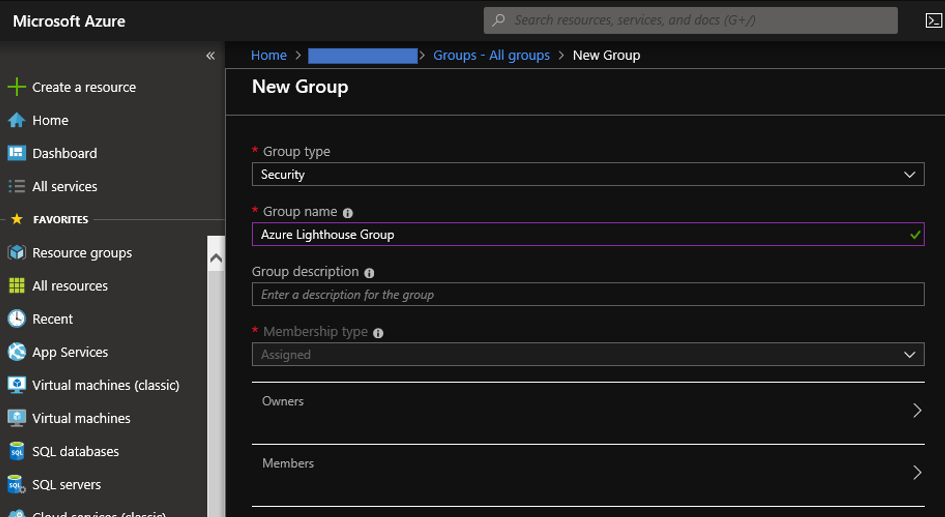
You need to pick up "Object ID" of this user group by following below. This ID will be used to enable Azure Lighthouse.
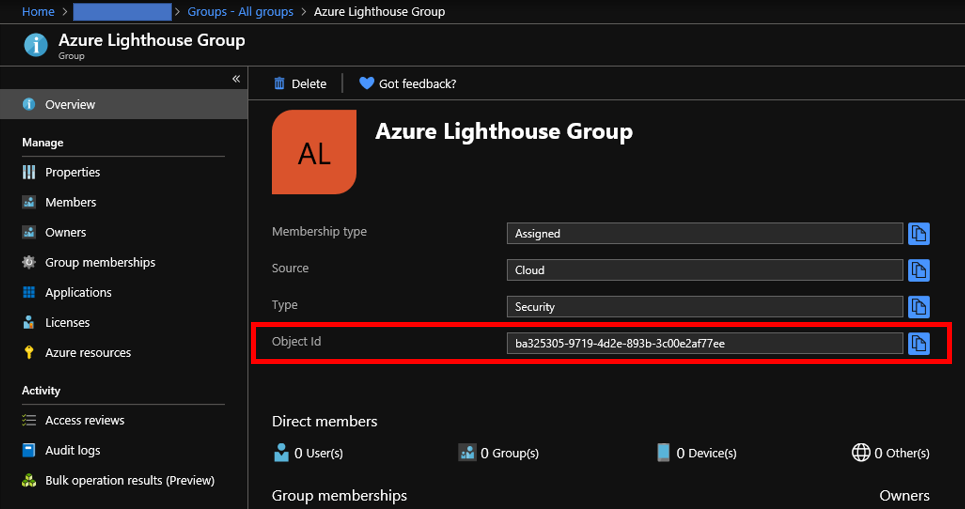
You can complete this step by adding users to relish Azure Lighthouse like below.
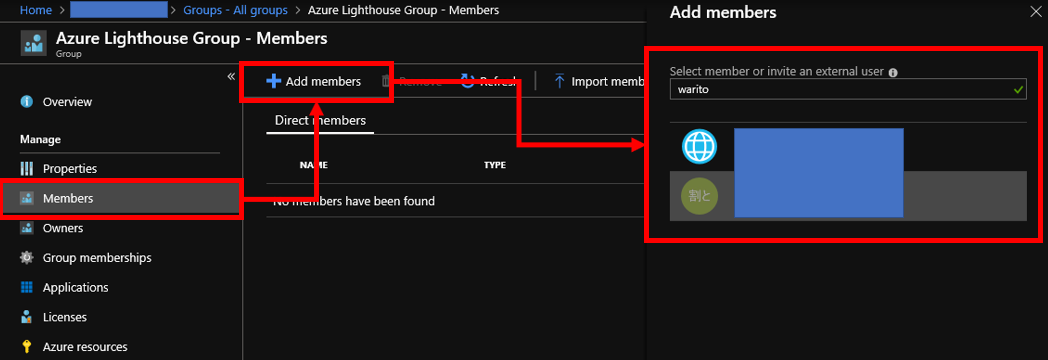
Step3 : modify ARM Template
You need to update an ARM Template file with picked up IDs in previous steps - Object ID and Directory ID like below. You can find RBAC Role IDs with Built-in roles for Azure resources | Microsoft Docs. You can choose "Contributor", "Reader" or others depending on requirements of subscription owners.
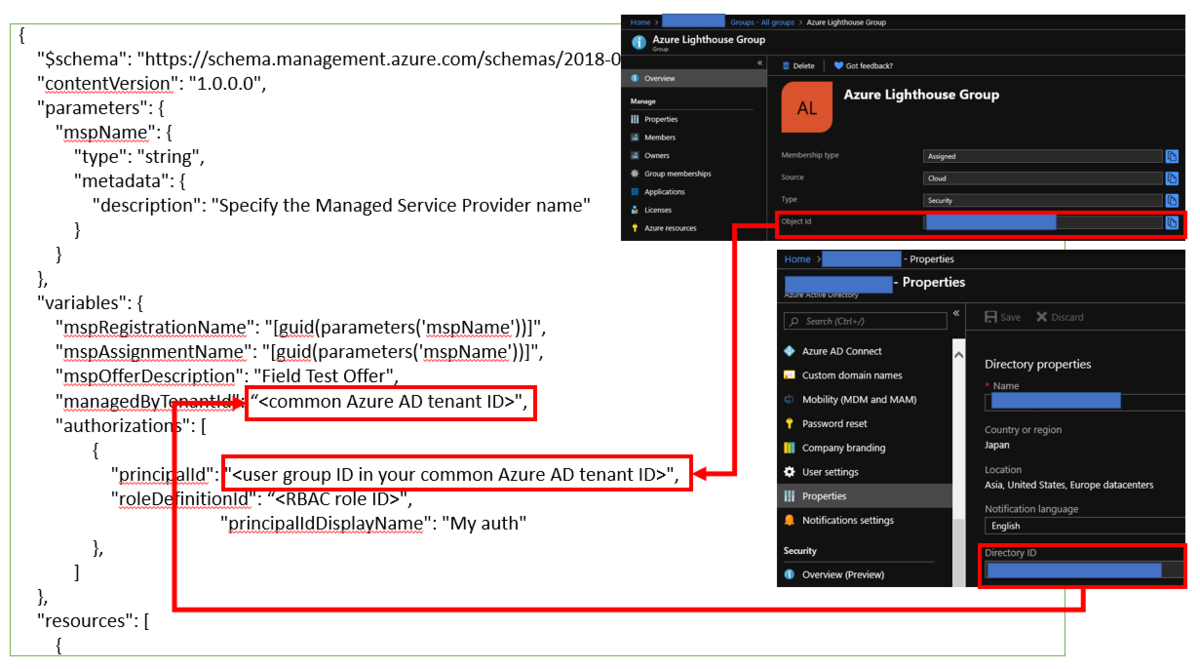
Save texts below as a JSON file and update parameters by following instructions above.
{
    "$schema": "https://schema.management.azure.com/schemas/2018-05-01/subscriptionDeploymentTemplate.json#",
    "contentVersion": "1.0.0.0",
    "parameters": {
        "mspName": {
            "type": "string",
            "metadata": {
                "description": "Specify the Managed Service Provider name"
            }
        }
    },
    "variables": {
        "mspRegistrationName": "[guid(parameters('mspName'))]",
        "mspAssignmentName": "[guid(parameters('mspName'))]",
        "mspOfferDescription": "Field Test Offer",
        "managedByTenantId": "<common Azure AD tenant ID>",
        "authorizations": [
                {
                    "principalId": "<user group ID in your common Azure AD tenant ID>",
                    "roleDefinitionId": "<RBAC role ID>",
		    "principalIdDisplayName": "My auth"
                },
            ]
    },
    "resources": [
        {
            "type": "Microsoft.ManagedServices/registrationDefinitions",
            "apiVersion": "2019-06-01",
            "name": "[variables('mspRegistrationName')]",
            "properties": {
                "registrationDefinitionName": "[parameters('mspName')]",
                "description": "[variables('mspOfferDescription')]",
                "managedByTenantId": "[variables('managedByTenantId')]",
                "authorizations": "[variables('authorizations')]"
            }
        },
        {
            "type": "Microsoft.ManagedServices/registrationAssignments",
            "apiVersion": "2019-06-01",
            "name": "[variables('mspAssignmentName')]",
            "dependsOn": [
                "[resourceId('Microsoft.ManagedServices/registrationDefinitions/', variables('mspRegistrationName'))]"
            ],
            "properties": {
                "registrationDefinitionId": "[resourceId('Microsoft.ManagedServices/registrationDefinitions/', variables('mspRegistrationName'))]"
            }
        }
    ],
    "outputs": {
        "mspName": {
            "type": "string",
            "value": "[concat('Managed by', ' ', parameters('mspName'))]"
        },
        "authorizations": {
            "type": "array",
            "value": "[variables('authorizations')]"
        }
    }
}
Step4 : Run PowerShell command to enable Azure Lighthouse
Make sure that you have already installed "Azure PowerShell module". Install "Azure PowerShell module" with reference to Install Azure PowerShell with PowerShellGet | Microsoft Docs if you haven't installed it.
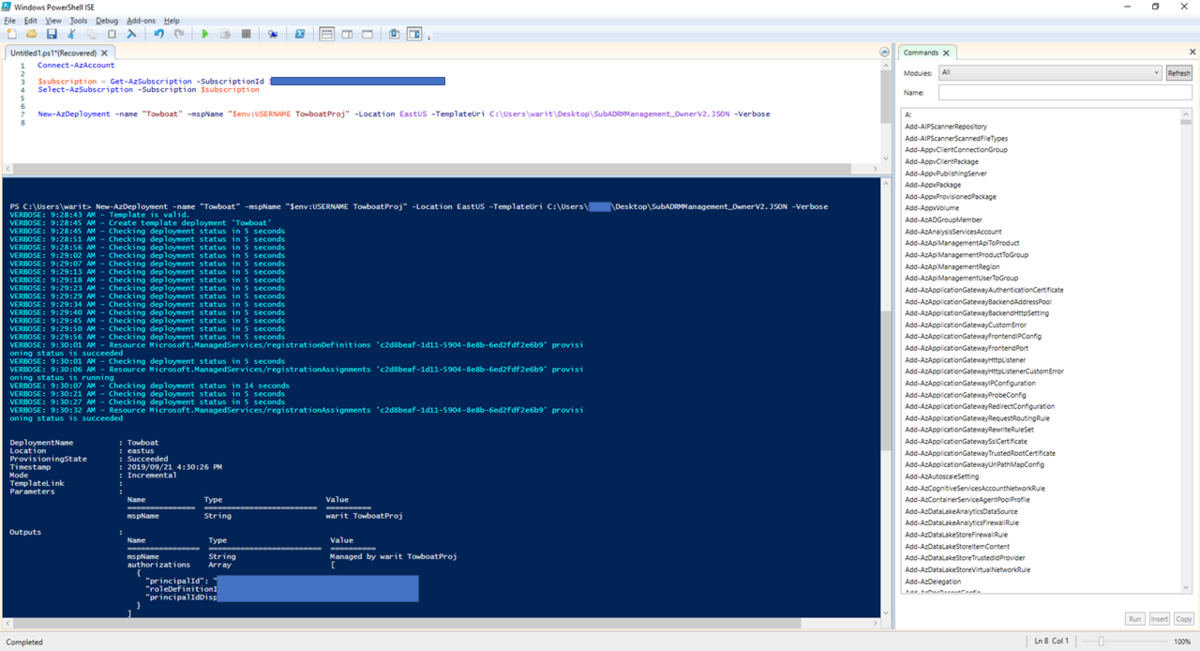
Now, you can enable Azure Lighthouse by execution commands below. Please change "subscription id" and ARM Template json file name depending on your environments.
Connect-AzAccount
Get-AzSubscription

$subscription = Get-AzSubscription -SubscriptionId "your subscription ID"
Select-AzSubscription -Subscription $subscription

New-AzDeployment -name "Towboat" -mspName "$env:USERNAME TowboatProj" -Location EastUS -TemplateUri C:\Users\myuser\Desktop\azurelighthousesetup.JSON -Verbose
Here is an image when I have tried to run the commands. It takes a few minutes to complete the command and it takes about 10 or 20 minutes to enable Azure Lighthouse on Azure Portal.
Step 5: Retrieve Azure resources across Azure AD tenants
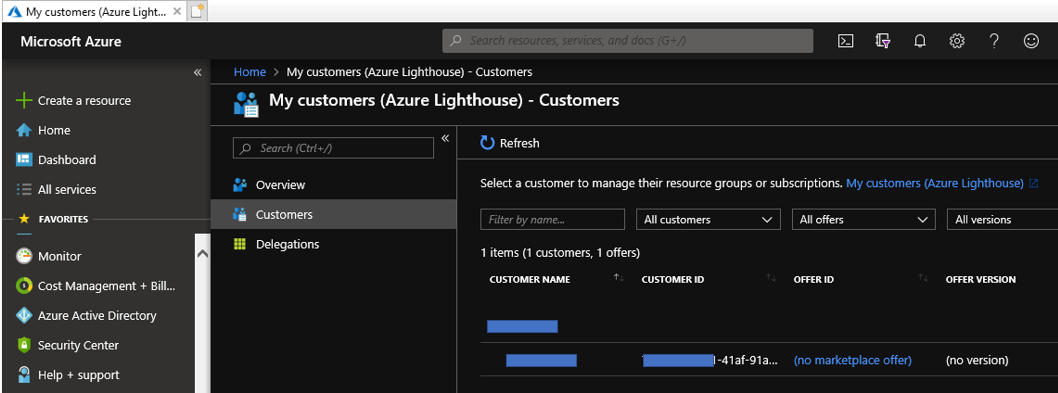
Find "My customers (Azure Lighthouse)" menu on Azure Portal and choose "customers" from left side menu. Now, you can find subscriptions in other Azure AD tenants like below.
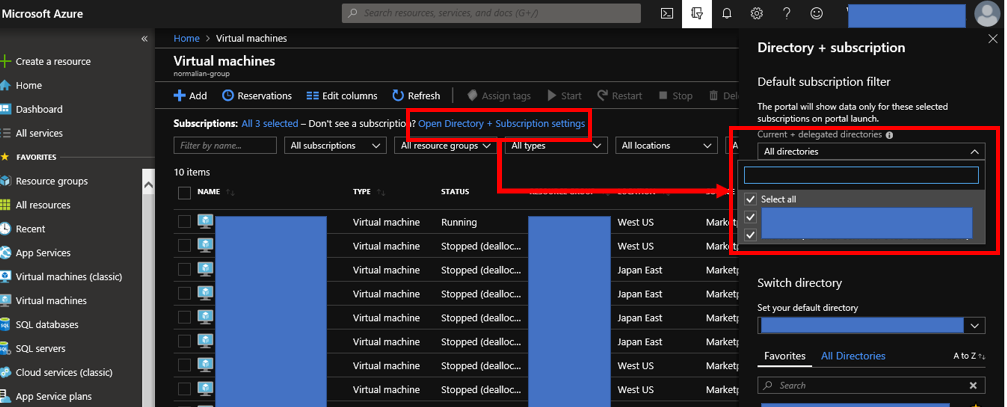
As an example to enjoy an feature of Azure Lighthouse, you can enable to retrieve Azure VMs across Azure AD tenants like below.
Step 6: Delete offer
Choose "Service providers (Azure Lighthouse) " on Azure Portal with "Subscription owner" account. Select "Service provider offers" from left side menus. Delete offers by clicking trash box icons.
