normalian blog

Let's talk about Microsoft Azure, ASP.NET and Java!

Get started with Apache Storm on HDInsight for your jar files

HDInsight provides you to create Apache Storm clusters easily. Please read reference articles in this post if you don't know overview of Apache Storm.

Create Storm Cluster on HDInsight

Follow https://docs.microsoft.com/en-us/azure/hdinsight/hdinsight-apache-storm-tutorial-get-started-linux article until "Create a Storm cluster" section. It takes about 15 minutes to create your Storm cluster, and pick up below info to connect your Storm cluster.

  • SSH login URL: engiyoistorm02-ssh.azurehdinsight.net
  • Dashboard URL: https://"your cluster name".azurehdinsight.net/
  • StormUI URL: https://"your cluster name".azurehdinsight.net/stormui/index.html

Deploy your jar files into your Storm cluster

Create your jar file including Topology class to deploy into your Storm Cluster. Please refer below example if you don't have such Java projects.
https://github.com/apache/storm/tree/master/examples/storm-starter

After making your jar file, try to connect to your cluster via ssh. Here is a sample connecting to your cluster using WinSCP.
f:id:waritohutsu:20170724143720p:plain
Transfer your jar file from your computer into your cluster. Now, you can run your jar file into your cluster.

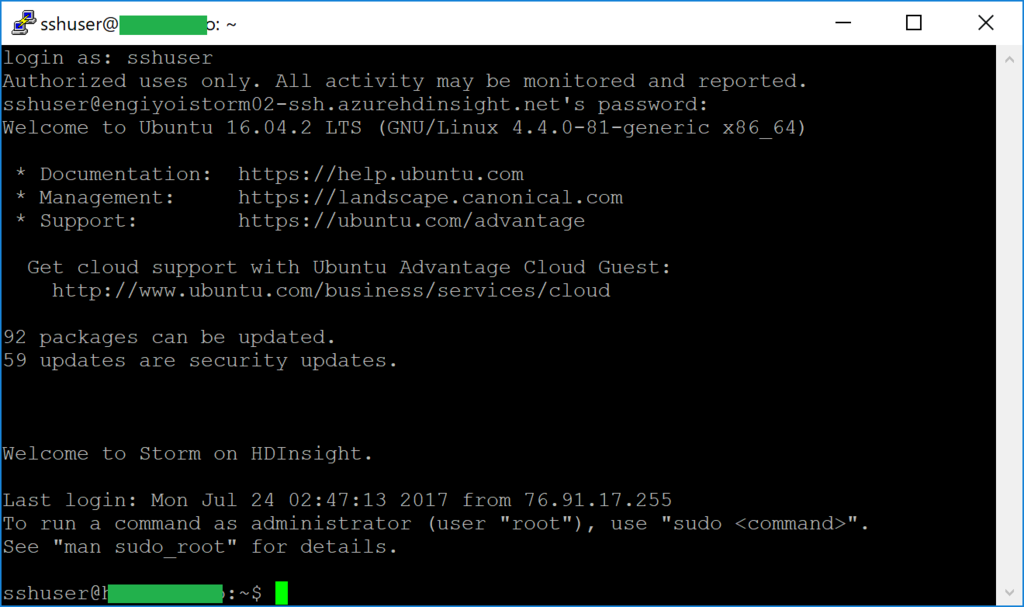
Connect to you cluster via ssh. Here is a sample connecting to your cluster using putty.
f:id:waritohutsu:20170724143739p:plain
Follow below commands to run your jar file. Specify second argument as topology class and third argument as topology name.

sshuser@xxxxxxxx:~$ storm jar /home/sshuser/hellostorm-0.0.1-SNAPSHOT.jar com.mydomain.hellostorm.HelloTopology hello-topology
sshuser@xxxxxxxx:~$ storm list
6244 [main] INFO  o.a.s.u.NimbusClient - Found leader nimbus : 10.0.0.10:6627
Topology_name        Status     Num_tasks  Num_workers  Uptime_secs
-------------------------------------------------------------------
hello-topology       ACTIVE     8          3            8758

Monitor your application

Open https://"your cluster name".azurehdinsight.net/stormui/index.html via your browser. You can find you topology in Storm UI.
f:id:waritohutsu:20170724143827p:plain

Azure Container Service overview of Kubernetes for Java applications

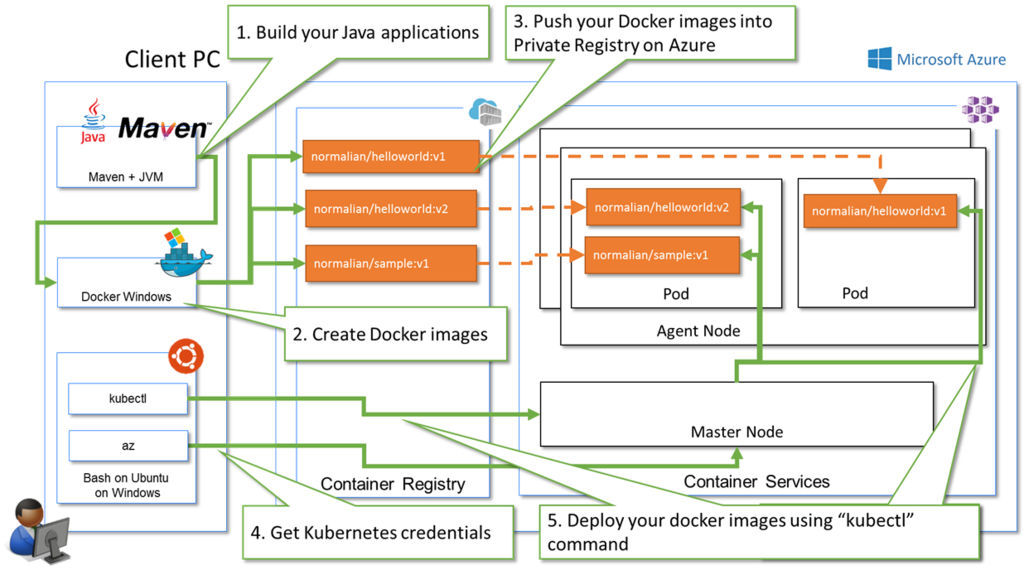
Here is a sample architecture ACS Kubernetes. People sometimes confuse components of Container Services, because there are so many components such like Java, Docker Windows, private registry, cluster and others. This architecture helps such people to understand overview of ACS Kubernetes.
f:id:waritohutsu:20170713014405p:plain

Steps to run your Java applications using ACS Kubernetes

Follow below steps to run your Java applications.

  1. Build your Java applications
  2. Create Docker images
  3. Push your Docker images into Private Registry on Azure
  4. Get Kubernetes credentials
  5. Deploy your docker images using “kubectl” command

How to install kubectl into your client machine on "Bash on Ubuntu on Windows"

Run below commands.

normalian@DESKTOP-QJCCAGL:~$ echo "deb [arch=amd64] https://packages.microsoft.com/repos/azure-cli/ wheezy main" | sudo tee /etc/apt/sources.list.d/azure-cli.list
[sudo] password for normalian:
deb [arch=amd64] https://packages.microsoft.com/repos/azure-cli/ wheezy main
normalian@DESKTOP-QJCCAGL:~$ sudo apt-key adv --keyserver packages.microsoft.com --recv-keys 417A0893
normalian@DESKTOP-QJCCAGL:~$ sudo apt-get install apt-transport-https
normalian@DESKTOP-QJCCAGL:~$ sudo apt-get update && sudo apt-get install azure-cliExecuting: gpg --ignore-time-conflict --no-options --no-default-keyring --homedir /tmp/tmp.5tm3Sb994i --no-auto-check-trustdb --trust-model always --keyring /etc/apt/trusted.gpg --primary-keyring /etc/apt/trusted.gpg --keyserver packages.microsoft.com --recv-keys 417A0893

...


normalian@DESKTOP-QJCCAGL:~$ az

Welcome to Azure CLI!
---------------------
Use `az -h` to see available commands or go to https://aka.ms/cli.

...


normalian@DESKTOP-QJCCAGL:~$ az login
To sign in, use a web browser to open the page https://aka.ms/devicelogin and enter the code XXXXXXXXX to authenticate.

...


normalian@DESKTOP-QJCCAGL:~$ az acs kubernetes install-cli
Downloading client to /usr/local/bin/kubectl from https://storage.googleapis.com/kubernetes-release/release/v1.7.0/bin/linux/amd64/kubectl
Connection error while attempting to download client ([Errno 13] Permission denied: '/usr/local/bin/kubectl')
normalian@DESKTOP-QJCCAGL:~$ sudo az acs kubernetes install-cli
Downloading client to /usr/local/bin/kubectl from https://storage.googleapis.com/kubernetes-release/release/v1.7.0/bin/linux/amd64/kubectl
normalian@DESKTOP-QJCCAGL:~$ az acs kubernetes get-credentials --resource-group=<resource group name> --name=<cluster name>  --ssh-key-file=<ssh key file>
normalian@DESKTOP-QJCCAGL:~$ kubectl get pods
NAME                             READY     STATUS    RESTARTS   AGE

How to update your Java application in ACS Kubernetes

This post is continuation of . Please read the post before this one if you haven't read it. I will show you how to update your Java application in ACS kubernetes in this post.

Update your Java application - Run this section at your Windows Docker Client

At first, update your Java application. Modify your "index.jsp" file like below.

<html>
 <head>
  <title>Docker deployed apps !!update!!</title>
 </head>
 <body>
  <h2>Hello World! on Docker !!update!!</h2>
 </body>
</html>

And run "mvn package" command in the Java project folder. After create new war file in "helloworld/target/helloworld.war", create new Docker image and launch the application by running below commands.

helloworld>docker build --no-chache -t normalian/wildfly-helloworld .

helloworld>docker images
REPOSITORY                                                  TAG                 IMAGE ID            CREATED             SIZE
normalian/wildfly-helloworld                                latest              xxxx2536f9e2        11 seconds ago      584MB
xxxxxxxxxxxxxxxxx.azurecr.io/normalian/wildfly-helloworld   latest              xxxx171bcbcf        40 minutes ago      584MB
jboss/wildfly                                               latest              xxxx152f84f9        5 days ago          584MB

helloworld>docker run -it --rm -p 8080:8080 normalian/wildfly-helloworld

After above, access http://localhost:8080/helloworld. Stop the application if you can check your update.

Push your Docker image into your private repository on Azure by running below commands.

helloworld>docker tag normalian/wildfly-helloworld xxxxxxxxxxxxxxxxx.azurecr.io/normalian/wildfly-helloworld

helloworld>docker push xxxxxxxxxxxxxxxxx.azurecr.io/normalian/wildfly-helloworld
The push refers to a repository [xxxxxxxxxxxxxxxxx.azurecr.io/normalian/wildfly-helloworld]
xxxx02afd48c: Pushed
xxxx5bc19b9a: Pushed
xxxx11518954: Layer already exists
xxxx13dfbb96: Layer already exists
xxxx519728f4: Layer already exists
xxxx7c284ded: Layer already exists
xxxx8d9413e4: Layer already exists
latest: digest: sha256:xxxxxxxxxxxxxxxxx1522ee990cd74155116034b15ab51198ecc9a7e246a926 size: 1789

Update your Java application - Run this section at Kubernetes master node

Connect Kubernetes master node by SSH(e.x, Bash on Ubuntu on Windows). Run below commands.

azureuser@k8s-master-3AEAFCA1-0:~$ kubectl set image deployment my-java-app01 my-java-app01=xxxxxxxxxxxxxxxxx.azurecr.io/normalian/wildfly-helloworld
deployment "my-java-app01" image updated

azureuser@k8s-master-3AEAFCA1-0:~$ kubectl get pod
NAME                             READY     STATUS              RESTARTS   AGE
my-java-app01-2735613267-h0gsp   0/1       ContainerCreating   0          5s
my-java-app01-979249178-1k5c9    1/1       Running             0          35m

azureuser@k8s-master-3AEAFCA1-0:~$ kubectl get services
NAME            CLUSTER-IP    EXTERNAL-IP    PORT(S)          AGE
kubernetes      10.0.0.1      <none>         443/TCP          3d
my-java-app01   10.0.174.35   23.99.81.xxx   8080:32298/TCP   1h

After above, access http://23.99.81.xxx:8080/helloworld via browser. You can check your updated Java application.

Please note "kubectl set image deployment my-java-app01 my-java-app01=xxxxxxxxxxxxxxxxx.azurecr.io/normalian/wildfly-helloworld:latest" won't work when you use "latest" tag for your Docker images.

What should you do when you got "Error response from daemon ... [::1]:53: read udp [::1]:33230->[::1]:53: read: connection refused"?

When I tried to run "docker login" command, I got below error.

Error response from daemon: Get https://xxxxxxxx.azurecr.io/v2/: dial tcp: lookup xxxxxxxx.azurecr.io on [::1]:53: read udp [::1]:33230->[::1]:53: read: connection refused

I'm not sure what's this, but I found this article.
github.com

Following the article, I re-install Docker Windows. I finally succeed to login remote Docker repository.

C:\Users\normalian>docker login xxxxxxxx.azurecr.io
Username (xxxxxxxx):
Password:
Login Succeeded

How to deploy your Java applications into Azure Container Service

As you know, Azure Container Service(ACS) has some orchestrators such like DC/OS, Swarm and Kubernetes. In this post, you can get below knowledge.

What's requirement to use ACS for Java

In this post, I use my Windows machine for Docker client. Please prepare below environment at first to deploy your Java applications into ACS Kubernetes.

How to make Java application Docker images

Run below maven command in general command prompt. You can find your Java web application in your current directory. Please change "groupId" and "artifactId" for your environment.

mvn archetype:generate -DgroupId=com.mydomain -DartifactId=helloworld -DarchetypeArtifactId=maven-archetype-webapp -DinteractiveMode=false

Please edit helloworld\src\main\webapp\index.jsp like below if you need.

<html>
 <head>
  <title>Docker deployed apps</title>
 </head>
 <body>
  <h2>Hello World! on Docker</h2>
 </body>
</html>

Create Dockerfile for your application in your Java project folder like below.

FROM jboss/wildfly
MAINTAINER normalian

ADD ./target/helloworld.war /opt/jboss/wildfly/standalone/deployments

EXPOSE 8080

This Dockerfile pull public "jboss/wildfly" Docker image, deploy your application into WildFly and expose 8080 port for web accesses.

Create a Docker image with your application to run below command in your Java project folder.

helloworld>docker build -t normalian/wildfly-helloworld .
Sending build context to Docker daemon  35.33kB
Step 1/4 : FROM jboss/wildfly
 ---> ec96c1eb76d4
Step 2/4 : MAINTAINER normalian
 ---> Using cache
 ---> f445b07e38f8
Step 3/4 : ADD ./target/helloworld.war /opt/jboss/wildfly/standalone/deployments
 ---> Using cache
 ---> 92fd373f0f55
Step 4/4 : EXPOSE 8080
 ---> Using cache
 ---> 13a52eeb004a
Successfully built 13a52eeb004a
Successfully tagged normalian/helloworld-test:latest
SECURITY WARNING: You are building a Docker image from Windows against a non-Windows Docker host. All files and directories added to build context will have '-rwxr-xr-x' permissions. It is recommended to double check and reset permissions for sensitive files and directories.

You will find a warning, but you can ignore the warning in this post. Please consider it depending on your environment. After that you can check your docker image and run your application with the image.

helloworld>docker images
REPOSITORY                                                  TAG                 IMAGE ID            CREATED             SIZE
normalian/wildfly-helloworld                                latest              9c25b0840c8c        9 minutes ago       584MB

helloworld>docker run -it --rm -p 8080:8080 normalian/wildfly-helloworld

Please access http://localhost:8080/helloworld/index.jsp with your browser. You can watch your jsp file of your application. After that, please stop your container, and the container will remove caused by "--rm" option.

How to push your Docker images into "Container registries" in Microsoft Azure

Access https://portal.azure.com/ and create your "Container registries". Please refer this article https://docs.microsoft.com/en-us/azure/container-service/container-service-tutorial-kubernetes-prepare-acr if you need. After creating "Container registries", you can get "Registry name", "Login server" and "password" via the portal. Please refer below image.
f:id:waritohutsu:20170705120644p:plain

Run below command to push your docker image into your "Container registries" in Microsoft Azure.

helloworld> docker login --username=<username> --password=<password> xxxxxxxx.azurecr.io
helloworld> docker tag normalian/wildfly-helloworld xxxxxxxx.azurecr.io/normalian/wildfly-helloworld
helloworld> docker push xxxxxxxx.azurecr.io/normalian/wildfly-helloworld

After that, you can watch your image in your "Container registries" like below.
f:id:waritohutsu:20170705120956p:plain

Please read this section at first if you haven't setup ssh in your client machine. Launch "Bash on Ubuntu on Windows" in your client machine, and run below commands.

normalian@k8s-master-2E00DAB3-0:~$ ssh-keygen
Generating public/private rsa key pair.
Enter file in which to save the key (/home/normalian/.ssh/id_rsa):
Created directory '/home/normalian/.ssh'.
Enter passphrase (empty for no passphrase):
Enter same passphrase again:
Your identification has been saved in /home/normalian/.ssh/id_rsa.
Your public key has been saved in /home/normalian/.ssh/id_rsa.pub.
The key fingerprint is:
SHA256:XXXXXXXXXXXXXXXXXXXXXXXXXXXXXXXXXXXXXXXX normalian@k8s-master-2E00DAB3-0
The key's randomart image is:
+---[RSA 2048]----+
|                 |
|      o          |
|   . o o      . .|
|  + B *  .   . = |
|E+ X X +S o . + o|
|o O =.=  . = + . |
| +...o... o +    |
|oo ... ...       |
|O .oo...         |
+----[SHA256]-----+
normalian@k8s-master-2E00DAB3-0:~$

Refer this article https://github.com/yoshioterada/DEIS-k8s-ACS/blob/master/KubernetesOnAzureContainerService.md, and follow steps "until Login to the master node of ACS".

How to deploy and run your Java applications on ACS

Make a yaml file to define your application in master node of Kubernetes, and run below commands to publish your docker image.

normalian@k8s-master-2E00DAB3-0:~$ vi java-app-deployment.yaml
normalian@k8s-master-2E00DAB3-0:~$ cat java-app-deployment.yaml
apiVersion: apps/v1beta1
kind: Deployment
metadata:
  name: my-java-app01
spec:
  replicas: 1
  template:
    metadata:
      labels:
        app: my-java-app01
    spec:
      containers:
      - name: my-java-app01
        image: zzzzzzzzzzzzzz.azurecr.io/normalian/wildfly-helloworld:latest
        ports:
        - containerPort: 8080
          name: wildfly

normalian@k8s-master-2E00DAB3-0:~$ kubectl create -f java-app-deployment.yaml
normalian@k8s-master-2E00DAB3-0:~$ kubectl get deployments
NAME            DESIRED   CURRENT   UP-TO-DATE   AVAILABLE   AGE
my-java-app01   1         1         1            1           4h

normalian@k8s-master-2E00DAB3-0:~$ kubectl expose deployment my-java-app01 --type=LoadBalancer

You can't access via internet without "kubectl expose deployment my-java-app01 --type=LoadBalancer", because Kubernetes deploy docker images into its own network. After this, run below commands to get IP to access from internet.

normalian@k8s-master-2E00DAB3-0:~$ kubectl get service
NAME            CLUSTER-IP   EXTERNAL-IP   PORT(S)          AGE
kubernetes      10.0.0.1     <none>        443/TCP          4h
my-java-app01   10.0.3.145   <pending>     8080:30226/TCP   2m
normalian@k8s-master-2E00DAB3-0:~$ kubectl get service
NAME            CLUSTER-IP   EXTERNAL-IP   PORT(S)          AGE
kubernetes      10.0.0.1     <none>        443/TCP          4h
my-java-app01   10.0.3.145   13.91.1.xx    8080:30226/TCP   3m

Input "http://13.91.1.xx:8080/helloworld" in your browser, and you can access your Java application.

Cognitive Services の Emotion API を利用する

AI 熱が過熱している昨今、Microsoft は Cognitive Services の各 API リリース&ブラッシュアップし続けている。REST API を直接利用するサンプルは多いが、SDK を利用したサンプルが以外に少ないので自身の備忘録として記載する。プログラムの動作までには以下のステップが必要だ。

  • Microsoft Azure の管理ポータルで Cognitive Services のアカウントを作成し、Subscription Key を取得する
  • Visual Studio で新規プロジェクトを作成し、NuGet で Microsoft.ProjectOxford.Emotion を取得する
  • ソースコードの記載、実行

まずは Microsoft Azure の管理ポータルにログインし、以下の画面の様な Cognitive Services の Emotion API アカウントを作成し、KEY1 を取得する(KEY2 でも良い)。
f:id:waritohutsu:20170221125557p:plain

次に Visual Studio を起動し、「NuGet パッケージ管理」から以下の画面に従い Microsoft.ProjectOxford.Emotion をインストールする。
f:id:waritohutsu:20170221125602p:plain

最後に、以下のソースコードを記載してアプリケーションを実行する。

using Microsoft.ProjectOxford.Emotion;
using System;
using System.Linq;
using System.IO;
using System.Threading.Tasks;

namespace ConsoleApplication1
{
    class Program
    {
        static void Main(string[] args)
        {
            var client = new EmotionServiceClient("your subscription key on Microsoft Azure portal");
            string path = @"D:\temp\myimage01.png";
            MakeRequest(client, path).Wait();
            Console.WriteLine("ENTER to end this app....");
            Console.ReadLine();
        }

        static async Task MakeRequest(EmotionServiceClient client, string path)
        {
            using (var fileStream = new FileStream(path, FileMode.Open))
            {
                // 認識した顔の数だけ実行
                var emotions = await client.RecognizeAsync(fileStream);
                foreach (var emotion in emotions)
                {
                    Console.WriteLine("Anger = {0}, Contempt = {1}, Disgust = {2}, Fear = {3}, Happiness = {4}, Neutral = {5}, Sadness = {6}, Surprise = {7}",
                        emotion.Scores.Anger,
                        emotion.Scores.Contempt,
                        emotion.Scores.Disgust,
                        emotion.Scores.Fear,
                        emotion.Scores.Happiness,
                        emotion.Scores.Neutral,
                        emotion.Scores.Sadness,
                        emotion.Scores.Surprise);
                }
            }
        }
    }
}

以下の様に実行結果が表示される。

Anger = 1.391707E-05, Contempt = 0.004622553, Disgust = 1.419089E-05, Fear = 4.515473E-06, Happiness = 0.8965916, Neutral = 0.09813519, Sadness = 4.940341E-05, Surprise = 0.0005686138
ENTER to end this app....

顔が検出されない場合、上記の foreach 文に入らない点に留意してほしい。

ARM 版の Application Gateway を PowerShell で作成する

今回はコマンドラインにて Application Gateway を作成する。Application Gateway をご存じでない方のために簡単に捕捉すると「機能が豊富なロードバランサ( Azure ロードバランサ比)」だ。よく使いたいといわれる Application Gateway の機能は以下だ。

  • cookie ベースでの振り分け
  • パスベースでのアクセス振り分け( デフォルトは サーバ A、/admin/* はサーバ B 等)
  • SSL オフロード

一方でApplication Gateway は有料であり、中規模以上で2インスタンス以上でないと SLA が保証されない点に注意してほしい。以下は Application Gateway の価格 の抜粋だ。

Microsoft は、複数の中規模またはより大規模なインスタンスを持つ各 Application Gateway Service に対し、
99.95% 以上の可用性を保証します。インスタンスが 1 つのみ、あるいは小規模なインスタンスしか含まれない
 Application Gateway Services に関しては SLA は提供していません。SLA の詳細については、SLA のページを
ご覧ください。

パスベースのルールを持つ Application Gateway を作成する PowerShell スクリプト

Application Gateway は管理ポータルからでも作成できるが、ルール名等々を柔軟に設定するには PowerShell が有効なので、以下を備忘録として張り付けておく。以下が前提なことに注意してほしい。

  • リソースグループ my-demo-rg が作成済み
  • 仮想ネットワーク my-demo-vnet が作成済みであり、waf-subnet が作成済み
  • Application Gateway が配置されるサブネットと通信できる場所に 10.0.1.10 アドレスの WEB サーバが配置済み
  • Application Gateway が配置されるサブネットと通信できる場所に 10.0.1.20 アドレスの WEB サーバが配置済み
# まずはログイン
Get-AzureRmSubscription

# 利用サブスクリプションを選択
Select-AzureRmSubscription -SubscriptionId "your subscription id"

# 配置先のリソースグループ、仮想ネットワーク、サブネット、リージョンを指定
$rgName = "my-demo-rg"
$vnetName = "my-demo-vnet"
$subnetName = "waf-subnet"
$location = "japanwest"
$publicIPName = "APPGW-Public-IP"
$wafName = "my-gateway"

$vnet = Get-AzureRmVirtualNetwork -Name $vnetName -ResourceGroupName $rgName
$subnet = $vnet.Subnets[0]
$publicip = New-AzureRmPublicIpAddress -ResourceGroupName $rgName -name $publicIPName -location $location -AllocationMethod Dynamic
$gipconfig = New-AzureRmApplicationGatewayIPConfiguration -Name $wafName -Subnet $subnet

# 振り分け先のサーバを指定、複数指定する場合は , でつなげる
$defaultPool = New-AzureRmApplicationGatewayBackendAddressPool -Name defaultPool -BackendIPAddresses 10.0.1.10 #1d34.170.185.46, 134.170.188.221,134.170.185.50
$adminPool = New-AzureRmApplicationGatewayBackendAddressPool -Name adminPool -BackendIPAddresses 10.0.1.20 #1d34.170.185.46, 134.170.188.221,134.170.185.50

# 80 番ポートを指定し、cookie ベースの振り分けを有効化
$poolSetting = New-AzureRmApplicationGatewayBackendHttpSettings -Name appGatewayBackendHttpSettings -Port 80 -Protocol Http -CookieBasedAffinity Enabled
$fp = New-AzureRmApplicationGatewayFrontendPort -Name frontendport01  -Port 80
$fipconfig = New-AzureRmApplicationGatewayFrontendIPConfig -Name appGatewayFrontendIP -PublicIPAddress $publicip

# デフォルトは 10.0.1.10、/admin/* は 10.0.1.20 の振り分け指定
$listener = New-AzureRmApplicationGatewayHttpListener -Name appGatewayHttpListener -Protocol Http -FrontendIPConfiguration $fipconfig -FrontendPort $fp
$adminPathRule = New-AzureRmApplicationGatewayPathRuleConfig -Name "adminPathrule" -Paths "/admin/*" -BackendAddressPool $adminPool -BackendHttpSettings $poolSetting
$urlPathMap = New-AzureRmApplicationGatewayUrlPathMapConfig -Name "urlpathmap" -PathRules $adminPathRule -DefaultBackendAddressPool $defaultPool -DefaultBackendHttpSettings $poolSetting
$adminRule = New-AzureRmApplicationGatewayRequestRoutingRule -Name "adminRule" -RuleType PathBasedRouting -HttpListener $listener -UrlPathMap $urlPathMap

# SLA が担保される SKU を指定
$sku = New-AzureRmApplicationGatewaySku -Name "Standard_Medium" -Tier Standard -Capacity 2
$appgw = New-AzureRmApplicationGateway -Name appgwtest -ResourceGroupName $rgName -Location $location -BackendAddressPools $defaultPool, $adminPool -BackendHttpSettingsCollection $poolSetting -FrontendIpConfigurations $fipconfig -GatewayIpConfigurations $gipconfig -FrontendPorts $fp -HttpListeners $listener -UrlPathMaps $urlPathMap -RequestRoutingRules $adminRule -Sku $sku -Debug

上記を実行すれば ARM 版の Application Gateway が作成されるはずだ。

参考