normalian blog

Let's talk about Microsoft Azure, ASP.NET and Java!

クラウドサービスで Application Insights の Java SDK を利用する場合の TIPS

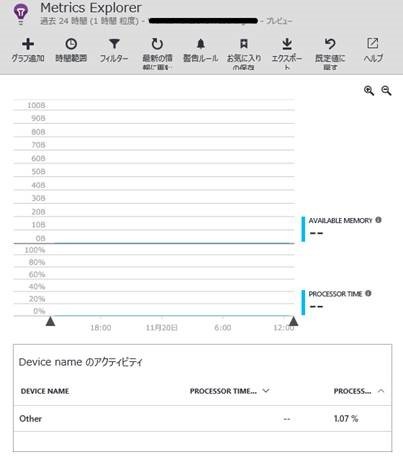
本ブログで何度も紹介させて頂いている Application Insights だが、クラウドサービスの利用時に AVAILBABLE MEMORY, PROCESS IO RATE, PROCESSOR TIME が以下の様に出力されない場合がある。
f:id:waritohutsu:20151129143045j:plain

解決方法を先に言ってしまうと、クラウドサービスのスタートアップタスクで Visual C++ Redistributable Packages for Visual Studio 2013 をインストールすればよい。

何でログが出ないの?

クラウドサービスで利用する OS は Windows Server(設定によってバージョンは変わる)なのは周知だと思うが、Java SDK の JniPCConnector.java を確認すればわかるが、JNI を利用してネイティブコードを呼び出している。
さらにソースコード内で ApplicationInsights-Java の C++ ソースを確認すればわかる通り、ネイティブコードを利用してパフォーマンスカウンタに登録していることがわかる。
これらの処理を行う際、Windows Server では Visual C++ Redistributable Packages for Visual Studio 2013 のセットアップが必要になるが、本モジュールが不足しているために AVAILBABLE MEMORY, PROCESS IO RATE, PROCESSOR TIME が出力されないという問題が発生する。

対応方法

Azure Toolkit for Eclipse を利用したプロジェクト構成が前提となるが、以下の手順で問題は解決できる。

  • Visual C++ Redistributable Packages for Visual Studio 2013 から vcredist_x64.exe ファイルを取得
  • "project name"\WorkerRole1\approot\vcredist_x64.exe にモジュールを配置する
  • 以下のバッチファイルを参考に、"project name"\WorkerRole1\approot\startup.cmd に対して vcredist_x64.exe のセットアップ処理を記載する
:: *** This script will run whenever Azure starts this role instance.
:: *** This is where you can describe the deployment logic of your server, JRE and applications 
:: *** or specify advanced custom deployment steps
::     (Note though, that if you're using this in Eclipse, you may find it easier to configure the JDK,
::     the server and the server and the applications using the New Azure Deployment Project wizard 
::     or the Server Configuration property page for a selected role.)

echo Hello World!
vcredist_x64.exe /install /quiet

WildFly Swarm で JAX-RS アプリを動かしてみる #1

今回は Microsoft Azure からちょっと外れ、WildFly Swarm という WildFly プロジェクトの派生プロジェクトをいじってみる。

WildFly Swarm って何?

WildFly Swarm とは Java EE 系の AP サーバ起動が遅かったり、Java EE 系の仕様策定が遅めで各仕様のバージョンアップを個別にしたい等、様々な課題に対しての解決策として提示された機能っぽい*1。Spring Boot の様に実行コンテナごと Fat Jar 化する機能を持っている。

まずは疎通をとってみる

簡単に疎通をとって動かしてみるサンプルとして JAX-RS が簡単そうだったので以下のように動かすとする。以下を参照いただければわかる通り、わずかな plugin 設定と wildfly-swarm-jaxrs への参照設定を追加する程度でアプリケーションの作成が可能になる。

<project xmlns="http://maven.apache.org/POM/4.0.0" xmlns:xsi="http://www.w3.org/2001/XMLSchema-instance"
	xsi:schemaLocation="http://maven.apache.org/POM/4.0.0 http://maven.apache.org/xsd/maven-4.0.0.xsd">
	<modelVersion>4.0.0</modelVersion>

	<groupId>com.mydomain</groupId>
	<artifactId>HelloWildFlySwarm</artifactId>
	<version>0.0.1-SNAPSHOT</version>
	<packaging>jar</packaging>
	<name>HelloWildFlySwarm</name>
	<url>http://maven.apache.org</url>

	<properties>
		<project.build.sourceEncoding>UTF-8</project.build.sourceEncoding>
	</properties>
	<build>
		<plugins>
			<plugin>
				<groupId>org.wildfly.swarm</groupId>
				<artifactId>wildfly-swarm-plugin</artifactId>
				<configuration>
					<mainClass>com.mydomain.HelloWildFlySwarm.App</mainClass>
				</configuration>
				<executions>
					<execution>
						<goals>
							<goal>package</goal>
						</goals>
					</execution>
				</executions>
			</plugin>
		</plugins>
	</build>
	<dependencies>
		<dependency>
			<groupId>org.wildfly.swarm</groupId>
			<artifactId>wildfly-swarm-jaxrs</artifactId>
			<version>1.0.0.Alpha4</version>
		</dependency>
	</dependencies>
</project>

以下を参照いただければ分かるが main 関数内で一つ以上の deploy を実施する必要がある。

package com.mydomain.HelloWildFlySwarm;

import org.jboss.shrinkwrap.api.ShrinkWrap;
import org.wildfly.swarm.container.Container;
import org.wildfly.swarm.jaxrs.JAXRSArchive;

import com.mydomain.HelloWildFlySwarm.jaxrs.RootApi;

public class App {
	public static void main(String[] args) throws Exception {
		Container container = new Container();
		JAXRSArchive jaxrsDeployment = ShrinkWrap.create(JAXRSArchive.class);
		jaxrsDeployment.addClass(RootApi.class);
		jaxrsDeployment.addAllDependencies();
		container.start().deploy(jaxrsDeployment);
	}
}

また、上記では ShrinkWrap を利用している。

package com.mydomain.HelloWildFlySwarm.jaxrs;

import javax.ws.rs.GET;
import javax.ws.rs.Path;
import javax.ws.rs.Produces;

@Path("/")
public class RootApi {

	@GET
	@Produces("text/plain")
	public String get() {
		return "Hello WildFly Swarm";
	}
}

以下の Maven コマンドをたたいて実行すると、AP サーバを立ち上げることなく REST アプリケーションの立ち上げが可能だ。

>mvn clean wildfly-swarm:run

jar ファイルが 30MB 程度になっており、なかなかのサイズになっていた。実行コンテナ、依存 jar も含まれるからまぁそんなもんかというところ。

TIPS

初回動作させる際に Failed to resolve artifact 'org.jboss.msc:jboss-msc:1.2.6.Final' が発生していた。Swarm でなく Maven 側の依存解決の問題となるが、以下を一時的に追加して自身のローカルリポジトリに以下の jar を配置することで回避できる。

		<dependency>
			<groupId>org.jboss.msc</groupId>
			<artifactId>jboss-msc</artifactId>
			<version>1.2.6.Final</version>
		</dependency>
		<dependency>
			<groupId>org.jboss.spec.javax.sql</groupId>
			<artifactId>jboss-javax-sql-api_7.0_spec</artifactId>
			<version>1.1.0.Final</version>
		</dependency>

*1:誰か間違っていたら突っ込みをお願いしたい

Power BI 向けの組織アカウントをお手軽に作ってみる

Stream Analytics の出力先に Power BI が指定可能になってしばらく経った。リアルタイム分析*1を行う場合、Power BI は非常に有力な機能であり、当ブログでも以下のように機能を紹介してきた。

今回は Power BI を利用する際にちょっとハマる出来事について紹介したい。

Stream Analytics の出力先に Power BI を指定すると認証に失敗する?

管理ポータルから Stream Analyics のインスタンスを選択し、「出力の追加」をを指定すると Power BI(プレビュー)が選択できる。
こちらを選択した後、アカウント選択が可能だが、「既存の Microsoft Power BI ユーザ」を選択して xxxx@hotmail.com の様な Microsoft アカウント を入力すると以下のようにエラーになる。
f:id:waritohutsu:20151112132446p:plain

こちらの原因は Power BI 側の承認は組織アカウントのみをサポートしている点だ。組織アカウントと Microsoft アカウントの差異については以下の記事を参考にしてほしい。

お手軽に組織アカウントを作るには?

オンプレミス側に Active Directory サーバを作成し、ディレクトリ同期機能を使って Azure Active Directory にアカウント同期をするといった処理を行えばもちろん組織アカウントの作成は可能だが、そんなにメンドクサイことはしたくない場合も多いだろう(特に検証時)。

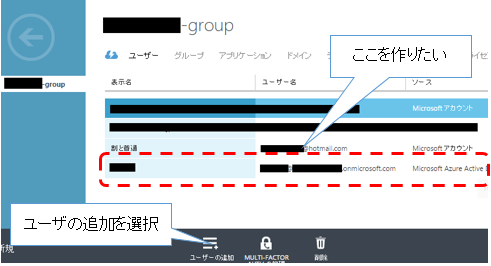
その場合、既存の Azure Active Directoryディレクトリに対し、直にユーザを作成する方法があげられる。以下のように、ソースが Microsoft アカウント でなく Microsoft Azure Active Directory ならば Power BI 側でアカウント作成が可能だ。
f:id:waritohutsu:20151112132513p:plain

「ユーザーの追加」ボタンを押下し、以下のように「組織内の新しいユーザー」を作成する。
f:id:waritohutsu:20151112132520p:plain

ウィザードに従ってアカウントの作成後、再度 Stream Analytics の「出力の追加」先で「新規ユーザー」を指定し、作成した組織アカウントでログインを実施する(例:"user name"@"directory name".onmicrosoft.com
)。
設定が完了すると、以下のように「種類」が Power BI の出力先が作成される。
f:id:waritohutsu:20151112132527p:plain

*1:数分程度の誤差は生じる

Application Insigts のリクエストデータを SQL Database に格納する

アプリケーションのログデータを永続化/可視化してくれる Application Insights だが、本ブログでは今まで過去2回にわたり、Web アプリのログに対して Stream Analytics を介し Power BI を利用した可視化を紹介していた。

上記は Java の Web アプリで行っていたが、今回は ASP.NET を利用したログ出力を行い、SQL Database へと Application Insights のログを永続化する方法を紹介する。

ASP.NET で Application Insights を利用する方法

こちらは非常にシンプルだ。以下のサイトを参考に Application Insights の SDK を有効化するだけでアプリケーションの監視が可能になる*1
Application Insights SDK を追加して ASP.NET アプリを監視する

上記のステップを通して Application Insights の SDK を有効化したアプリケーションを、Azure Resource Manager で作成した Windows Server 2012 R2 仮想マシンIIS にデプロイした。

Application Insights のログを SQL Database に出力するまでにステップ

以下の手順が必要になる。連続エクスポートの設定については特に記載は不要だと思うので、他の手順について紹介する。

  • Application Insights の連続エクスポートの有効化
  • ログ格納用に SQL Database のテーブル作成
  • Stream Analytics の設定

今回は サーバによって受信された要求 である Request データを取り扱う。こちらは以下のようなファイル名でデータが格納される。

  • "appinsights name"_"your instrument key"/Requests/{date}/{time}/93ddecba-d09f-4027-aaed-f773de32495e_20151108_085830.blob

Request データのファイルの中身は以下のような形式だ。

{
    "context": {
        "application": {
            "version": "Unknown"
        }, 
        "cloud": {}, 
        "custom": {
            "dimensions": [], 
            "metrics": []
        }, 
        "data": {
            "eventTime": "2015-11-08T08:11:49.5138835Z", 
            "isSynthetic": false, 
            "samplingRate": 100.0
        }, 
        "device": {
            "browser": "Internet Explorer", 
            "browserVersion": "Internet Explorer 11.0", 
            "deviceModel": "Virtual Machine", 
            "deviceName": "Virtual Machine", 
            "id": "(my vm name)", 
            "locale": "en-US", 
            "network": "6", 
            "oemName": "Microsoft Corporation", 
            "os": "Windows", 
            "osVersion": "Windows 10", 
            "roleInstance": "(my vm name)", 
            "screenResolution": {}, 
            "type": "PC"
        }, 
        "location": {
            "city": "Tokyo", 
            "clientip": "119.242.23.0", 
            "continent": "Asia", 
            "country": "Japan", 
            "province": "Tōkyō"
        }, 
        "operation": {
            "id": "3579395009003726603", 
            "name": "GET Account/Register", 
            "parentId": "3579395009003726603"
        }, 
        "serverDevice": {}, 
        "session": {
            "id": "C1A7FDE1-AD1B-4D65-9F05-3DA2421E88FB", 
            "isFirst": false
        }, 
        "user": {
            "accountAcquisitionDate": "2015-11-08T04:20:59Z", 
            "anonAcquisitionDate": "0001-01-01T00:00:00Z", 
            "anonId": "16BADE4E-E5E6-4652-B518-8F012442C25D", 
            "authAcquisitionDate": "0001-01-01T00:00:00Z", 
            "isAuthenticated": false
        }
    }, 
    "internal": {
        "data": {
            "documentVersion": "1.61", 
            "id": "fcac8a5b-7615-4c53-9e51-28ccd6f40eac"
        }
    }, 
    "request": [
        {
            "count": 1, 
            "durationMetric": {
                "count": 1.0, 
                "max": 373751007.0, 
                "min": 373751007.0, 
                "sampledValue": 373751007.0, 
                "stdDev": 0.0, 
                "value": 373751007.0
            }, 
            "id": "3579395009003726603", 
            "name": "GET Account/Register", 
            "responseCode": 200, 
            "success": true, 
            "url": "http://(my vm public ip)/Account/Register", 
            "urlData": {
                "base": "/Account/Register", 
                "hashTag": "", 
                "host": "<my vm public ip>"
            }
        }
    ]
}

シンプルな JSON 形式だが、request 部分は中身が配列になっているので、Stream Analytics でクエリを書く際に注意が必要なポイントになる。

ログ格納用に SQL Database のテーブル作成

自分のサブスクリプションである必要はないが、SQL Database インスタンスを一つ作成(インスタンスサイズは何でも良いが、Standard: S0 以上を推奨する)し、以下のテーブルを作成する。

CREATE TABLE [dbo].[RequestTable](
    [eventTime] [datetime] NOT NULL,
    [isSynthetic] [nvarchar](50) NULL,
    [samplingRate] [real] NULL,

    [browser] [nvarchar](50) NULL,
    [browserVersion] [nvarchar](50) NULL,
    [deviceModel] [nvarchar](50) NULL,
    [deviceName] [nvarchar](50) NULL,
    [deviceId] [nvarchar](50) NULL,
    [locale] [nvarchar](50) NULL,
    [network] [nvarchar](50) NULL,
    [oemName] [nvarchar](50) NULL,
    [os] [nvarchar](50) NULL,
    [osVersion] [nvarchar](50) NULL,

    [roleInstance] [nvarchar](50) NULL,
    [type] [nvarchar](50) NULL,

    [clientIp] [nvarchar](50) NULL,
    [continent] [nvarchar](50) NULL,
    [country] [nvarchar](50) NULL,
    [province] [nvarchar](50) NULL,
    [city] [nvarchar](50) NULL,

    [operationId] [nvarchar](50) NULL,
    [operationName] [nvarchar](50) NULL,
    [parentId] [nvarchar](50) NULL,

    [sessionId] [nvarchar](max) NULL,
    [sessionIsFirst] [nvarchar](50) NULL,

    [requestName] [nvarchar](50) NULL,
    [responseCode] [nvarchar](50) NULL,
    [requestSuccess] [nvarchar](50) NULL,
    [requestUrl] [nvarchar](50) NULL
)

CREATE CLUSTERED INDEX [pvTblIdx] ON [dbo].[RequestTable]
(
    [eventTime] ASC
)WITH (PAD_INDEX = OFF, STATISTICS_NORECOMPUTE = OFF, SORT_IN_TEMPDB = OFF, DROP_EXISTING = OFF, ONLINE = OFF, ALLOW_ROW_LOCKS = ON, ALLOW_PAGE_LOCKS = ON)

全ての JSON データを格納するテーブル構造となっていはいないが、もし必要な場合は自分で修正してほしい。

Stream Analytics の設定

まずは Stream Analytics の input として以下の形式で BLOB を 設定する。

  • 名前:input-blob
  • ソースタイプ:データストリーム
  • ソース:BLOBストレージ
  • パスパターン:(appinsights name)_(your instrument key)/Requests/{date}/{time}
  • 日付の形式:YYYY-MM-DD
  • 時刻の形式:HH

次に、Stream Analytics の output として以下を設定する。サーバ名、データベース名、ユーザ名、パスワード等は適切に設定すること。

  • 名前:output-sqldb
  • シンク:SQL データベース
  • テーブル:RequestTable

上記の設定後、以下のクエリを Stream Analytics に設定する。

    SELECT 
      flat.ArrayValue.name as requestName
      ,flat.ArrayValue.responseCode as responseCode
      ,flat.ArrayValue.success as requestSuccess
      ,flat.ArrayValue.url as requestUrl

      ,A.context.data.eventTime as eventTime
      ,A.context.data.isSynthetic as isSynthetic
      ,A.context.data.samplingRate as samplingRate

      ,A.context.device.browser as browser
      ,A.context.device.browserVersion as browserVersion
      ,A.context.device.deviceModel as deviceModel
      ,A.context.device.deviceName as deviceName
      ,A.context.device.id as deviceId
      ,A.context.device.locale as locale
      ,A.context.device.network as network
      ,A.context.device.oemName as oemName
      ,A.context.device.os as os
      ,A.context.device.osVersion as osVersion
      ,A.context.device.roleInstance as roleInstance
      ,A.context.device.type as type

      ,A.context.location.clientip as clientIp
      ,A.context.location.continent as continent
      ,A.context.location.country as country
      ,A.context.location.province as province
      ,A.context.location.city as city

      ,A.context.operation.id as operationId
      ,A.context.operation.name as operationName
      ,A.context.operation.parentId as parentId

      ,A.context.session.id as sessionId
      ,A.context.session.isFirst as sessionIsFirst
    INTO
      [output-sqldb]
    FROM [input-blob] A
    CROSS APPLY GetElements(A.request) AS flat

上記の完了後、Stream Analytics ジョブを実行すると SQL Database 側にデータが格納されているはずだ。

実行結果の確認

今回は Visual StudioSQL Server オブジェクトエクスプローラから確認する。サーバに接続し、テーブルを右クリックして データ表示 を選択した結果は以下となる。
f:id:waritohutsu:20151108213952p:plain

さらに以下のクエリを発行し、国別のアクセスを確認してみる。

SELECT COUNTRY, COUNT(COUNTRY) as NUM FROM [dbo].[RequestTable] GROUP BY COUNTRY

f:id:waritohutsu:20151108214004p:plain

なぜか United States のリクエストがあり若干衝撃だが、こういったデータの取得も可能になる。

*1:ただし、依存関係の追跡 (および IIS パフォーマンス カウンター)も監視する場合には追加で手順が必要な点も記載がある

Eclipse で Maven Project を使ってる際にはまるかもしれない TIPS

EclipseMaven Project を使っている場合、Eclipse の設定でしばしばはまるので備忘録として書いておく。

Unbound Classpath Variable: 'M2_REPO/... が発生する

Eclipse のクラスパス変数に対して M2_REPO が設定できていないケース。以下のコマンドで対応できる。

>mvn -Declipse.workspace=c:\opt\workspace eclipse:configure-workspace

調べ方によっては eclipse:add-maven-repo を実行する方法が出てくるが、Maven 2.1 辺りからコマンドが変わったそうな。

jsp が javax.servlet.HttpServlet が見つからないと怒る

以下のサイトを参考にビルドパスに Web App Libraries を追加する。
http://stackoverflow.com/questions/4440479/how-can-i-add-jar-files-to-the-web-inf-lib-folder-in-eclipse

WEB-INF/lib に追加したはずの Maven Dependency ライブラリが追加されず、Tomcat 起動時にエラーになる

Eclipse に依存 jar が追加されていない。Eclipse のパッケージエクスプローラ等から [Maven - Update Project...] を実行する。

AppInsights と Power BI を使って Java Web アプリの例外発生をリアルタイム監視する

前回の記事である Application Insights と Power BI を使って Java の Web アプリの PageView を監視する にて、Application Insights の連続エクスポート/Stream Analytics の Power BI 出力を活用して PageView のログが簡単に可視化できることが分かった。
今回は Application Insights に例外ログを出力して Power BI に可視化するまでの手順を紹介する。なお、Application Insights の連続エクスポート、Stream Analytics の設定、Power BI 設定の細かな手順については前回の記事を参照してほしい。

Java アプリケーションの記載

以下の様に入力文字列が空の場合に IllegalArgumentException を出力するコードを作成する。

<%@ page language="java" contentType="text/html; charset=UTF-8"
	pageEncoding="UTF-8"%>
<!DOCTYPE html>
<html lang="ja">
<head>
<meta charset="utf-8" />
<script type="text/javascript">
        var appInsights=window.appInsights||function(config){
            function r(config){t[config]=function(){var i=arguments;t.queue.push(function(){t[config].apply(t,i)})}}var t={config:config},u=document,e=window,o="script",s=u.createElement(o),i,f;for(s.src=config.url||"//az416426.vo.msecnd.net/scripts/a/ai.0.js",u.getElementsByTagName(o)[0].parentNode.appendChild(s),t.cookie=u.cookie,t.queue=[],i=["Event","Exception","Metric","PageView","Trace"];i.length;)r("track"+i.pop());return r("setAuthenticatedUserContext"),r("clearAuthenticatedUserContext"),config.disableExceptionTracking||(i="onerror",r("_"+i),f=e[i],e[i]=function(config,r,u,e,o){var s=f&&f(config,r,u,e,o);return s!==!0&&t["_"+i](config,r,u,e,o),s}),t
        }({
            instrumentationKey:"<my instrumentation key>"
        });
        
        window.appInsights=appInsights;
        appInsights.trackPageView();
    </script>
<title>AppInsights-site index page</title>
</head>
<body>
	<h2>ポストしてみる</h2>
	<form method="post" action="<%=request.getContextPath()%>/home">
		文字列: <input name="message" type="text" placeholder="文字列を入力してください" />
		<br /> <input type="submit" value="送信 " />
	</form>
</body>
</html>
package com.mydomain;

import javax.servlet.RequestDispatcher;
import javax.servlet.ServletException;
import javax.servlet.annotation.WebServlet;
import javax.servlet.http.HttpServlet;
import javax.servlet.http.HttpServletRequest;
import javax.servlet.http.HttpServletResponse;

import org.apache.logging.log4j.LogManager;
import org.apache.logging.log4j.Logger;
import com.microsoft.applicationinsights.TelemetryClient;

@WebServlet("/home")
public class HomeServlet extends HttpServlet {
	private static final long serialVersionUID = 1L;

	private static final Logger logger = LogManager.getLogger(HomeServlet.class);

	/**
	 * @see HttpServlet#HttpServlet()
	 */
	public HomeServlet() {
		super();
		// TODO Auto-generated constructor stub
	}

	/**
	 * @see HttpServlet#doGet(HttpServletRequest request, HttpServletResponse
	 *      response)
	 */
	protected void doGet(HttpServletRequest request, HttpServletResponse response)
			throws ServletException, IOException {
	}

	/**
	 * @see HttpServlet#doPost(HttpServletRequest request, HttpServletResponse
	 *      response)
	 */
	protected void doPost(HttpServletRequest request, HttpServletResponse response)
			throws ServletException, IOException {
		TelemetryClient telemetryClient = new TelemetryClient();

		String message = request.getParameter("message");
		if (message == null || message.length() == 0) {
			IllegalArgumentException ex = new IllegalArgumentException("please input message");
			telemetryClient.trackException(ex);
			logger.warn("input warning");
		}
		RequestDispatcher dispatch = request.getRequestDispatcher("/second.jsp");
		dispatch.forward(request, response);
	}
}

非常にシンプルなコードなので、特に解説は不要だと思う。

Stream Analytics を設定する

前回の記事を参考にインプットに BLOB ストレージ、アウトプットに Power BI を指定する。特に Stream Analytics のインプットのパターンは以下となる。

  • プレフィックスのパターン: forpowerbiappinsights_/Exceptions/{date}/{time}
  • 日付形式: YYYY-MM-DD
  • 時刻形式: HH

そんな BLOB の格納される Exception のログは以下になる。

{  
   "basicException":[  
      {  
         "assembly":"Unknown",
         "exceptionType":"java.lang.IllegalArgumentException",
         "outerExceptionType":"java.lang.IllegalArgumentException",
         "outerExceptionThrownAtMethod":"com.mydomain.HomeServlet.doPost",
         "outerExceptionThrownAtAssembly":"",
         "failedUserCodeMethod":"com.mydomain.HomeServlet.doPost",
         "failedUserCodeAssembly":"",
         "exceptionGroup":"java.lang.IllegalArgumentException at com.mydomain.HomeServlet.doPost",
         "id":"Representative",
         "typeName":"java.lang.IllegalArgumentException",
         "handledAt":"UserCode",
         "count":1,
         "method":"com.mydomain.HomeServlet.doPost",
         "problemId":"",
         "outerExceptionMessage":"please input message"
      },
      {  
         "parsedStack":[  
            {  
               "method":"com.mydomain.HomeServlet.doPost",
               "fileName":"HomeServlet.java",
               "level":0,
               "line":78
            },
            {  
               "method":"javax.servlet.http.HttpServlet.service",
               "fileName":"HttpServlet.java",
               "level":1,
               "line":648
            },
            <中略>

上記の "basicException" 内にある "exceptionType" を取得するクエリは以下となる。"parsedStack" 部分をスキップしないと空白の count(*) が出力されるため、HAVING 句で "basicException" の無い項目はスキップしている。

    SELECT
      flat.ArrayValue.exceptionType,
      count(*)
    INTO
      [pbi-exception-output]
    FROM
      [export-input] A
    OUTER APPLY GetElements(A.[basicException]) as flat
    GROUP BY TumblingWindow(minute, 1), flat.ArrayValue.exceptionType
    HAVING LEN(flat.ArrayValue.exceptionType) > 0

Power BI でのリアルタイム表示

Power BI にログインし、Stream Analytics のアウトプットで指定したデータセットが表示されていることを確認する。ポータルから表示方法を設定し、"以下の様に ダッシュボード" にレポートを作成する*1
f:id:waritohutsu:20151012215131p:plain

体感値として、1分弱の時間で Application Insights の連続エクスポートが永続ログを吐き出し、2分~3分で Power BI 側に情報が反映される様だ。

*1:ダッシュボードに保存しないと、リアルタイムでの更新が確認できない

Application Insights と PowerBI を使って Java の Web アプリの PageView を監視する

半年ほど前に 割と普通なブログ > Application Insight を Java アプリケーションから利用する で紹介させて頂いた Java の Application Insights の利用方法だが、以下のように BLOB ストレージに永続ログとしてデータを出力できることをご存じだろうか。

連続エクスポートは Application Insights の標準以上の有料プランで利用する必要があるが、以下の様に "30日間のプレミアム試用版"という期間限定でお試しで無料で利用できるプランがある。
f:id:waritohutsu:20150930012936p:plainf:id:waritohutsu:20150930012946p:plain

今回はこちらを利用して Application Insights のログを Power BI の可視化までを無料で行ってみる。

連続エクスポートの設定

管理ポータルから Application Insights の設定タブより、宛先のストレージサービスを選択してログの出力先を指定する。
f:id:waritohutsu:20150930012954p:plain

この際、以下の様にエクスポートするデータの種類を選択できる。
f:id:waritohutsu:20150930013007p:plain

Java アプリケーションの作成

JSP ファイルが 3 個、Servlet が一つのシンプルな構成とする。特に解説はしないが、画面とサーブレットの関係が inde.jsp <- HomeServlet.jsp -> second.jsp かつ、third.jsp が独立している構成なことが理解いただけると思う。また、Application Insights へログ出力が必要な instrumentationKey 値は管理ポータルから取得すること。

<project xmlns="http://maven.apache.org/POM/4.0.0" xmlns:xsi="http://www.w3.org/2001/XMLSchema-instance"
	xsi:schemaLocation="http://maven.apache.org/POM/4.0.0 http://maven.apache.org/maven-v4_0_0.xsd">
	<modelVersion>4.0.0</modelVersion>
	<groupId>com.mydomain</groupId>
	<artifactId>AppInsightWebApp</artifactId>
	<packaging>war</packaging>
	<version>0.0.1-SNAPSHOT</version>
	<name>AppInsightWebApp Maven Webapp</name>
	<url>http://maven.apache.org</url>
	<dependencies>
		<dependency>
			<groupId>junit</groupId>
			<artifactId>junit</artifactId>
			<version>3.8.1</version>
			<scope>test</scope>
		</dependency>
		<dependency>
			<groupId>com.microsoft.azure</groupId>
			<artifactId>applicationinsights-web</artifactId>
			<version>1.0.1</version>
		</dependency>
		<dependency>
			<groupId>com.microsoft.azure</groupId>
			<artifactId>applicationinsights-core</artifactId>
			<version>1.0.1</version>
		</dependency>
		<dependency>
			<groupId>com.microsoft.azure</groupId>
			<artifactId>applicationinsights-logging-log4j2</artifactId>
			<version>1.0.1</version>
		</dependency>
		<dependency>
			<groupId>org.apache.logging.log4j</groupId>
			<artifactId>log4j-api</artifactId>
			<version>2.3</version>
		</dependency>
		<dependency>
			<groupId>org.apache.logging.log4j</groupId>
			<artifactId>log4j-core</artifactId>
			<version>2.3</version>
		</dependency>
		<dependency>
			<groupId>javax.servlet</groupId>
			<artifactId>javax.servlet-api</artifactId>
			<version>3.0.1</version>
			<scope>provided</scope>
		</dependency>
	</dependencies>
	<build>
		<finalName>AppInsightWebApp</finalName>
	</build>
</project>
package com.mydomain;

import java.io.IOException;

import javax.servlet.RequestDispatcher;
import javax.servlet.ServletException;
import javax.servlet.annotation.WebServlet;
import javax.servlet.http.HttpServlet;
import javax.servlet.http.HttpServletRequest;
import javax.servlet.http.HttpServletResponse;

@WebServlet("/home")
public class HomeServlet extends HttpServlet {
	private static final long serialVersionUID = 1L;

	protected void doGet(HttpServletRequest request,
			HttpServletResponse response) throws ServletException, IOException {

		String nextPage = request.getParameter("next");
		if (nextPage == null) {
			nextPage = "index.jsp";
		}

		RequestDispatcher dispatch = request.getRequestDispatcher("/"
				+ nextPage);
		dispatch.forward(request, response);
	}

	protected void doPost(HttpServletRequest request,
			HttpServletResponse response) throws ServletException, IOException {
		// TODO Auto-generated method stub
	}
}
<!DOCTYPE html>
<html lang="ja">
<head>
<meta charset="utf-8" />
<script type="text/javascript">
        var appInsights=window.appInsights||function(config){
            function r(config){t[config]=function(){var i=arguments;t.queue.push(function(){t[config].apply(t,i)})}}var t={config:config},u=document,e=window,o="script",s=u.createElement(o),i,f;for(s.src=config.url||"//az416426.vo.msecnd.net/scripts/a/ai.0.js",u.getElementsByTagName(o)[0].parentNode.appendChild(s),t.cookie=u.cookie,t.queue=[],i=["Event","Exception","Metric","PageView","Trace"];i.length;)r("track"+i.pop());return r("setAuthenticatedUserContext"),r("clearAuthenticatedUserContext"),config.disableExceptionTracking||(i="onerror",r("_"+i),f=e[i],e[i]=function(config,r,u,e,o){var s=f&&f(config,r,u,e,o);return s!==!0&&t["_"+i](config,r,u,e,o),s}),t
        }({
            instrumentationKey:"<my instrumentationKey>"
        });
        
        window.appInsights=appInsights;
        appInsights.trackPageView();
    </script>
<title>AppInsights-site index</title>
</head>
<body>
	<h2>Hello World! - index page</h2>
	<a href="<%=request.getContextPath()%>/home?next=second.jsp">next
		page</a>
</body>
</html>
<!DOCTYPE html>
<html lang="ja">
<head>
<meta charset="utf-8" />
<script type="text/javascript">
        var appInsights=window.appInsights||function(config){
            function r(config){t[config]=function(){var i=arguments;t.queue.push(function(){t[config].apply(t,i)})}}var t={config:config},u=document,e=window,o="script",s=u.createElement(o),i,f;for(s.src=config.url||"//az416426.vo.msecnd.net/scripts/a/ai.0.js",u.getElementsByTagName(o)[0].parentNode.appendChild(s),t.cookie=u.cookie,t.queue=[],i=["Event","Exception","Metric","PageView","Trace"];i.length;)r("track"+i.pop());return r("setAuthenticatedUserContext"),r("clearAuthenticatedUserContext"),config.disableExceptionTracking||(i="onerror",r("_"+i),f=e[i],e[i]=function(config,r,u,e,o){var s=f&&f(config,r,u,e,o);return s!==!0&&t["_"+i](config,r,u,e,o),s}),t
        }({
            instrumentationKey:"<my instrumentationKey>"
        });
        
        window.appInsights=appInsights;
        appInsights.trackPageView();
    </script>
<title>AppInsights-site second</title>
</head>
<body>
	<h2>Hello World!- second page</h2>
	<a href="<%=request.getContextPath()%>/home?next=index.jsp">next
		page</a>
</body>
</html>
<!DOCTYPE html>
<html lang="ja">
<head>
<meta charset="utf-8" />
<script type="text/javascript">
        var appInsights=window.appInsights||function(config){
            function r(config){t[config]=function(){var i=arguments;t.queue.push(function(){t[config].apply(t,i)})}}var t={config:config},u=document,e=window,o="script",s=u.createElement(o),i,f;for(s.src=config.url||"//az416426.vo.msecnd.net/scripts/a/ai.0.js",u.getElementsByTagName(o)[0].parentNode.appendChild(s),t.cookie=u.cookie,t.queue=[],i=["Event","Exception","Metric","PageView","Trace"];i.length;)r("track"+i.pop());return r("setAuthenticatedUserContext"),r("clearAuthenticatedUserContext"),config.disableExceptionTracking||(i="onerror",r("_"+i),f=e[i],e[i]=function(config,r,u,e,o){var s=f&&f(config,r,u,e,o);return s!==!0&&t["_"+i](config,r,u,e,o),s}),t
        }({
            instrumentationKey:"<my instrumentationKey>"
        });
        
        window.appInsights=appInsights;
        appInsights.trackPageView();
    </script>
<title>AppInsights-site third@@@@@@</title>
</head>
<body>
	<h2>Hello World!- third page</h2>
</body>
</html>

次に、上記のアプリケーションを作成後、Tomcat 等で Web アプリケーションを起動する。

ログ出力の確認

起動した Web アプリケーションにブラウザ経由でアクセスすると、Application Insights へのログ出力が成功していれば以下のように管理ポータルからログが閲覧可能だ。
f:id:waritohutsu:20150930013020p:plain

更に、連続エクスポートが正常に行われている場合、blob container に以下の様にファイルが出力されているはずだ。今回は このうちの PageViews をターゲットとする。
f:id:waritohutsu:20150930013030p:plain

Stream Analytics でログを整形し、Power BI に出力する

Application Insights データの Power BI ビュー を参照いただければ問題ないと思うが、Stream Analytics の新規インスタンスを作成して以下の設定を行う。

  • 入力として BLOB ストレージを選択
  • 出力先として Power BI を選択
  • Stream Analytics のクエリを作成

上記で Stream Analytics の入出力設定は特に問題ないと思うが、Stream Analytics のクエリがドキュメントではうまく動かなかった( A.[view] 部分が間違っていた程度だが )ので以下を参考にしてほしい。

    SELECT
      flat.ArrayValue.name,
      count(*)
    INTO
      [pbi-output]
    FROM
      [export-input] A
    OUTER APPLY GetElements(A.[view]) as flat
    GROUP BY TumblingWindow(minute, 1), flat.ArrayValue.name

上記のクエリは以下の様な形式で BLOB に格納されているデータは以下のような URL でファイルを作成されログ出力される。

  • https://<アカウント名>.blob.core.windows.net/appinsightslog/forpowerbiappinsights_581bb4f68f56476c9c3ce13eca62c0f4/PageViews/2015-09-29/10/c565d13c-b5f9-42f4-b9eb-a82e05fa6695_20150929_100813.blob

ファイルの中身は以下となるが、上記のクエリは「"name": "AppInsights-site index"」における値を抜き出すクエリになっている。詳細は参考のリンク先における Stream Analytics のクエリを参考にしてほしい。

{
  "view": [
    {
      "urlData": {
        "port": 8080,
        "host": "localhost",
        "protocol": "http",
        "base": "/AppInsightWebApp/",
        "queryParameters": [ ],
        "hashTag": ""
      },
      "name": "AppInsights-site index",
      "count": 1,
      "durationMetric": {
        "value": 5980000.0,
        "count": 1.0,
        "sampledValue": 5980000.0
      },
      "url": "http://localhost:8080/AppInsightWebApp/"
    }
  ],
  "internal": {
    "data": {
      "id": "<my id>",
      "documentVersion": "1.6"
    }
  },
  "context": {
    "device": {
  <中略>
Power BI で閲覧

次に powerbi.microsoft.com へアクセスし、Stream Analytics の出力で設定した宛先を確認する。正常に Stream Analytics が動作していれば、以下の画面の様に「Stream Analytics の出力で設定した宛先」の箇所が追加されているので、こちらを操作して任意のグラフを作成できる。
f:id:waritohutsu:20150930015927p:plain

上記のように、Application Insights と Power BI を利用することで、容易に画面毎のアクセス数が確認できるビューを作成できることが分かった。もちろん Stream Analytics のクエリを変更することで任意の情報を Power BI 側に表示することが可能になる。