normalian blog

Let's talk about Microsoft Azure, ASP.NET and Java!

Quick introduction for portal sites of Microsoft Azure

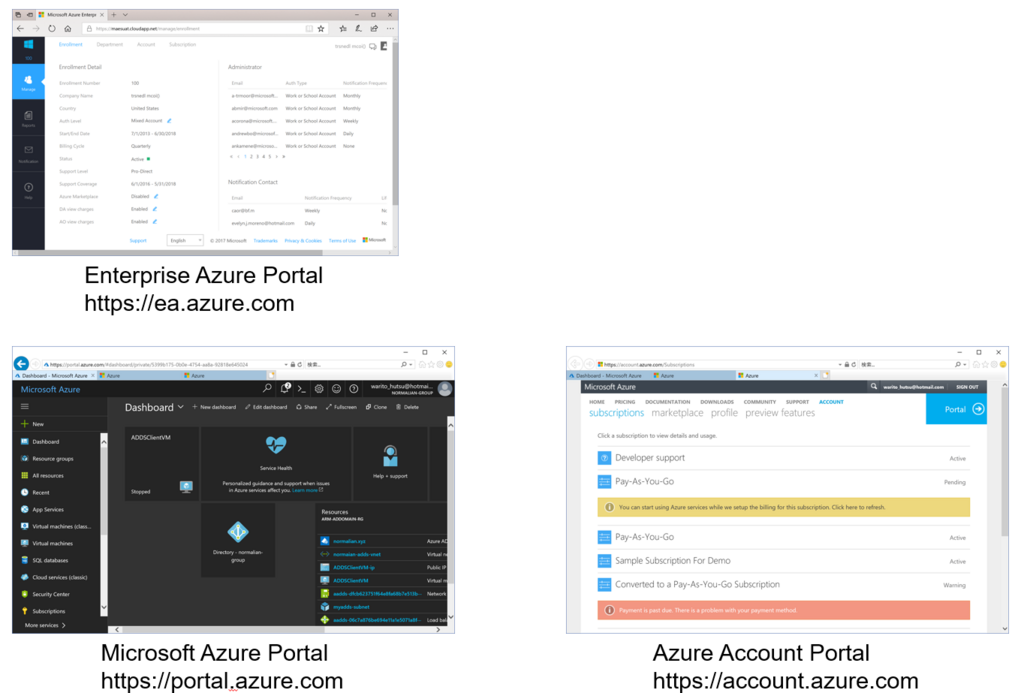
Do you know how many portal sites Microsoft Azure has? Almost all users access only "Microsoft Azure Portal". "Microsoft Azure Portal" manages all Azure resources such like VMs, App Service, SQL Database and others. In addition the portal site, Microsoft Azure also offers two other different portal sites as "Enterprise Azure Portal" and "Azure Account Portal".

  • "Enterprise Azure Portal" manages Azure subscriptions, subscription administrators and billing reports. This portal is mainly used by billing administrator in your company.
  • "Azure Account Portal" manages all Azure resources. This portal is mainly used by developers.
  • "Microsoft Azure Portal" is mainly used for create, transfer, cancel subscriptions. This portal is mainly used by developers.

f:id:waritohutsu:20171231160454p:plain

You don't need to use "Enterprise Azure Portal" if there are no EA contract with Microsoft in your company. Almost all users who use only "Pay-As-You-Go" Azure subscriptions need to use only "Azure Account Portal" and "Microsoft Azure Portal".

Enable to access Azure subscriptions across Azure AD tenants

All Azure subscriptions are associated to an Azure AD tenant. As you know, you can use some different Azure AD tenants like below. This sometimes causes some issues, but you can learn how to use these features properly though this post.
f:id:waritohutsu:20171229161730p:plain:w200
Azure AD also manages your "School or Work Account" in your organization. You have to choose account type whether "School or Work Account" or "Microsoft Account"/"Personal Account" when you login Azure. This account types can express simply like below.

  • "Microsoft Account" and "Personal Account" are technically same, and they are managed by Microsoft services. They were called "LIVE ID" in past.
  • "School or Work Account" is managed by your own Azure AD tenant such like "xxxxx.onmicrosoft.com", and you can assign custom domain name for your tenant as "contoso.com" and others.

As far as I have tried, it's easy to access subscriptions across Azure AD tenants using "Microsoft Account". But almost all companies use "School or Work Account" for governance perspective. Because "Microsoft Account"s are managed by Microsoft, so it's difficult to enable or disable their accounts immediately.
It's needed to invite other Azure AD tenant users into your Azure AD tenant when you want to grant other Azure AD tenant users to access your subscriptions associated with your Azure AD tenant.

How to enable to access subscriptions from other Azure AD tenant users

There are two steps to grant your subscriptions to other Azure AD tenant users.

  1. Invite the users into your Azure AD tenant
  2. Assign IAM roles

Invite the users into your Azure AD tenant

Refer Inviting Microsoft Account users to your Azure AD-secured VSTS tenant | siliconvalve or follow below steps.

  1. Login to portal.azure.com
  2. Login with your Global Admin credentials of your AD tenant
  3. Go to Azure Active Directory option on the blade
  4. In the next blade you will find an option of “user setting”
  5. Under “User setting” kindly check the option “admin and users in guest inviter role can invite”
  6. The option “admin and users in guest inviter role can invite” should be yes
  7. After that, go to users and groups in the same blade and click on “all users”
  8. Under all users, you will see the option “New guest user”
  9. After clicking on that, you can invite the user of other AD tenants.
  10. Once the user will accept the invitation, you can give access to the resource under the subscription of your AD tenant.

How to change AAD tenant associated to your subscriptions

You have already known how to create your own AAD tenant, but it sometimes causes some issues. As you know, all Azure subscriptions should be associated to an AAD tenant. You should change the AAD tenant of your subscriptions when you create new AAD tenant. You can learn how to change AAD tenant associated to your subscriptions in this post.

Step by step how to change AAD tenant in Azure portal

Choose your subscription need to change AAD tenant and click "Change directory" button like below.
f:id:waritohutsu:20171229163802p:plain

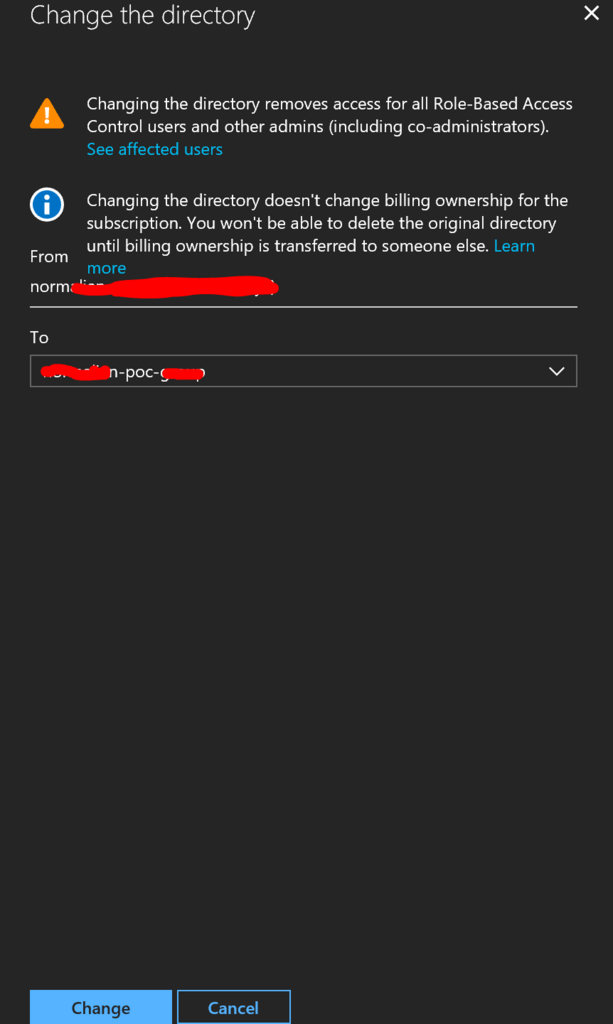
Choose your new AAD tenant should be associated your subscription.
f:id:waritohutsu:20171229163910p:plain

You can check its completion with portal notification like below, but it needed a few minutes to reflect into portal in my case. Please wait without hurry.
f:id:waritohutsu:20171229163958p:plain

How to create your own Azure Active Directory tenant

You sometimes want to create own tenant when you try to use Azure AD authentication or "School or Work Accounts" independently with your organization Azure AD tenant. Especially, you will really want to create it when you will be in charge of some PoC using Microsoft Azure. You can learn how to create your own Azure Active Directory tenant in this post.

Step by step to create new tenant in Azure portal

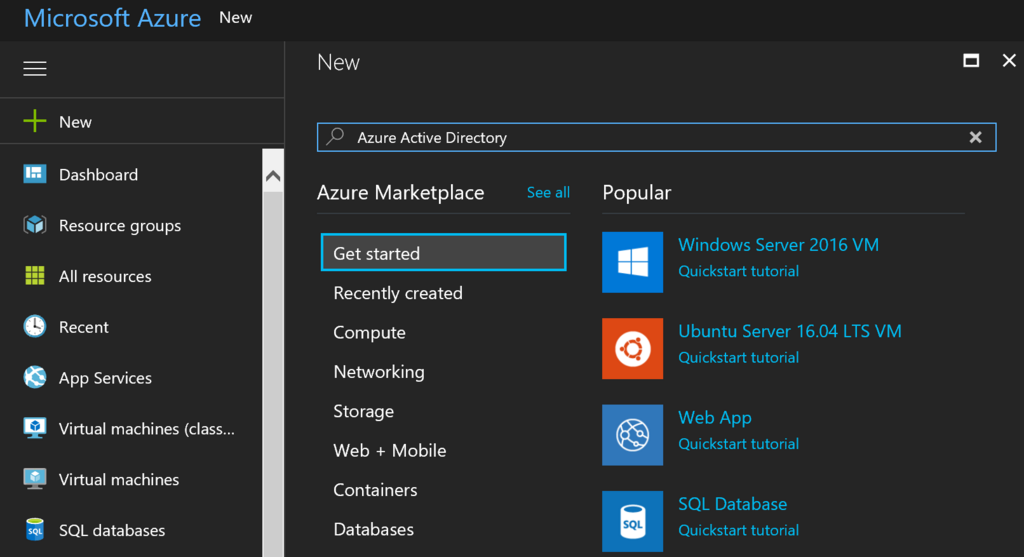
Please click "+ New" button in left side of Azure portal and input "Azure Active Directory" like below.
f:id:waritohutsu:20171229161418p:plain

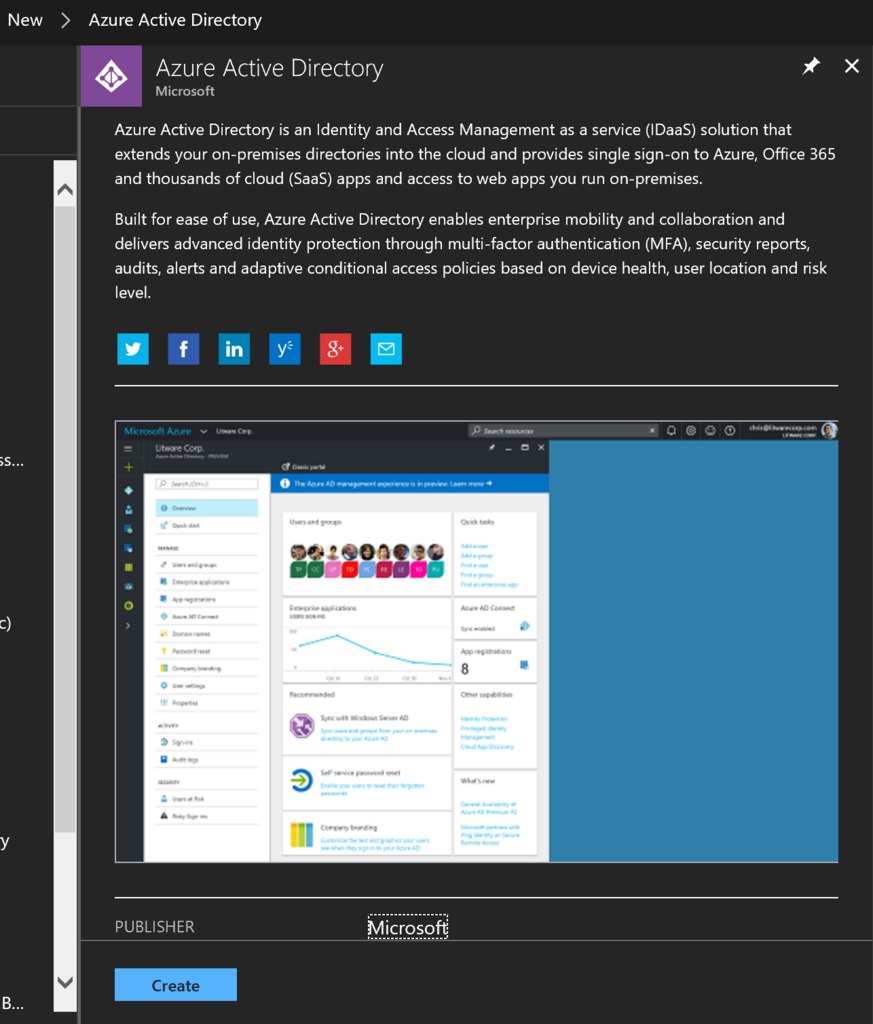
You can find "Azure Active Directory" by Microsoft like below, and please click "Create" button.
f:id:waritohutsu:20171229161529p:plain

Input your organization name and domain name, equal "tenant name", and choose your region.
f:id:waritohutsu:20171229161628p:plain

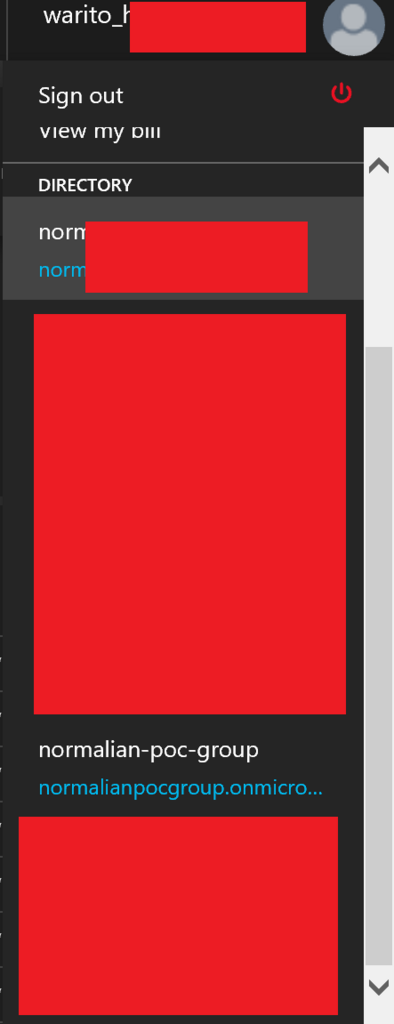
After a few minutes later, you can find your new tenant from upper-right like below.
f:id:waritohutsu:20171229161730p:plain

How to deploy your Azure Functions with VSTS when your project has multiple solutions

This article introduces how to deploy your Azure Functions with VSTS when your projects have multiple solutions like below. Please refer GitHub - AzureFunctions-CSharp-Sample if you need Azure Functions sample.

Your-Sample-Project
└─Trunk
    ├─HttpDemoFunctionApp
  └─JobDemoFunctionApp
        └─JobDemoFunctionApp

How to setup this build process

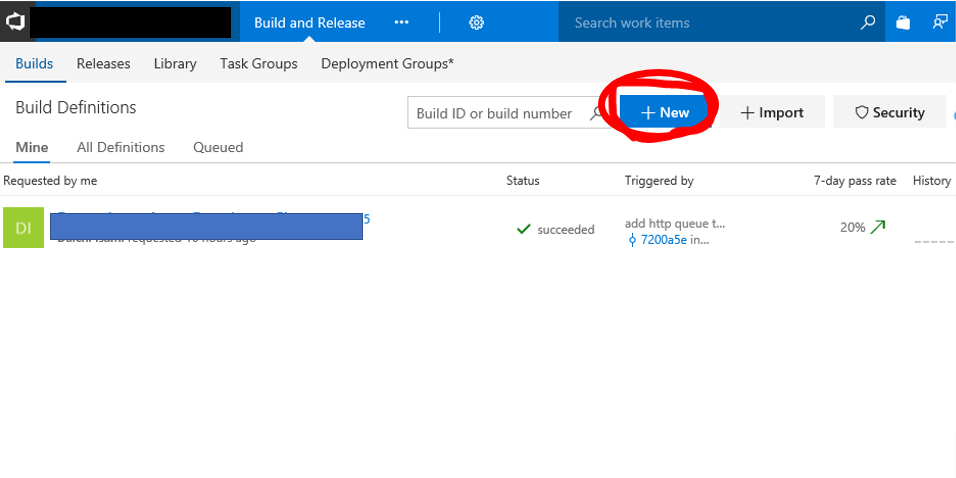
Open "Build and Release" tab in your VSTS project, and click "+New" button like below.
f:id:waritohutsu:20171031021259p:plain

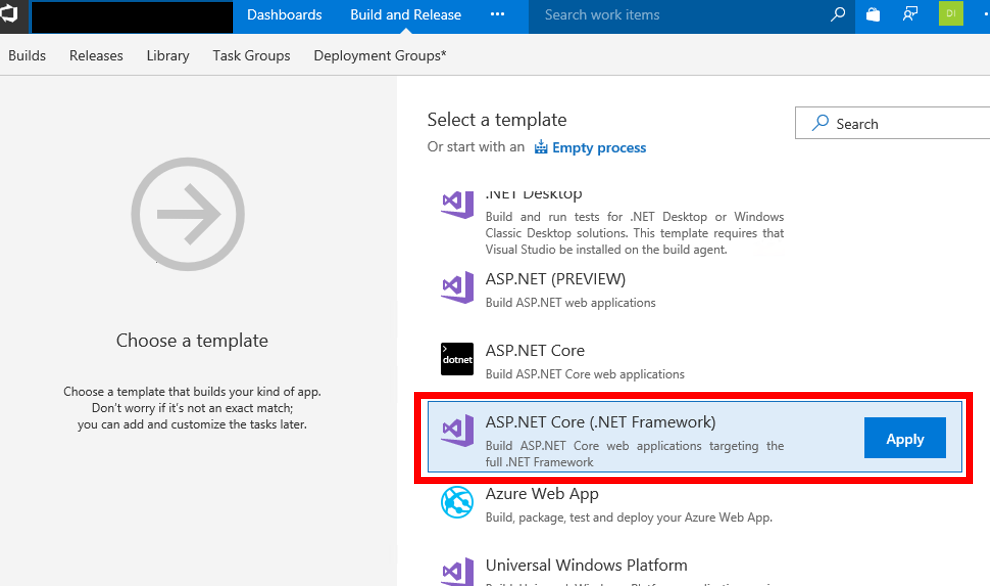
Choose "ASP.NET Core (.NET Framework)" template like below.
f:id:waritohutsu:20171031021310p:plain

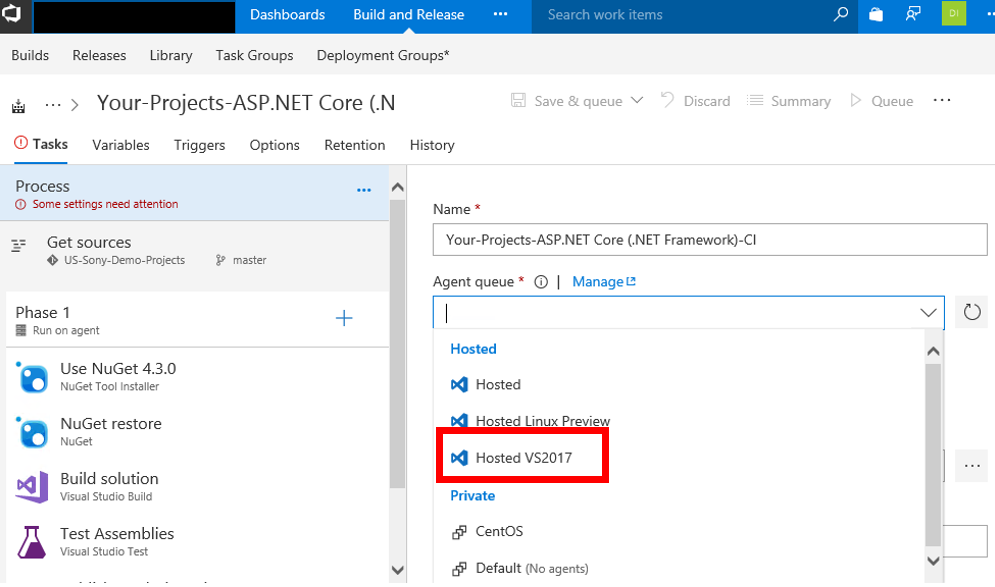
After creating a process, choose"Hosted VS2017" as "Agent queue". You will get error when you run this process if you choose other Agents.
f:id:waritohutsu:20171031021324p:plain

Choose your Azure Functions solution to deploy like below.
f:id:waritohutsu:20171031021341p:plain

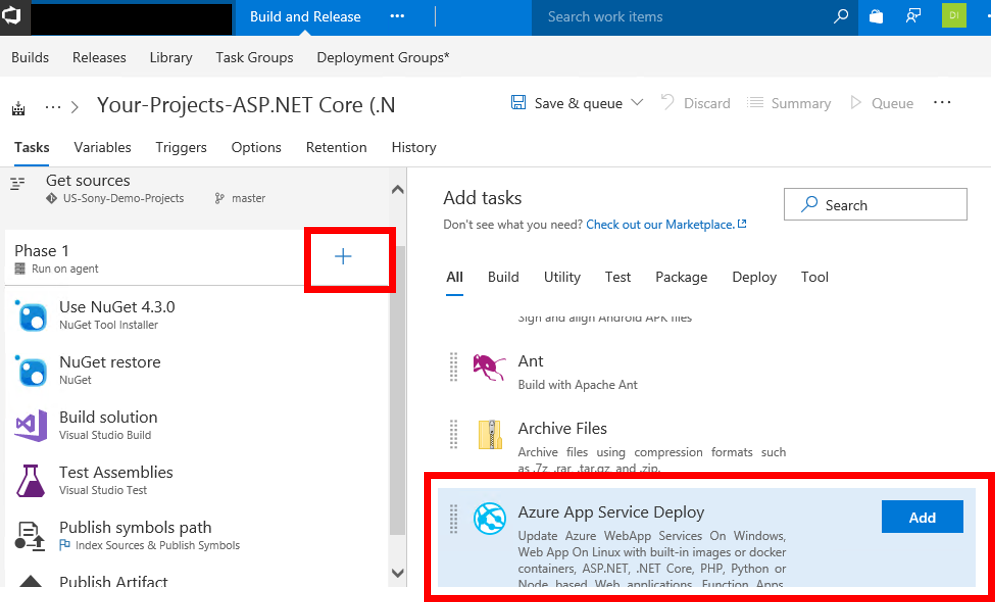
Add "Azure App Service Deploy" task like below.
f:id:waritohutsu:20171031021354p:plain

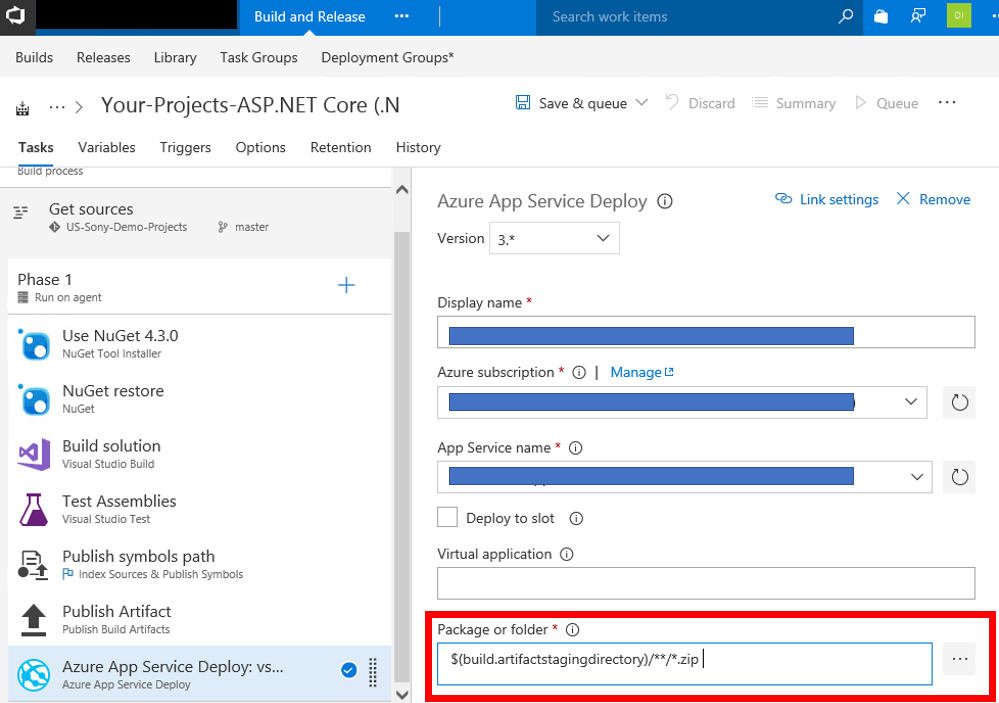
After adding the task, choose your Azure Functions and change "Package or folder" from "$(System.DefaultWorkingDirectory)/**/*.zip" to "$(build.artifactstagingdirectory)/**/*.zip".
f:id:waritohutsu:20171031021405p:plain

Tips

I got below error when I chose "Hosted" as "Agent queue", because the process failed to build my application. The cause was MSBuild didn't support Azure Functions application right now.

Got connection details for Azure App Service:'xxxxfunctionapp'

Error: No package found with specified pattern

How to create Hive tables via Ambari on Microsoft Azure HDInsight

As you know, HDInsight is powerful service to analyze, manage and process BigData on Microsoft Azure. You can create Hadoop, Storm, Spark and other clusters pretty easily! In this article, I will introduce how to create Hive tables via Ambari with cvs files stored in Azure Storage.
At first, you have to create your HDInsight cluster associated an Azure Storage account. In this article, I create a Spark 2.1.x cluster as HDInsight cluster.

Store CSV files into your Azure Storage

Upload your CSV files into the Azure Storage account. In this article, I upload Nikkei Average CSV file like below.

DATE,CLOSE,START,HIGH,LOW
2012/1/5,8488.71,8515.66,8519.16,8481.83
2012/1/6,8390.35,8488.98,8488.98,8349.33
2012/1/10,8422.26,8422.99,8450.59,8405.18
2012/1/11,8447.88,8440.96,8463.72,8426.03
2012/1/12,8385.59,8423.1,8426.83,8360.33
2012/1/13,8500.02,8471.1,8509.76,8458.68
2012/1/16,8378.36,8409.79,8409.79,8352.23
2012/1/17,8466.4,8420.12,8475.66,8413.22
2012/1/18,8550.58,8458.29,8595.78,8446.09
2012/1/19,8639.68,8596.68,8668.94,8596.68
2012/1/20,8766.36,8751.18,8791.39,8725.32
2012/1/23,8765.9,8753.91,8795.27,8744.54
2012/1/24,8785.33,8815.36,8825.09,8768.51
2012/1/25,8883.69,8842.01,8911.62,8816.09
2012/1/26,8849.47,8890.49,8894.6,8834.93
2012/1/27,8841.22,8851.02,8886.02,8810.89
2012/1/30,8793.05,8803.79,8832.48,8774.23
2012/1/31,8802.51,8781.44,8836.68,8776.65

It's stored into Azure Storage account associated with HDInsight cluster, and its path is described as "https://"storage-account-name"."spark-container-name".blob.core.windows.net/financedata/nikkei_stock_average_daily_en.csv". You can specify the path in Hive query as "wasb://"spark-container-name"@"storage-account-name".blob.core.windows.net/financedata/nikkei_stock_average_daily_en.csv".

Create Hive tables from your CSV files

Open https://portal.azure.com/ and choose your HDInsight cluster. You can open Ambari portal to click a link of "https://'your-cluster-name'.azurehdinsight.net" in "Overview" page. Next, click "Hive View 2.0" button like below.
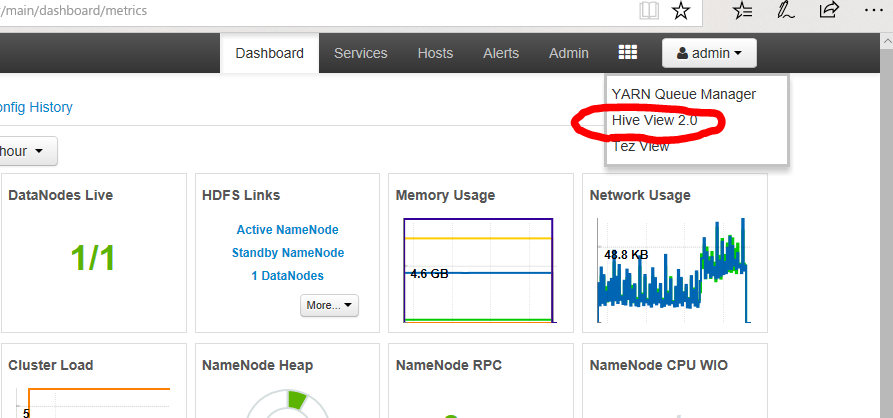
f:id:waritohutsu:20171002124722p:plain

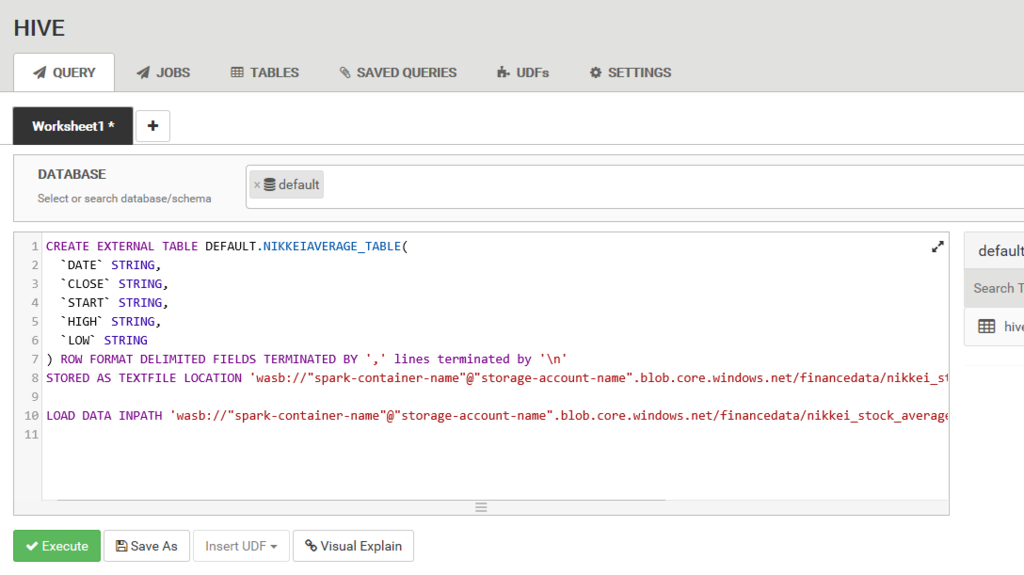
Now, you can execute Hive query using below portal site.
f:id:waritohutsu:20171002124752p:plain
Copy below query and execute it into the site.

CREATE EXTERNAL TABLE DEFAULT.NIKKEIAVERAGE_TABLE(
  `DATE` STRING,
  `CLOSE` STRING,
  `START` STRING,
  `HIGH` STRING,
  `LOW` STRING
) ROW FORMAT DELIMITED FIELDS TERMINATED BY ',' lines terminated by '\n'
STORED AS TEXTFILE LOCATION 'wasb://"spark-container-name"@"storage-account-name".blob.core.windows.net/financedata/nikkei_stock_average_daily_en.csv';

LOAD DATA INPATH 'wasb://"spark-container-name"@"storage-account-name".blob.core.windows.net/financedata/nikkei_stock_average_daily_en.csv' INTO TABLE DEFAULT.NIKKEIAVERAGE_TABLE;

Check your query result

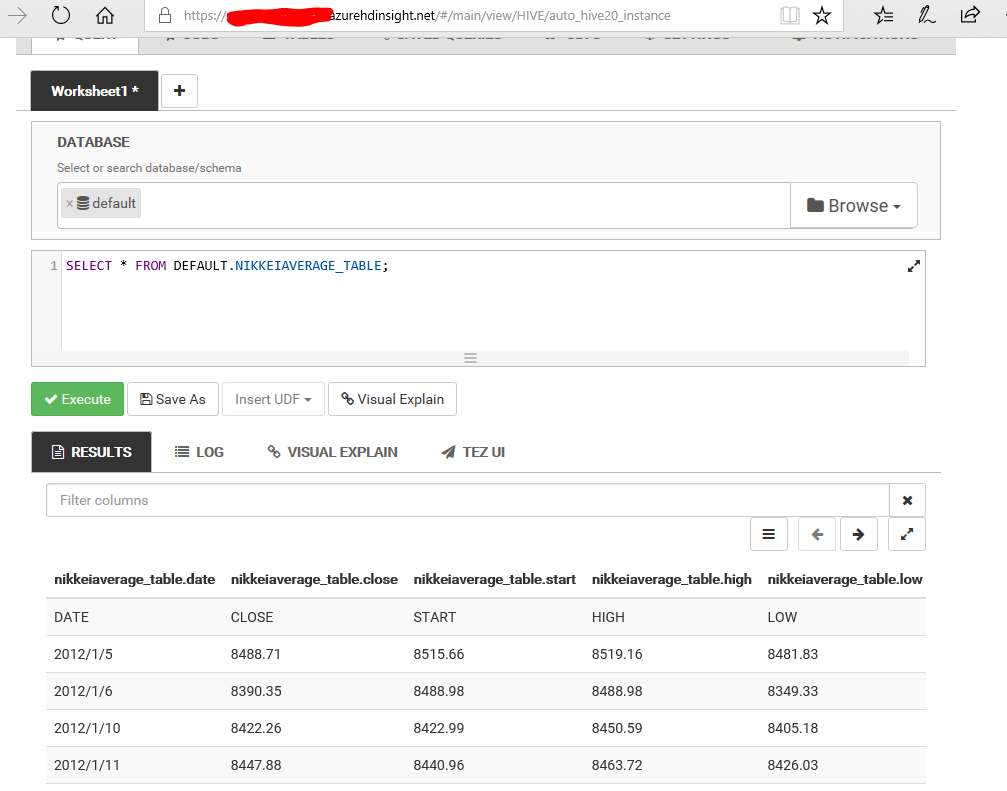
After executing your query, run below query to check the data in Ambari.

SELECT * FROM DEFAULT.NIKKEIAVERAGE_TABLE;

So, you can get below result.
f:id:waritohutsu:20171002150636p:plain

ロサンゼルス生活日誌 ~その4 米国でのインターネット開通~

ご無沙汰してますがこんにちは。実は私が一番苦労した米国でのインターネット開設の流れを紹介したいと思います。日本だったりすれば KDDI か NTT 東西 辺りに頼めば大きな問題になることはないイメージですが、米国では相当の企業がどこかを知らなかったのが大きな敗因でした。この辺の苦労と米国特有の板挟みの経由を紹介したいと思います。

インターネット開設のために辿った流れ

まずは私が今回インターネット開通までにたどった流れを紹介します。具体的には以下の様な流れになりましたが、結局 CONSOLIDATE SMART SYSTEM → Spectrum → DIRECTVAT&T → CONSOLIDATE SMART SYSTEMというループをしてます。このたらい回しは non native speaker にはなかなか辛かったっす。。。。

  1. 居住が決まったアパートから勧められた CONSOLIDATED SMART SYSTEM に連絡したが、電話越しにクレジットカード番号の提示を求められ「契約ごとは文章が無いと信用できないからメールで文章よこせ」と突っぱねたにも拘わらず電話でしか連絡が来ないので放置する
    • DIRECTV という有名なプロバイダの Authorized Partner とチラシに書かれていたもののいまいち信用できず
    • 周辺の知人にも「いきなりクレジットカード番号を要求する様なところは辞めた方が良い」と言われて却下
  2. 近所に Spectrum のオフィスがあることが分かったので直接訪問してインターネット契約をお願いしてみるが「お前の住んでるところはサポートしてない」と言われる。「CONSOLIDATED SMART SYSTEM ってところを勧められたがクレジットカード番号を電話越しに聞かれたから信用できない」と答えたところ「DIRECTVへ直に連絡した方がよい」と言われる
  3. DIRECTV へ直接連絡したら「お前の住んでいる場所だとインターネット契約は AT&T を使っているから直接連絡しろ」とたらい回し。DIRECTV は後述の AT&T の様にチャットでのQ&Aサービスがあったのでその点は楽だった。どうやらそもそも DIRECTV はプロバイダ相当らしく、インターネット回線自体は提供できない模様。
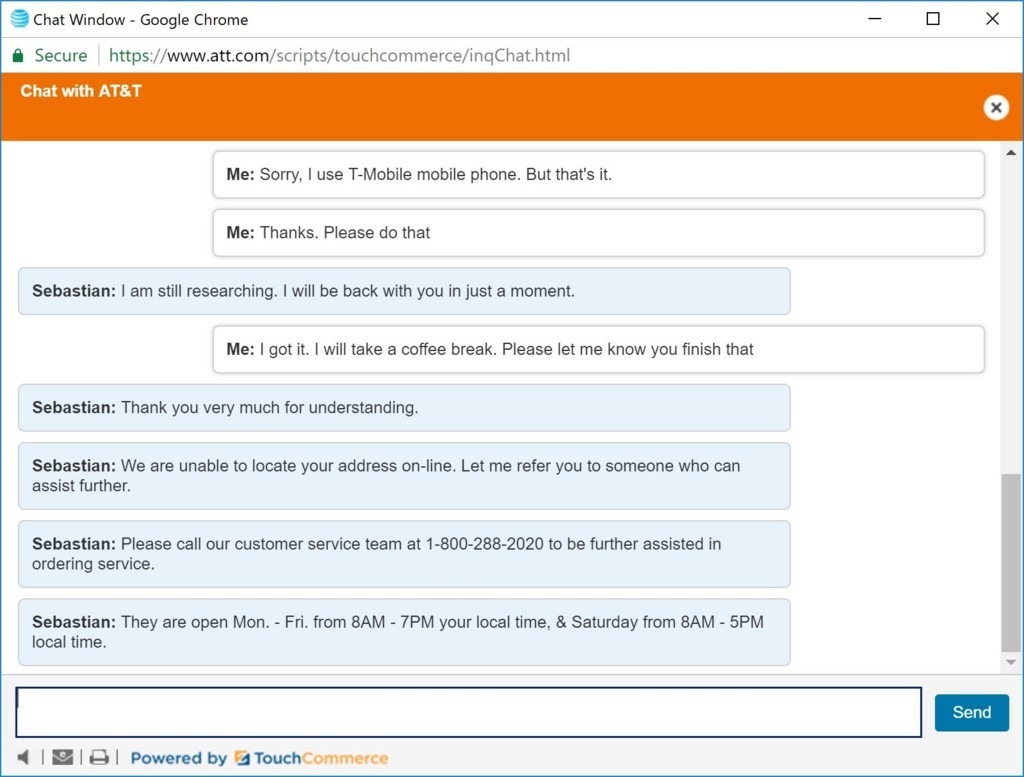
  4. AT&T のチャットサービスに以下の様に聞いたところ「お前の住んでるところはよく分からんから直接電話窓口に連絡しろ」と言われる。これまたチャットで話せるのはまだ大分マシ f:id:waritohutsu:20171002085452j:plain
  5. AT&T の窓口に連絡したところ「DIRECTV の契約が無いと紹介できないサービスだ」と言われ、仕方なく DIRECTV の契約を行う
  6. AT&TDIRECTV 契約者専用窓口に電話したところ長々と個人情報とクレジットカード番号を聞かれる。AT&T だからまぁ仕方あるまいとクレジットカード番号を伝えたところ、最終的に「どこでも良いから AT&T の実店舗に行ってID(身分証明書)を見せろ」と言われる
  7. 最寄りの AT&T 実店舗に行ったところ「そんなサービスを聞いたことが無い」と言われ契約が成立せず。「俺はこの電話口の相手と契約の話を進めたのにどっちかが嘘言ってんのか?」位をプッシュしても相手微動だにせず。しかも再度電話をかけたら窓口の相手が変わっており話が進まず。最終的に「契約できねぇのは分かったんだけど、DIRECTVは要らないから解約させろ」という点だけ聞き、DIRECTV の解約だけして帰宅
  8. 最終的に選択子が無かったので CONSOLIDATED SMART SYSTEM に連絡し電話口でクレジットカード番号を仕方なしに伝える。一週間程度でインターネットが開通\(^o^)/

上記を踏まえてインターネット開設時の反省

どうも住んでいる場所によって「おススメのインターネット会社」のレベルでなく「そもそも契約できるインターネット会社」が違うようです。私のヒアリング力だと解釈しきれなかったのですが、話を聞くと「お前の住んでるアパートでは一括で Home Association 契約が存在しているので個別契約はできない」という旨を言われて AT&T からは契約を拒否されました\(^o^)/
米国では一軒家レンタルが一般的なので、一軒家レンタルをする場合は個別契約でよいと思いますが、私の様にアパートの場合は住んでる方や Leasing Office(アパートの管理事務所相当)のおススメに素直に従った方が楽だと思います。
また、クレジットカードも実際に銀行口座から引かれるまでに「これ身に覚えないから請求止めて」と連絡することが可能だったりします。その点でも契約はフットワークが軽くても良かったかもしれません。

インターネット開通前までは T-Mobile 携帯のテザリングを利用してインターネットを利用していたのでえらい回線が遅かったです。しかし、仮にインターネット契約が遅れたとしても、スターバックスや Coffee Beans 等々のカフェでインターネットを気軽に使えるのが米国の良いところです(正直、米国でノマドが流行るわけが分かった気が。。。)。

最後に ~米国での契約について~

米国での契約はマジで注意しましょう。「よく分からないけどサインする」は完全に却下です。契約書にサインした時点で契約に完全に同意したとみなされます。どんなに理不尽な内容であったとしても、この時点でもう誰も助けられないし誰も助けてくれません。日本と違って「普通このくらい~」の「普通」という概念は米国には無いと思って契約を見ないと痛い目に見かねないので契約書を見るときには細心の注意を払いましょう。契約については以下のスタンスで行くと痛い目をみにくいと思います。