normalian blog

Let's talk about Microsoft Azure, ASP.NET and Java!

Step by step how to setup Service Fabric Explorer on Azure

This article introduce how to setup the environment on Azure. Service Fabric offers Microservices and containerized architecture on Microsoft Azure, and it's secure with multiple certificates for the clusters.

  • Create Key Vault
  • Create Service Fabric
  • Create Certificate and install into your computer
  • Register your certificate into your Service Fabric
  • Access Service Fabric Explorer

Create Key Vault

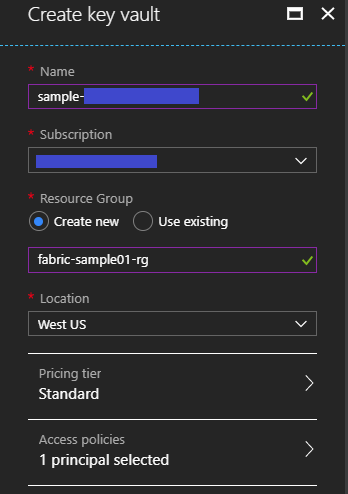
You need to setup a "Key vault" instance like below and it's OK to use existing one if you have already your "Key vault" instance, because Service Fabric depends on Key Vault
f:id:waritohutsu:20180209081056p:plain

Create Service Fabric

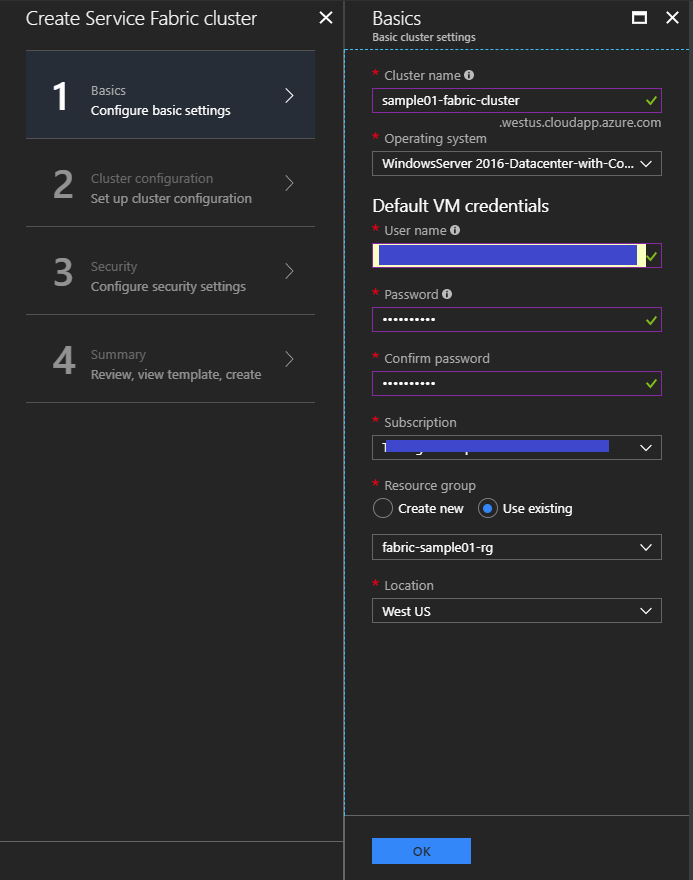
Create your Service Fabric cluster following below steps. You need to choose "Operating system" adjusting to your applications.
f:id:waritohutsu:20180209081308p:plain

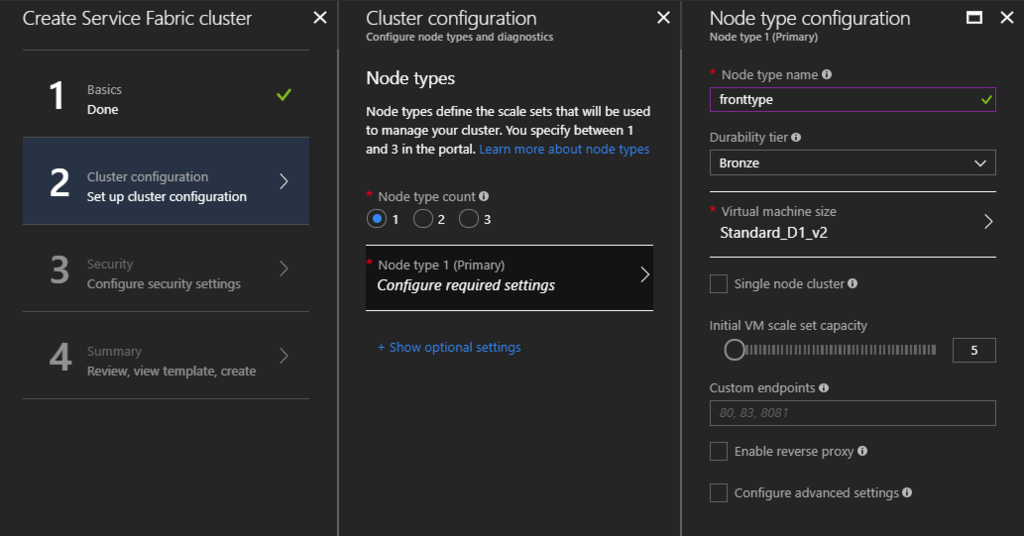
"Node types" is similar with "Cloud Service Roles". VM Scale sets will be created as a number of "Node type count", and specify your "Node type name" and instance type for your "Node Type".
f:id:waritohutsu:20180209081443p:plain

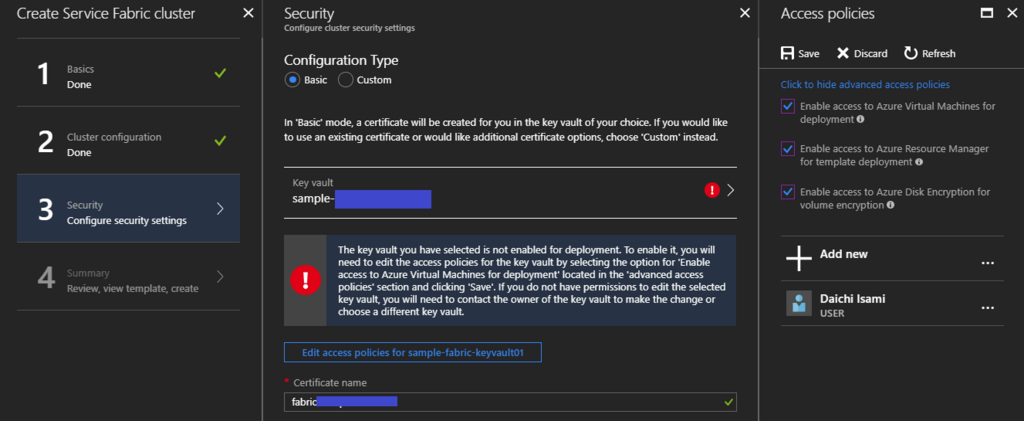
Setup up your cluster security. Please note "Click to hide advanced access policies" at first, and add "Enable access ..." as your Access policies on your Key Vault instance, because it's mandatory to setup. Input your "Certificate name" for your internal cluster communication.
f:id:waritohutsu:20180209081534p:plain

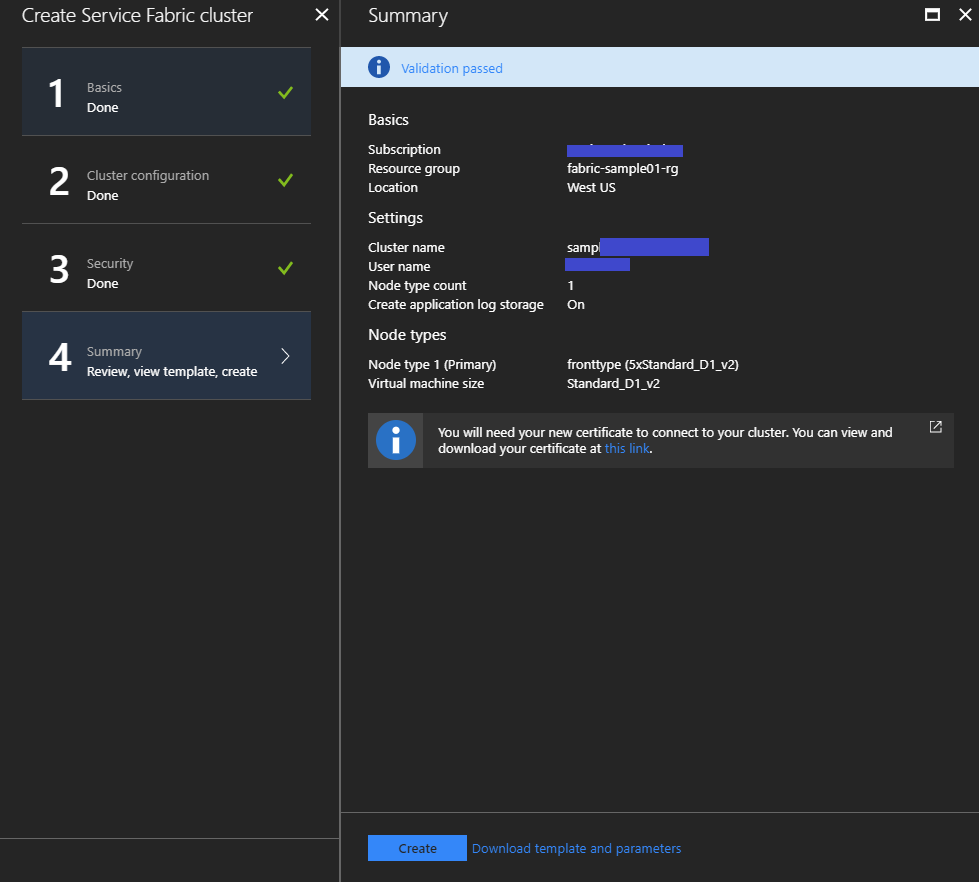
Verify your cluster info and execute to create it.
f:id:waritohutsu:20180209081803p:plain

Create Certificate and install into your computer

You need to create and register new certificate to communicate between your client machine and your cluster. At first, execute below command to create new certificate and you need to input some passwords for the certificates.

# I tried "C:\Program Files (x86)\Windows Kits\10\bin\10.0.16299.0\x64\makecert and PVK2PFX", but its path depends on your computer platform
makecert -sv yourprivatekeyfile.pvk -n "CN=Daichi Isami" yourcertfile.cer -b 02/14/2018 -e 12/31/2020 -r
PVK2PFX -pvk yourprivatekeyfile.pvk -spc yourcertfile.cer -pfx yourpfxfile.pfx -po <your password>

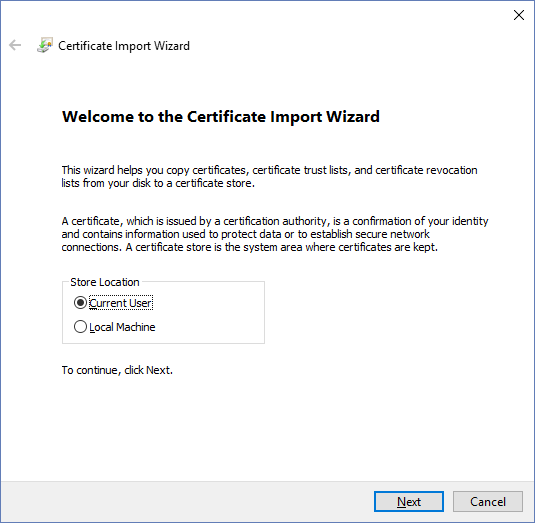
After creating your certificate, just double click it and install certificate into your compute with clicking below button. you need to input password when you create this certificate.
f:id:waritohutsu:20180216070141p:plain

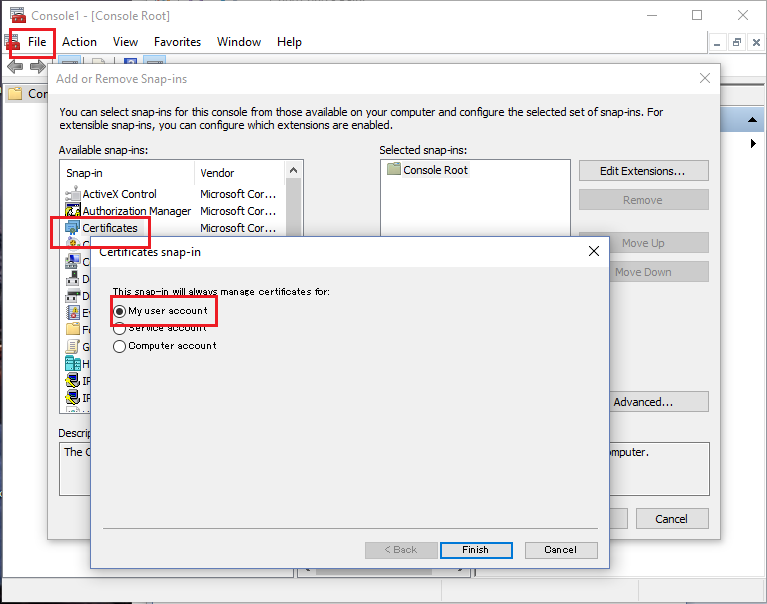
Next, execute "mmc" on PowerShell. Choose "File" -> "Add/Remove Snap-in..." and add "Certificates" as "My user account" like below.
f:id:waritohutsu:20180216070515p:plain

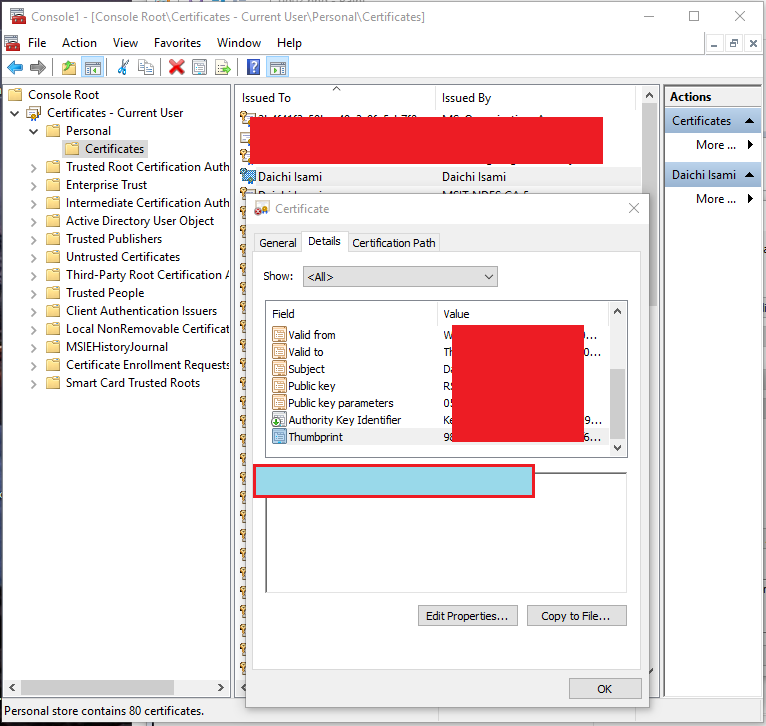
Choose "Certificates - Current User" -> "Personal" in left side and chose your certificate among certificates in central box. Now, you can pick up "Thumbprint" of you certificate like below.
f:id:waritohutsu:20180216070951p:plain

Register your certificate into your Service Fabric

Before proceed this step, you need to confirm your cluster status as "Ready". It might wait more than 20 minute. You might get “failed to submit updates for certificate” error if you proceed this step before that.
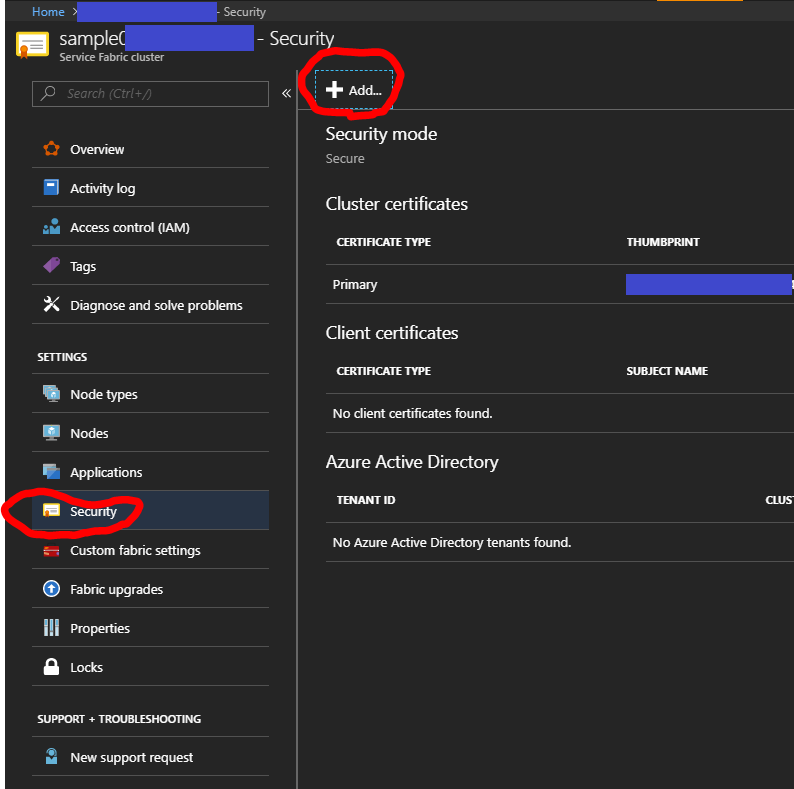
Register your certificate into your Service Fabric cluster in Azure Portal. Choose "Security" tab and "Add.." button.
f:id:waritohutsu:20180209082342p:plain

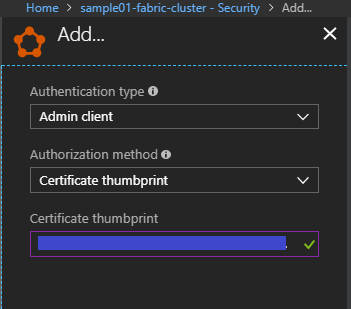
Select "Authentication type" as Admin client to deploy and upgrade your cluster. Input your saved thumbprint into "Certificate thumbprint" and save it.
f:id:waritohutsu:20180209083110p:plain

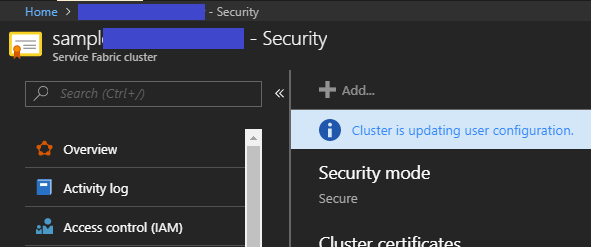
After this, it takes about 30 minutes to complete this step.
f:id:waritohutsu:20180209083121p:plain

Access Service Fabric Explorer

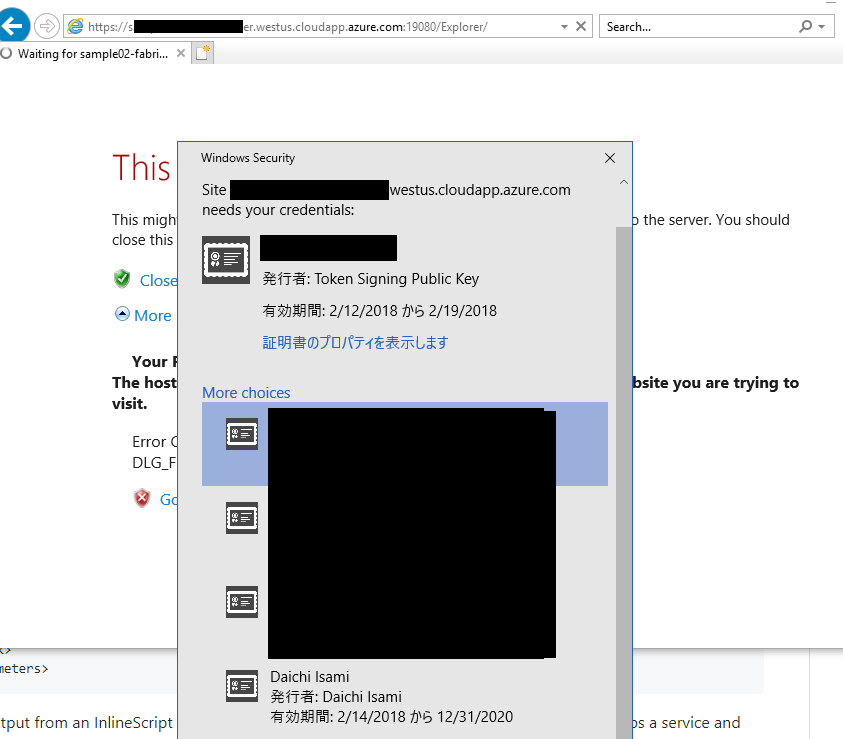
Access Service Fabric Explorer URL like https://"your cluster name"."your region".cloudapp.azure.com:19080/Explorer/index.html#/, and choose proper certificate installed into your compute.
f:id:waritohutsu:20180216072725p:plain

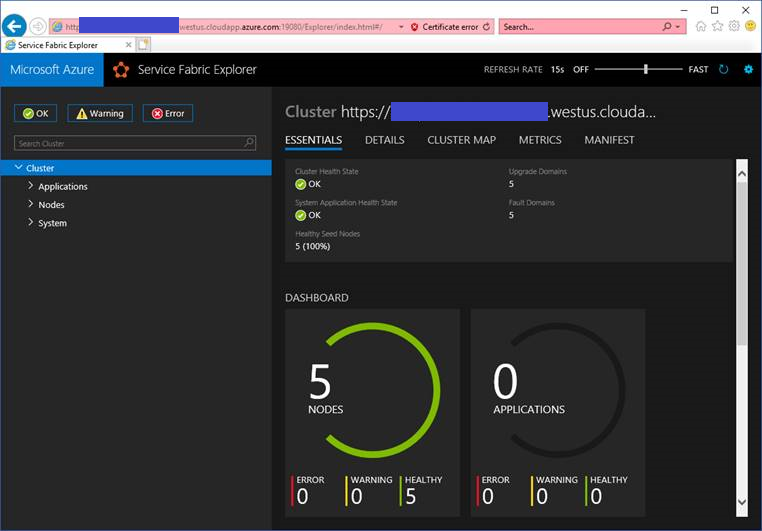
You can watch Service Fabric Explorer on your cluster
f:id:waritohutsu:20180209083302p:plain

Quick introduction for portal sites of Microsoft Azure

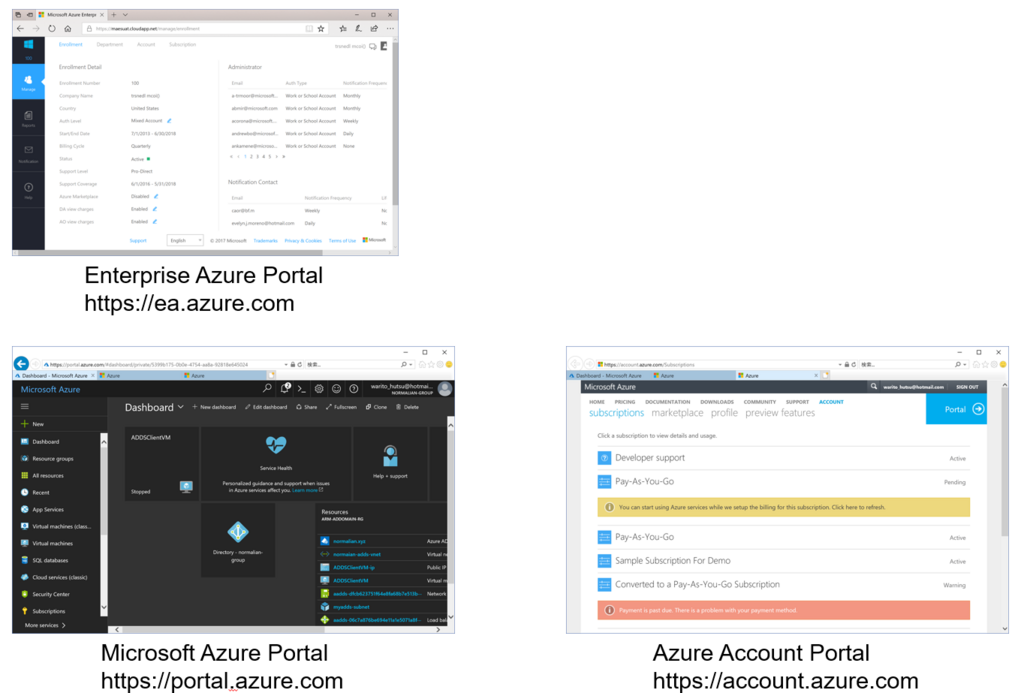
Do you know how many portal sites Microsoft Azure has? Almost all users access only "Microsoft Azure Portal". "Microsoft Azure Portal" manages all Azure resources such like VMs, App Service, SQL Database and others. In addition the portal site, Microsoft Azure also offers two other different portal sites as "Enterprise Azure Portal" and "Azure Account Portal".

  • "Enterprise Azure Portal" manages Azure subscriptions, subscription administrators and billing reports. This portal is mainly used by billing administrator in your company.
  • "Azure Account Portal" manages all Azure resources. This portal is mainly used by developers.
  • "Microsoft Azure Portal" is mainly used for create, transfer, cancel subscriptions. This portal is mainly used by developers.

f:id:waritohutsu:20171231160454p:plain

You don't need to use "Enterprise Azure Portal" if there are no EA contract with Microsoft in your company. Almost all users who use only "Pay-As-You-Go" Azure subscriptions need to use only "Azure Account Portal" and "Microsoft Azure Portal".

Enable to access Azure subscriptions across Azure AD tenants

All Azure subscriptions are associated to an Azure AD tenant. As you know, you can use some different Azure AD tenants like below. This sometimes causes some issues, but you can learn how to use these features properly though this post.
f:id:waritohutsu:20171229161730p:plain:w200
Azure AD also manages your "School or Work Account" in your organization. You have to choose account type whether "School or Work Account" or "Microsoft Account"/"Personal Account" when you login Azure. This account types can express simply like below.

  • "Microsoft Account" and "Personal Account" are technically same, and they are managed by Microsoft services. They were called "LIVE ID" in past.
  • "School or Work Account" is managed by your own Azure AD tenant such like "xxxxx.onmicrosoft.com", and you can assign custom domain name for your tenant as "contoso.com" and others.

As far as I have tried, it's easy to access subscriptions across Azure AD tenants using "Microsoft Account". But almost all companies use "School or Work Account" for governance perspective. Because "Microsoft Account"s are managed by Microsoft, so it's difficult to enable or disable their accounts immediately.
It's needed to invite other Azure AD tenant users into your Azure AD tenant when you want to grant other Azure AD tenant users to access your subscriptions associated with your Azure AD tenant.

How to enable to access subscriptions from other Azure AD tenant users

There are two steps to grant your subscriptions to other Azure AD tenant users.

  1. Invite the users into your Azure AD tenant
  2. Assign IAM roles

Invite the users into your Azure AD tenant

Refer Inviting Microsoft Account users to your Azure AD-secured VSTS tenant | siliconvalve or follow below steps.

  1. Login to portal.azure.com
  2. Login with your Global Admin credentials of your AD tenant
  3. Go to Azure Active Directory option on the blade
  4. In the next blade you will find an option of “user setting”
  5. Under “User setting” kindly check the option “admin and users in guest inviter role can invite”
  6. The option “admin and users in guest inviter role can invite” should be yes
  7. After that, go to users and groups in the same blade and click on “all users”
  8. Under all users, you will see the option “New guest user”
  9. After clicking on that, you can invite the user of other AD tenants.
  10. Once the user will accept the invitation, you can give access to the resource under the subscription of your AD tenant.

How to change AAD tenant associated to your subscriptions

You have already known how to create your own AAD tenant, but it sometimes causes some issues. As you know, all Azure subscriptions should be associated to an AAD tenant. You should change the AAD tenant of your subscriptions when you create new AAD tenant. You can learn how to change AAD tenant associated to your subscriptions in this post.

Step by step how to change AAD tenant in Azure portal

Choose your subscription need to change AAD tenant and click "Change directory" button like below.
f:id:waritohutsu:20171229163802p:plain

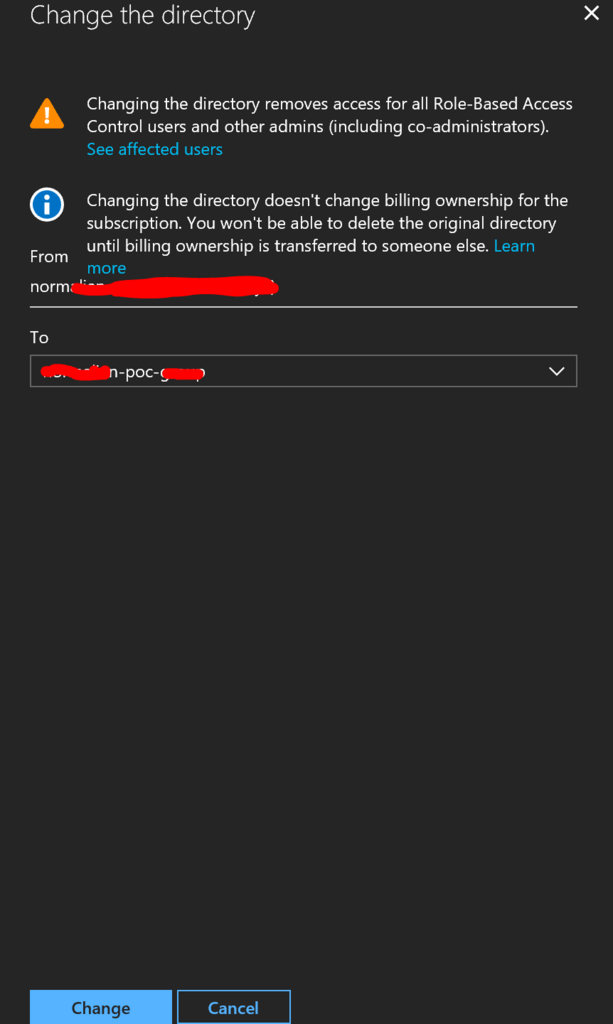
Choose your new AAD tenant should be associated your subscription.
f:id:waritohutsu:20171229163910p:plain

You can check its completion with portal notification like below, but it needed a few minutes to reflect into portal in my case. Please wait without hurry.
f:id:waritohutsu:20171229163958p:plain

How to create your own Azure Active Directory tenant

You sometimes want to create own tenant when you try to use Azure AD authentication or "School or Work Accounts" independently with your organization Azure AD tenant. Especially, you will really want to create it when you will be in charge of some PoC using Microsoft Azure. You can learn how to create your own Azure Active Directory tenant in this post.

Step by step to create new tenant in Azure portal

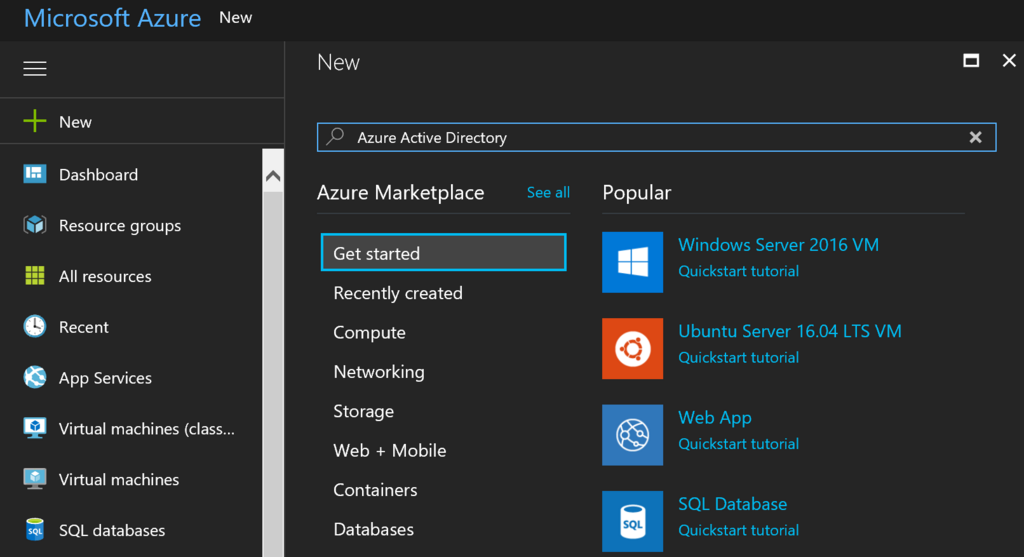
Please click "+ New" button in left side of Azure portal and input "Azure Active Directory" like below.
f:id:waritohutsu:20171229161418p:plain

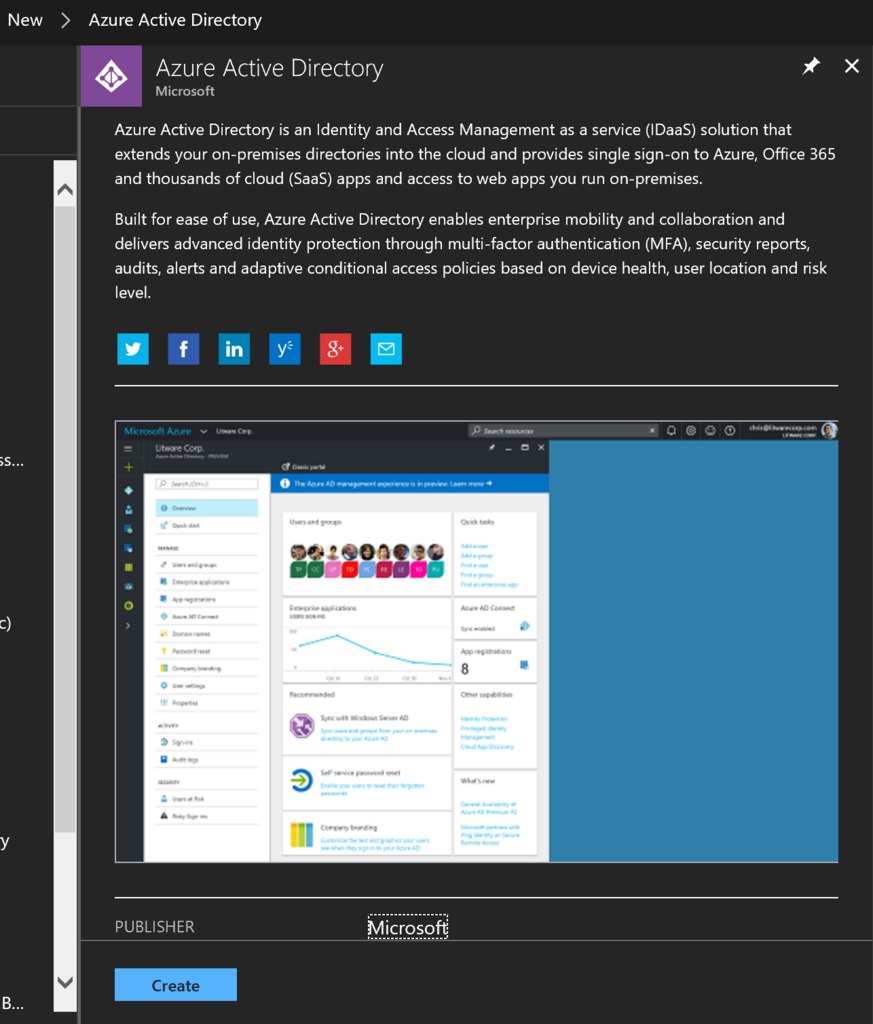
You can find "Azure Active Directory" by Microsoft like below, and please click "Create" button.
f:id:waritohutsu:20171229161529p:plain

Input your organization name and domain name, equal "tenant name", and choose your region.
f:id:waritohutsu:20171229161628p:plain

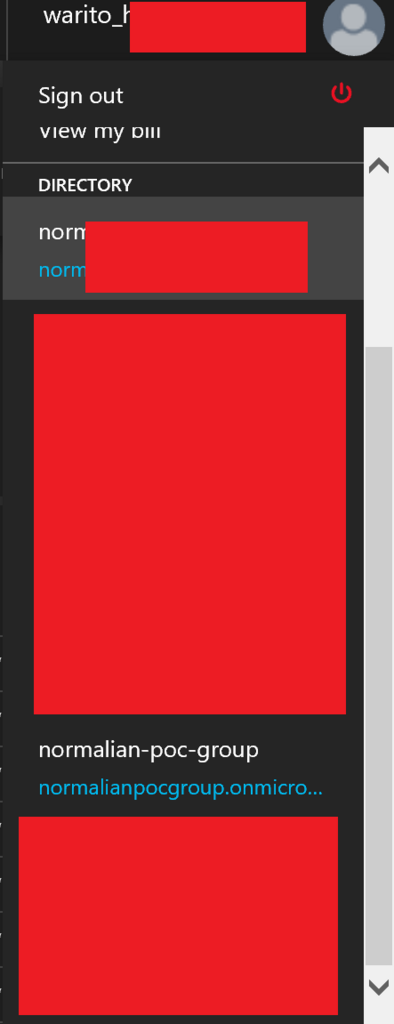
After a few minutes later, you can find your new tenant from upper-right like below.
f:id:waritohutsu:20171229161730p:plain

How to deploy your Azure Functions with VSTS when your project has multiple solutions

This article introduces how to deploy your Azure Functions with VSTS when your projects have multiple solutions like below. Please refer GitHub - AzureFunctions-CSharp-Sample if you need Azure Functions sample.

Your-Sample-Project
└─Trunk
    ├─HttpDemoFunctionApp
  └─JobDemoFunctionApp
        └─JobDemoFunctionApp

How to setup this build process

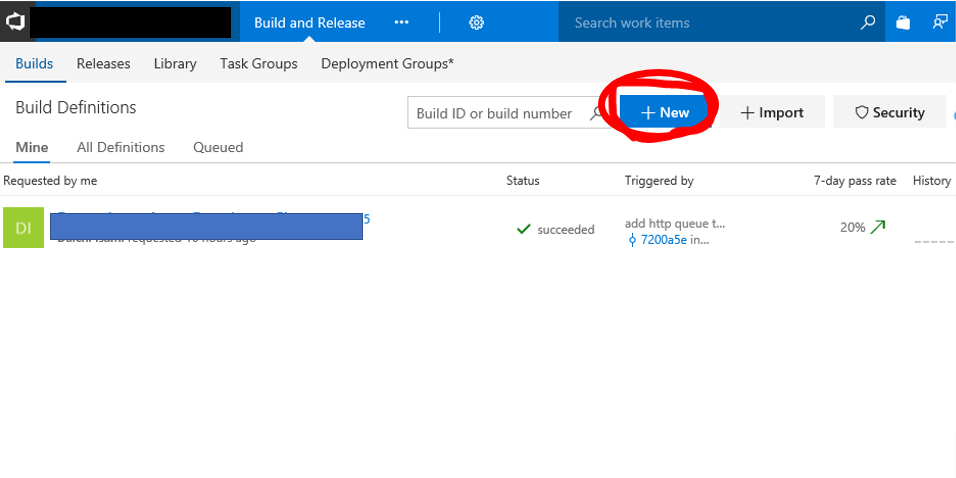
Open "Build and Release" tab in your VSTS project, and click "+New" button like below.
f:id:waritohutsu:20171031021259p:plain

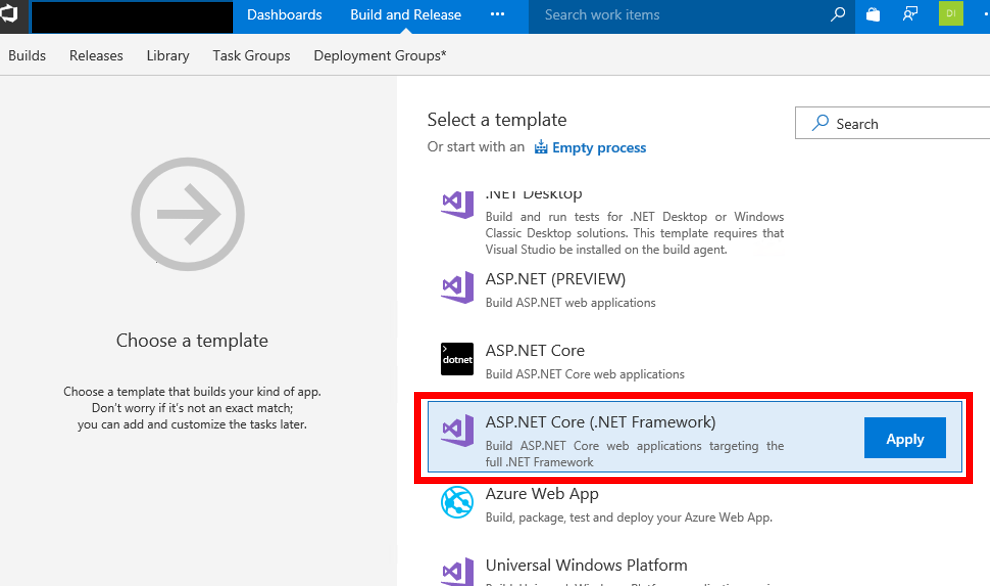
Choose "ASP.NET Core (.NET Framework)" template like below.
f:id:waritohutsu:20171031021310p:plain

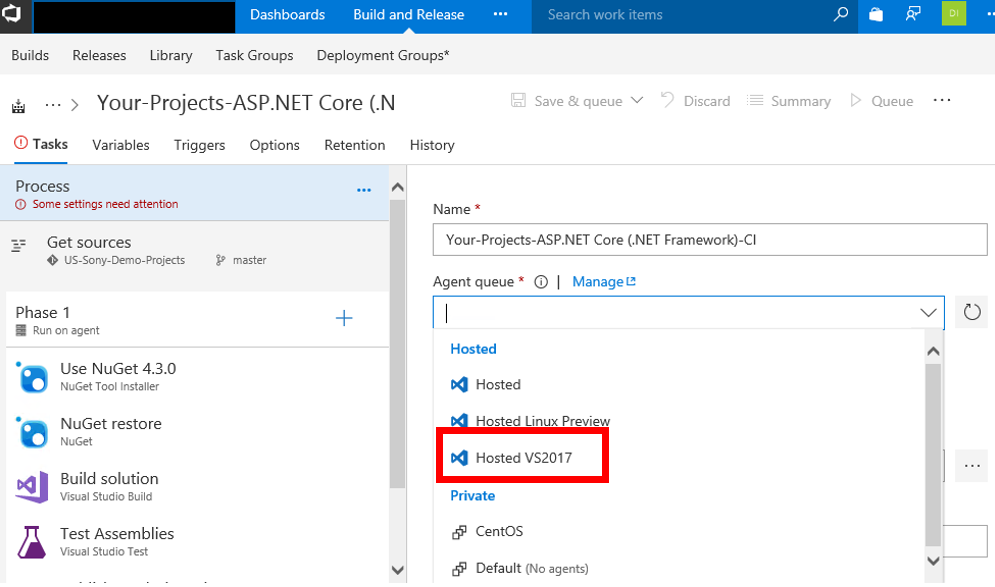
After creating a process, choose"Hosted VS2017" as "Agent queue". You will get error when you run this process if you choose other Agents.
f:id:waritohutsu:20171031021324p:plain

Choose your Azure Functions solution to deploy like below.
f:id:waritohutsu:20171031021341p:plain

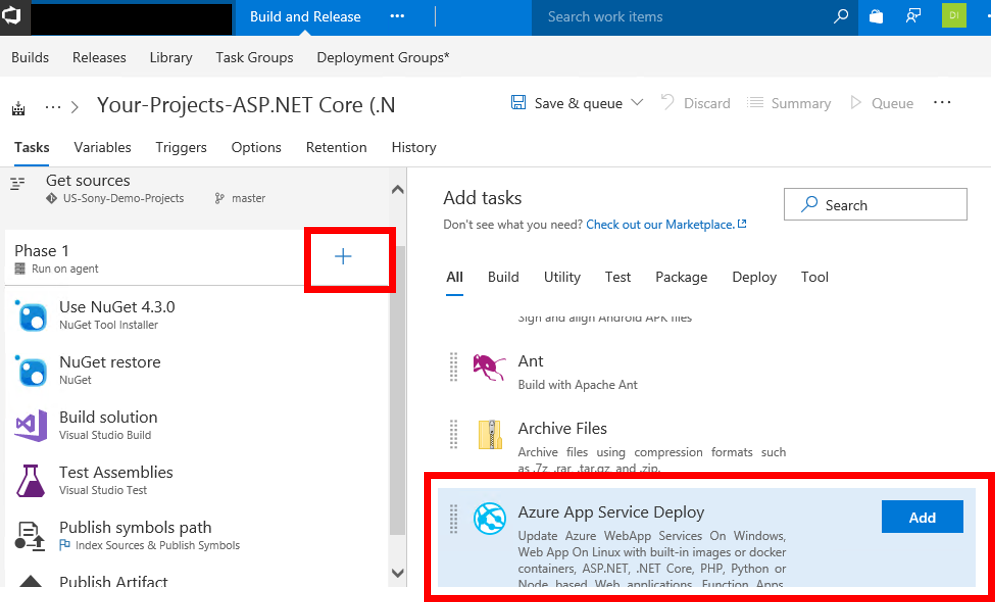
Add "Azure App Service Deploy" task like below.
f:id:waritohutsu:20171031021354p:plain

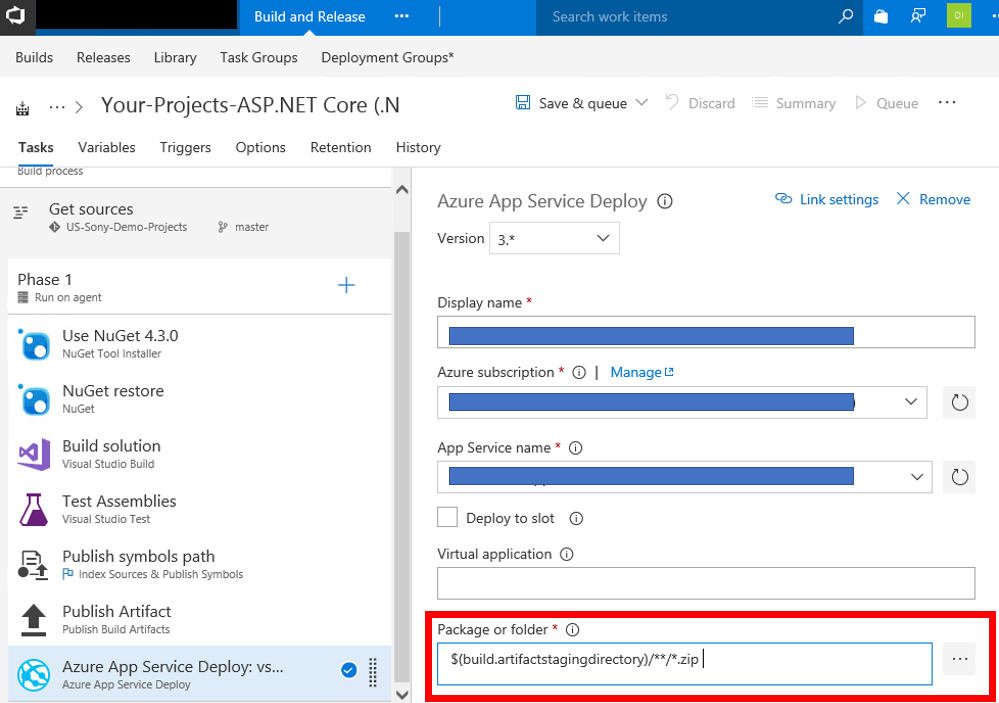
After adding the task, choose your Azure Functions and change "Package or folder" from "$(System.DefaultWorkingDirectory)/**/*.zip" to "$(build.artifactstagingdirectory)/**/*.zip".
f:id:waritohutsu:20171031021405p:plain

Tips

I got below error when I chose "Hosted" as "Agent queue", because the process failed to build my application. The cause was MSBuild didn't support Azure Functions application right now.

Got connection details for Azure App Service:'xxxxfunctionapp'

Error: No package found with specified pattern

How to create Hive tables via Ambari on Microsoft Azure HDInsight

As you know, HDInsight is powerful service to analyze, manage and process BigData on Microsoft Azure. You can create Hadoop, Storm, Spark and other clusters pretty easily! In this article, I will introduce how to create Hive tables via Ambari with cvs files stored in Azure Storage.
At first, you have to create your HDInsight cluster associated an Azure Storage account. In this article, I create a Spark 2.1.x cluster as HDInsight cluster.

Store CSV files into your Azure Storage

Upload your CSV files into the Azure Storage account. In this article, I upload Nikkei Average CSV file like below.

DATE,CLOSE,START,HIGH,LOW
2012/1/5,8488.71,8515.66,8519.16,8481.83
2012/1/6,8390.35,8488.98,8488.98,8349.33
2012/1/10,8422.26,8422.99,8450.59,8405.18
2012/1/11,8447.88,8440.96,8463.72,8426.03
2012/1/12,8385.59,8423.1,8426.83,8360.33
2012/1/13,8500.02,8471.1,8509.76,8458.68
2012/1/16,8378.36,8409.79,8409.79,8352.23
2012/1/17,8466.4,8420.12,8475.66,8413.22
2012/1/18,8550.58,8458.29,8595.78,8446.09
2012/1/19,8639.68,8596.68,8668.94,8596.68
2012/1/20,8766.36,8751.18,8791.39,8725.32
2012/1/23,8765.9,8753.91,8795.27,8744.54
2012/1/24,8785.33,8815.36,8825.09,8768.51
2012/1/25,8883.69,8842.01,8911.62,8816.09
2012/1/26,8849.47,8890.49,8894.6,8834.93
2012/1/27,8841.22,8851.02,8886.02,8810.89
2012/1/30,8793.05,8803.79,8832.48,8774.23
2012/1/31,8802.51,8781.44,8836.68,8776.65

It's stored into Azure Storage account associated with HDInsight cluster, and its path is described as "https://"storage-account-name"."spark-container-name".blob.core.windows.net/financedata/nikkei_stock_average_daily_en.csv". You can specify the path in Hive query as "wasb://"spark-container-name"@"storage-account-name".blob.core.windows.net/financedata/nikkei_stock_average_daily_en.csv".

Create Hive tables from your CSV files

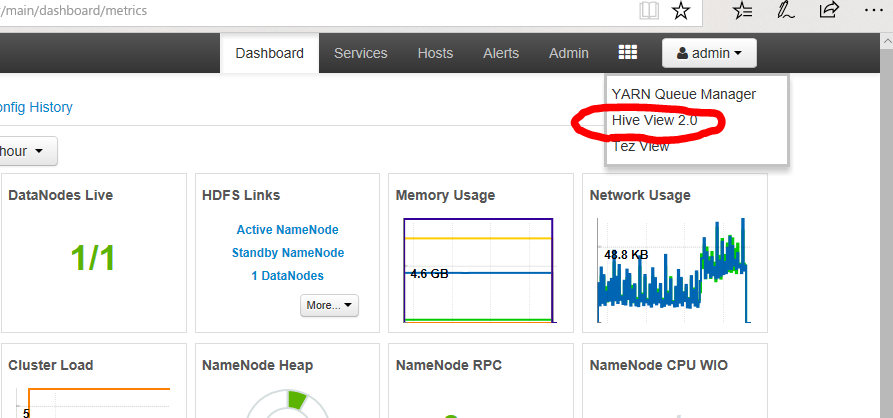
Open https://portal.azure.com/ and choose your HDInsight cluster. You can open Ambari portal to click a link of "https://'your-cluster-name'.azurehdinsight.net" in "Overview" page. Next, click "Hive View 2.0" button like below.
f:id:waritohutsu:20171002124722p:plain

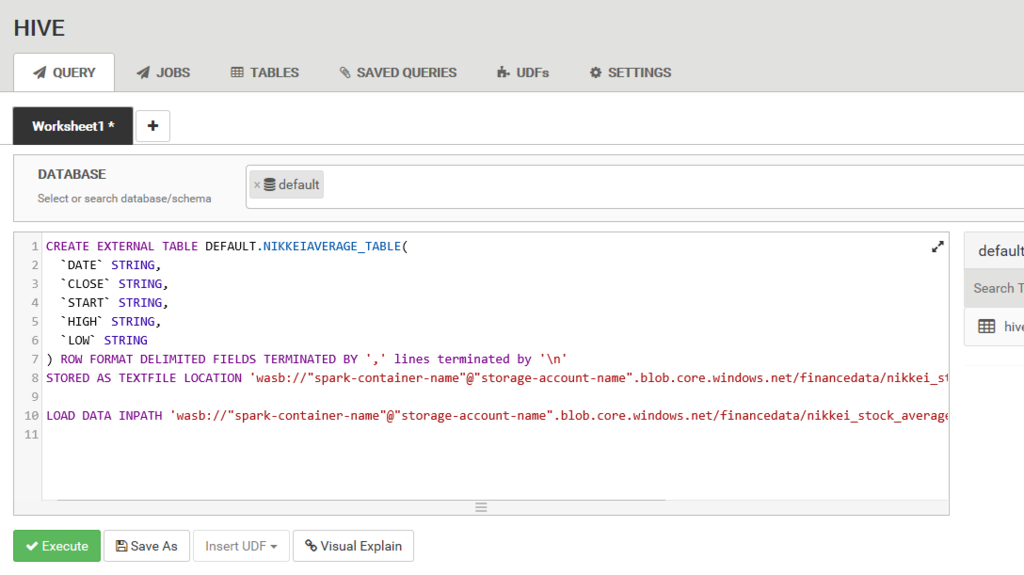
Now, you can execute Hive query using below portal site.
f:id:waritohutsu:20171002124752p:plain
Copy below query and execute it into the site.

CREATE EXTERNAL TABLE DEFAULT.NIKKEIAVERAGE_TABLE(
  `DATE` STRING,
  `CLOSE` STRING,
  `START` STRING,
  `HIGH` STRING,
  `LOW` STRING
) ROW FORMAT DELIMITED FIELDS TERMINATED BY ',' lines terminated by '\n'
STORED AS TEXTFILE LOCATION 'wasb://"spark-container-name"@"storage-account-name".blob.core.windows.net/financedata/nikkei_stock_average_daily_en.csv';

LOAD DATA INPATH 'wasb://"spark-container-name"@"storage-account-name".blob.core.windows.net/financedata/nikkei_stock_average_daily_en.csv' INTO TABLE DEFAULT.NIKKEIAVERAGE_TABLE;

Check your query result

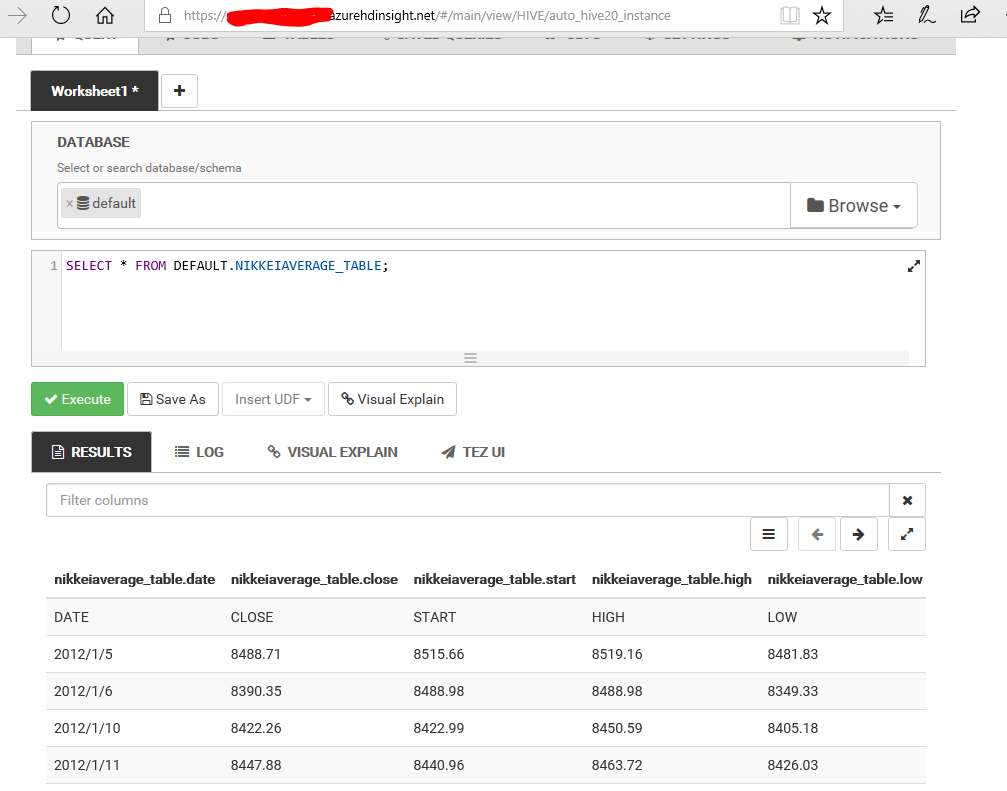
After executing your query, run below query to check the data in Ambari.

SELECT * FROM DEFAULT.NIKKEIAVERAGE_TABLE;

So, you can get below result.
f:id:waritohutsu:20171002150636p:plain