normalian blog

Let's talk about Microsoft Azure, ASP.NET and Java!

Tips to utilize Windows Server containers on AKS

Microsoft has announced that Azure Kubernetes Service (AKS) supports Windows Server containers as GA. This is quite useful and essential feature to containerize your ASP.NET Framework applications. In this article, you can acquire tiny tips to utilize Windows Server containers on AKS.

Enable Azure CNI (advanced) for Windows Server Container

Note that AKS requires to enable " Azure CNI (advanced) network plugin" to utilize Windows Server Containers. Choose "Advanced" as Network configuration like below when you try to create AKS clusters.
f:id:waritohutsu:20200511055511p:plain

You can confirm your AKS clusters are enabled Azure CNI on Azure Portal.
f:id:waritohutsu:20200511055548p:plain

Next, you need to create node pools as Windows OS type to deploy your Windows Server Container applications like below.
f:id:waritohutsu:20200511055835p:plain

Windows Server Container size

Windows Server Container requires huge capacity than Linux images. I have just pushed a simple hello world ASP.NET application into my Azure Container Repository(ACR) but it uses 1.08GB on my ACR. It will take a much time to upload your container images first time, so please note your network bandwidth not only ACR capacities when you push your container images into ACRs.
f:id:waritohutsu:20200511060031p:plain

Manage authorization for your application with user account attributes

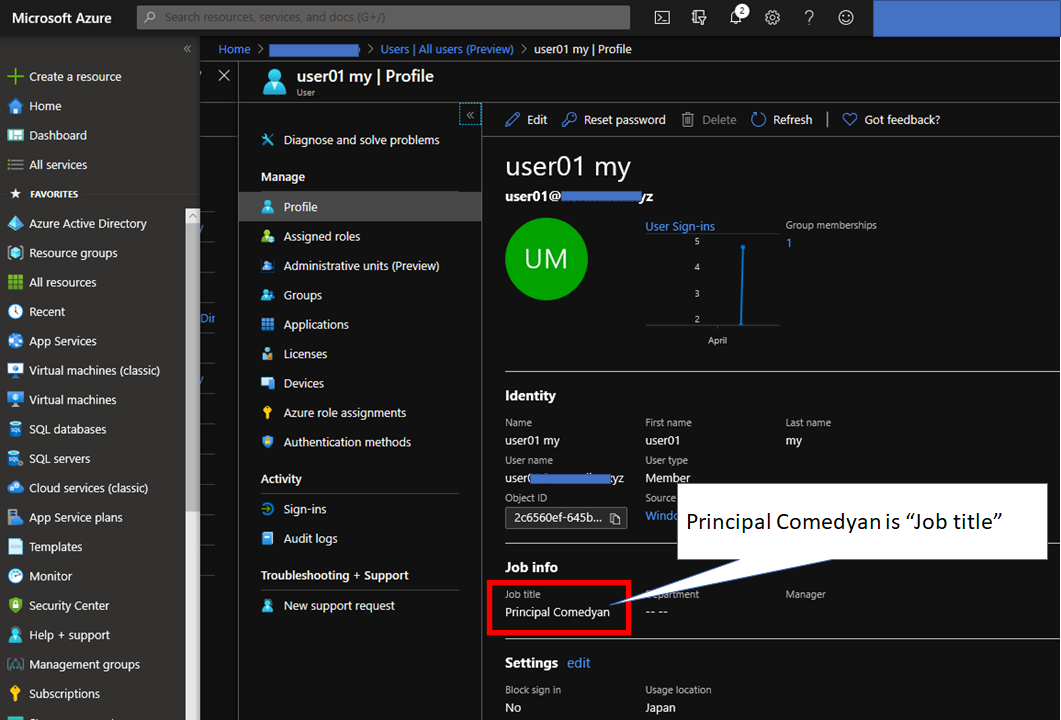
Azure AD offers quite useful features to manage accessibilities for your applications. I believe most Azure developers has already utilized user groups to assign privilege easily, but I guess many people don’t know “Dynamic User” user group. This user group enable to authorize users with user account attributes.

Let's setup to manage accessibilities with job title by using Dynamic User group. Here are accounts which are verified by the group.
f:id:waritohutsu:20200509043431p:plain
f:id:waritohutsu:20200509043445p:plain

How to create Dynamic User group

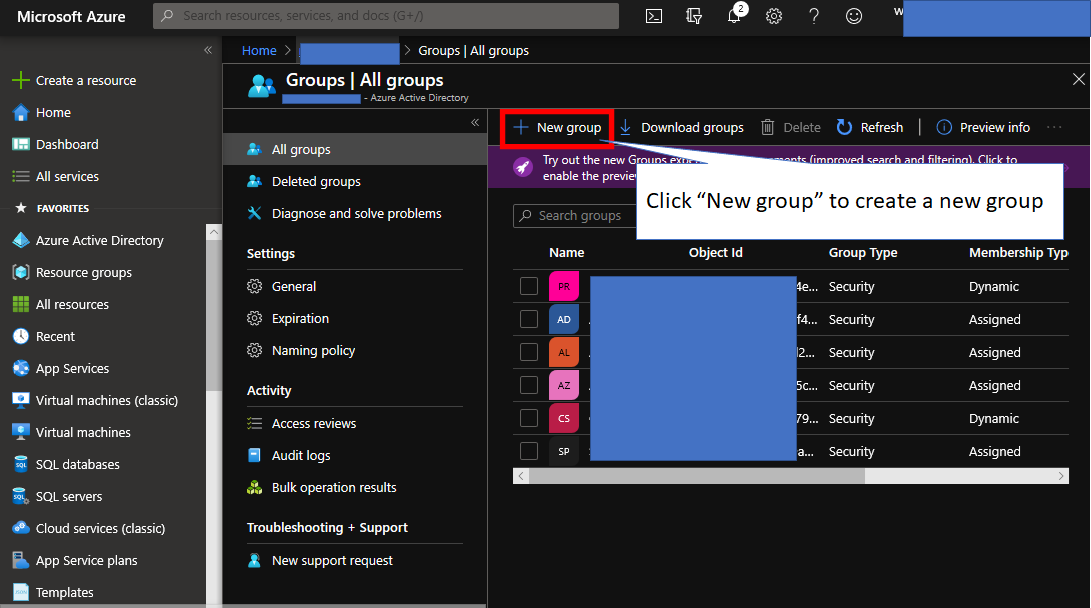
Let’s go to Azure Portal, choose Azure Active Directory, and click to “New Group” at first .
f:id:waritohutsu:20200509043119p:plain

You can choose “Dynamic User” as membership type like below.
f:id:waritohutsu:20200509043133p:plain

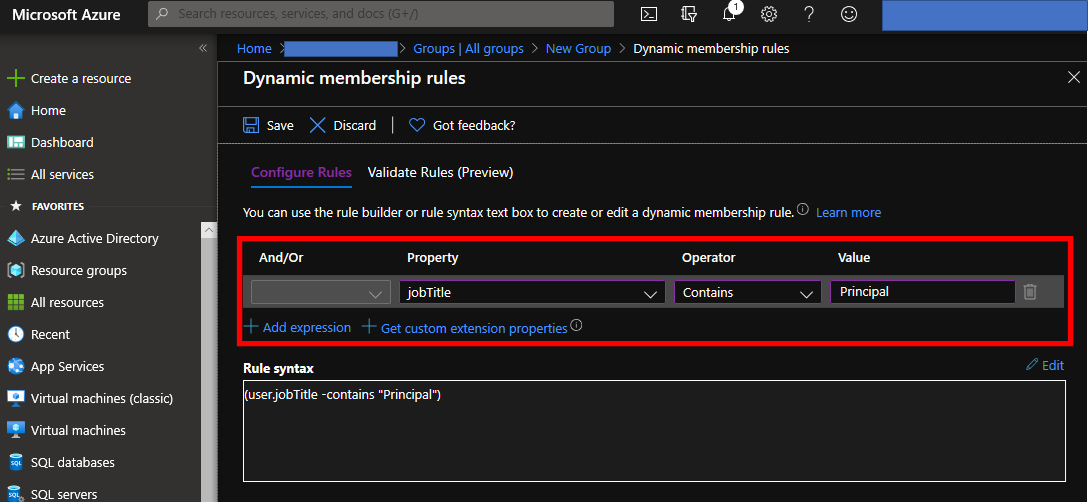
Click “Add dynamic query” to setup query to authorize users. This sample authorize users who contain “Principal” for their job title. It’s also possible to create complex queries to meet your business requirements.
f:id:waritohutsu:20200509043143p:plain

Click “Validate Rules (Preview)” like below. You can confirm your queries will works well or not.
f:id:waritohutsu:20200509043152p:plain

Reduce AKS clusters cost by setup zero node count for user mode node pools

Here is interesting article - Release Release 2020-04-13 · Azure/AKS · GitHub. You can find that "AKS now allows User nodepools to scale to 0" in the article. This feature enables to reduce AKS cost in your environments. I believe you would try to change node count by using az command, but it won't work well at this time - 5/1/2020. Please note this setting is possible for only User mode node pools not System mode.

$subcriptionId = "YOUR SUBSCRIPTION ID"
$rg = "YOUR RESOURCE GROUP"
$clustername = "YOUR AKS CLUSTER NAME"
$poolname = "YOUR NODE POOL NAME"
$count = 0
az aks scale --resource-group $rg --name $clustername --node-count $count --nodepool-name $poolname

f:id:waritohutsu:20200502043921p:plain

This issue is caused that az command doesn't support to setup zero node count for user mode node pools at this time. There are two options to achieve this setting here.

Change node count on https://resources.azure.com/

Open https://resources.azure.com/ and find your user mode node pool of your AKS clusters. Put "Edit" button to enable to change Azure resources setting and edit value of "count" as zero.
f:id:waritohutsu:20200502044622p:plain

Please note this setting is possible only User mode node pools. It will fail to change node count into zero for System mode node pools.
f:id:waritohutsu:20200502044934p:plain

Use REST API to change node count

You can REST API by using az command. Here is example to setup zero node count for user mode node pools.

$subcriptionId = "YOUR SUBSCRIPTION ID"
$rg = "YOUR RESOURCE GROUP"
$clustername = "YOUR AKS CLUSTER NAME"
$poolname = "YOUR NODE POOL NAME"
$count = 0

$body = "{  \`"properties\`": {    \`"count\`": ${count} } }"
$header = "{\`"Content-Type\`": \`"application/json\`"}"
az rest -u "https://management.azure.com/subscriptions/${subcriptionId}/resourceGroups/${rg}/providers/Microsoft.ContainerService/managedClusters/${clustername}/agentPools/${poolname}?api-version=2020-03-01" --method put --headers $header --body $body

You can confirm this setting on Azure Portal.
f:id:waritohutsu:20200502045455p:plain

Spot node pool limitation for AKS

Azure Kubernetes Service(AKS) recently offers spot node pool feature as preview - 4/30/2020 right now. This feature enable Azure developers to reduce VM costs by using spot VMs for AKS clusters.
Refer to Preview - Add a spot node pool to an Azure Kubernetes Service (AKS) cluster - Azure Kubernetes Service | Microsoft Docs. Here is a sample command to execute on Azure Portal, but you need to enable this preview feature by following the article before running commands below. You can execute this command successfully.

az aks nodepool add \
    --resource-group YOUR-RESOURCE-GROUP \
    --cluster-name YOUR-AKS-CLUSTER-NAME \
    --name spotnode01 \
    --priority Spot \
    --node-vm-size Standard_DS2_v2  \
    --node-count 1 \
    --eviction-policy Delete \
    --spot-max-price -1 \
    --no-wait

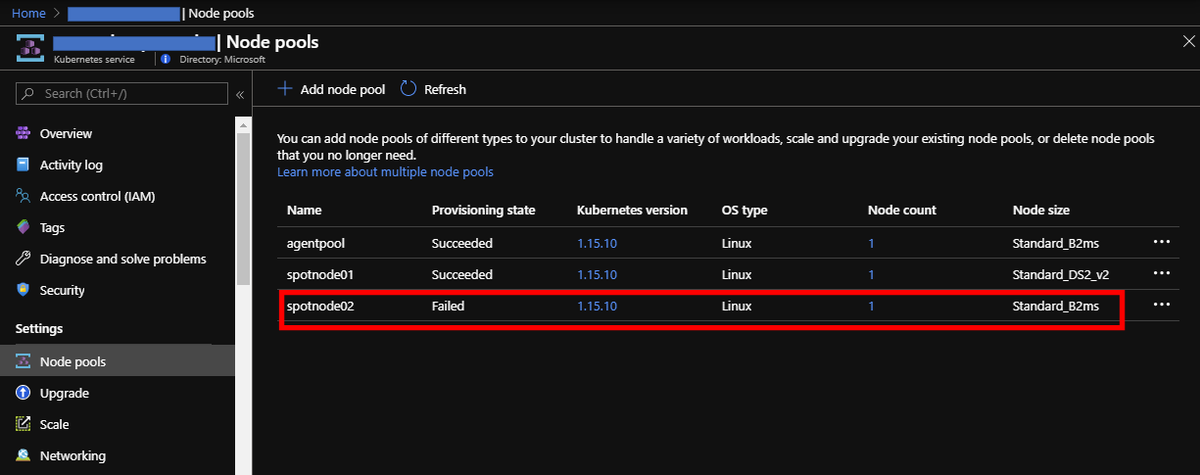
I guess you also want to save cost by using burstable instances named "B series". You can execute a command to specify B series instances but it will be failed .

az aks nodepool add \
    --resource-group YOUR-RESOURCE-GROUP \
    --cluster-name YOUR-AKS-CLUSTER-NAME \
    --name spotnode02 \
    --priority Spot \
    --node-vm-size Standard_B2ms \
    --node-count 1 \
    --eviction-policy Delete \
    --spot-max-price -1 \
    --no-wait

Here is a screenshot for commands above. You can execute commands to add node pools by using spot VMS, but provisions will fail.
f:id:waritohutsu:20200501144554p:plain

This is limitation of spot VMs. Refer to Use Azure Spot VMs - Azure Windows Virtual Machines | Microsoft Docs. B-series and Promo versions of any size (like Dv2, NV, NC, H promo sizes) are not supported at this time.

Upload Camera images into Azure Blob Storage by PowerApps

As you know, PowerApps offers a bunch of useful features to build up powerful applications easily. It's also possible to retrieve Microsoft Azure Platform not only Power Platform. You can acquire knowledge how upload images token by Camera into Azure Blob Storage. Here are steps to build up it.

  1. Azure Storage setup on Azure Portal
  2. Create Connection for Azure Storage on PowerApps Studio for Web
  3. Create apps by using the Connection on PowerApps Studio for Web

Azure Storage setup on Azure Portal

At first, open Azure Portal. Create Azure Storage account or choose existing one to utilize for PowerApps. Create new container to store images from PowerApps like below. The new container name is "images" in this example.
f:id:waritohutsu:20200315071807p:plain

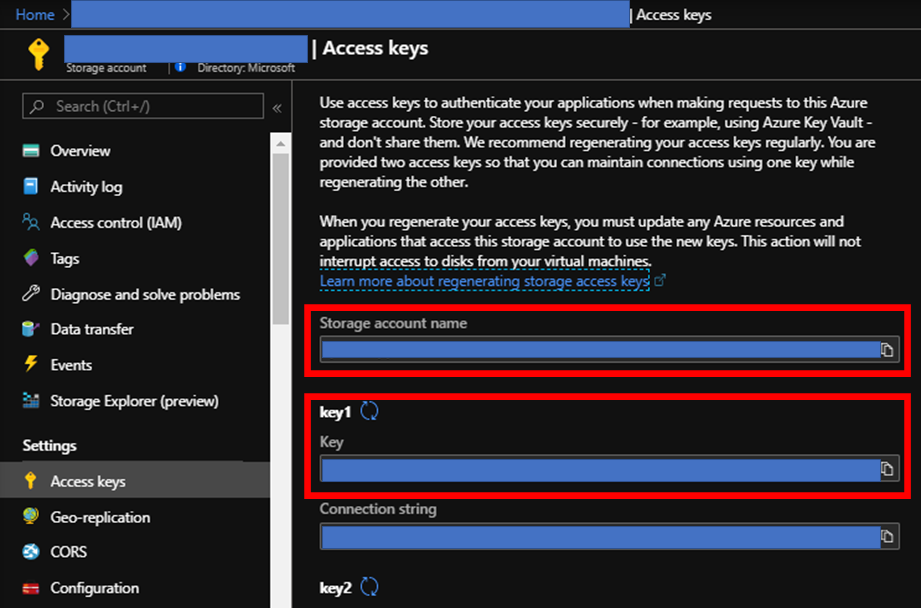
Pick up and save "Storage account name" and "Key1" into notepad to make "Connection" on PowerApps.
f:id:waritohutsu:20200315071903p:plain

Create new Connection for Azure Storage on PowerApps Studio for Web

Next, open PowerApps Studio for Web. Choose "Connection" from left menus. You need to create new connection for Azure Storage at first.
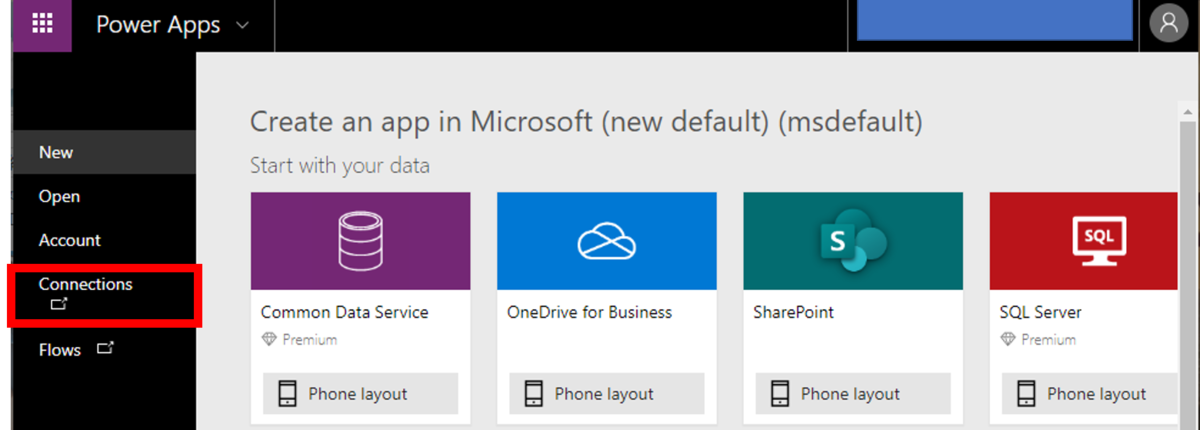
f:id:waritohutsu:20200315072200p:plain

You will find listed connections which someone has already created like below. Choose "New connection" to create newly your Azure Storage connection.
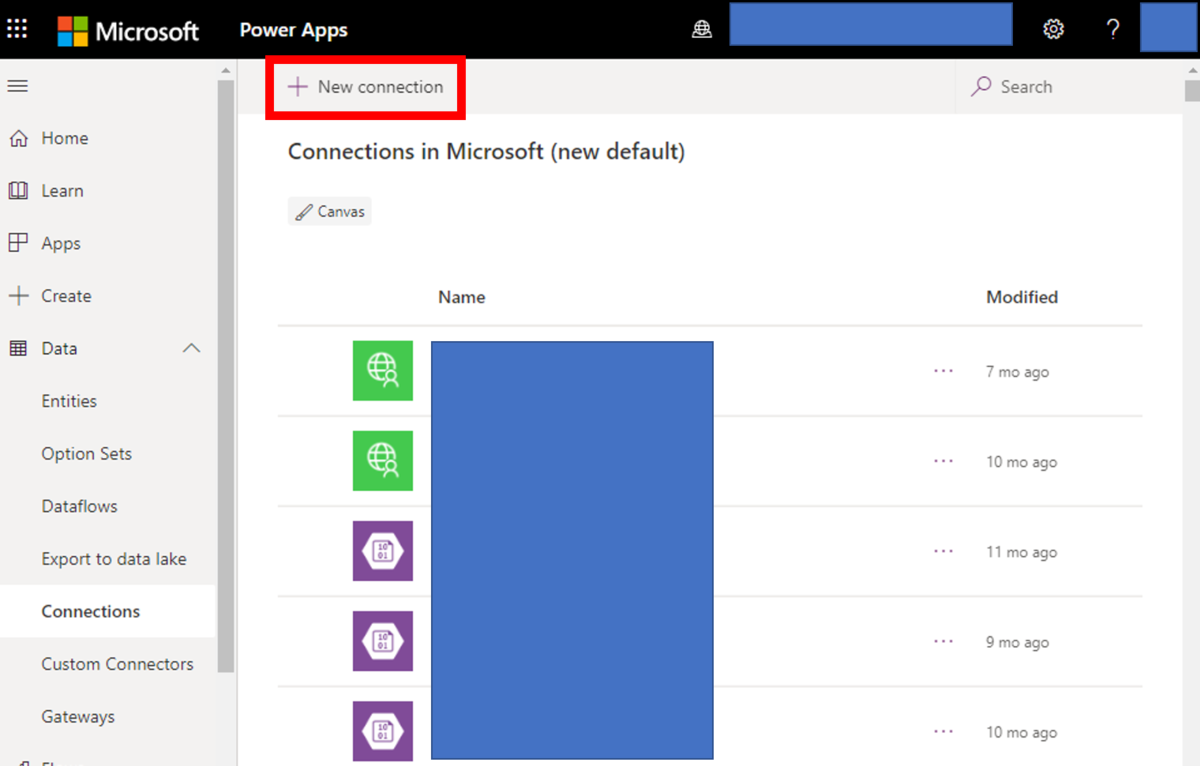
f:id:waritohutsu:20200315072327p:plain

Find "Azure Blob Storage" by using search box like below and click "+" button.
f:id:waritohutsu:20200315072450p:plain

Put "Storage account name" and "key" into inputboxes to complete this steps.
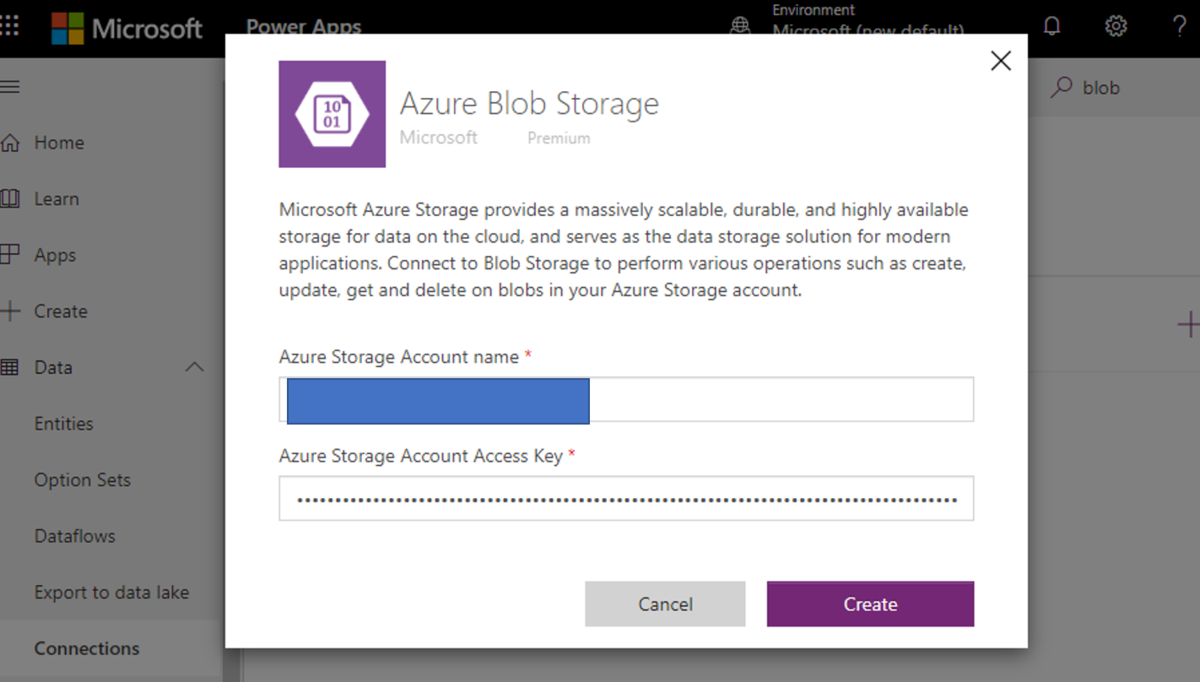
f:id:waritohutsu:20200315072558p:plain

This isn't mandatory, but I also recommend to change your connection name to find easily in later. Find you connection by sorting with "Modifed" like below.
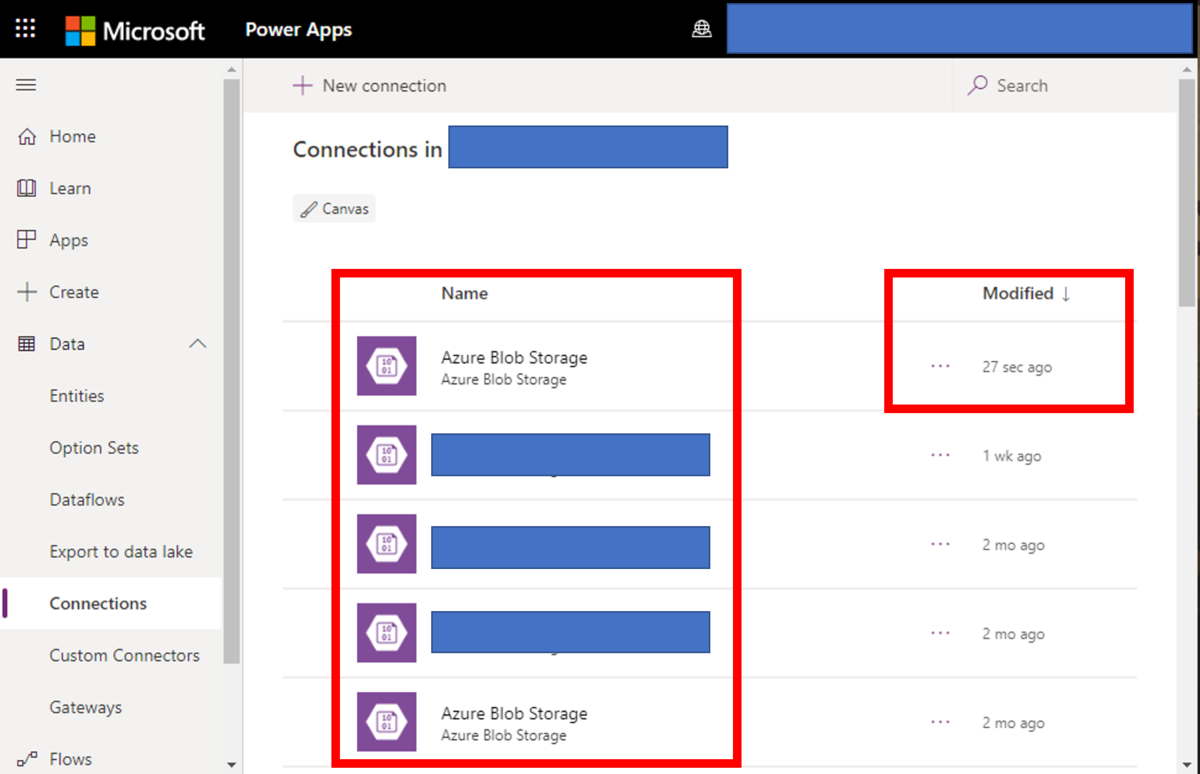
f:id:waritohutsu:20200315072728p:plain

You can change your connection name like here.
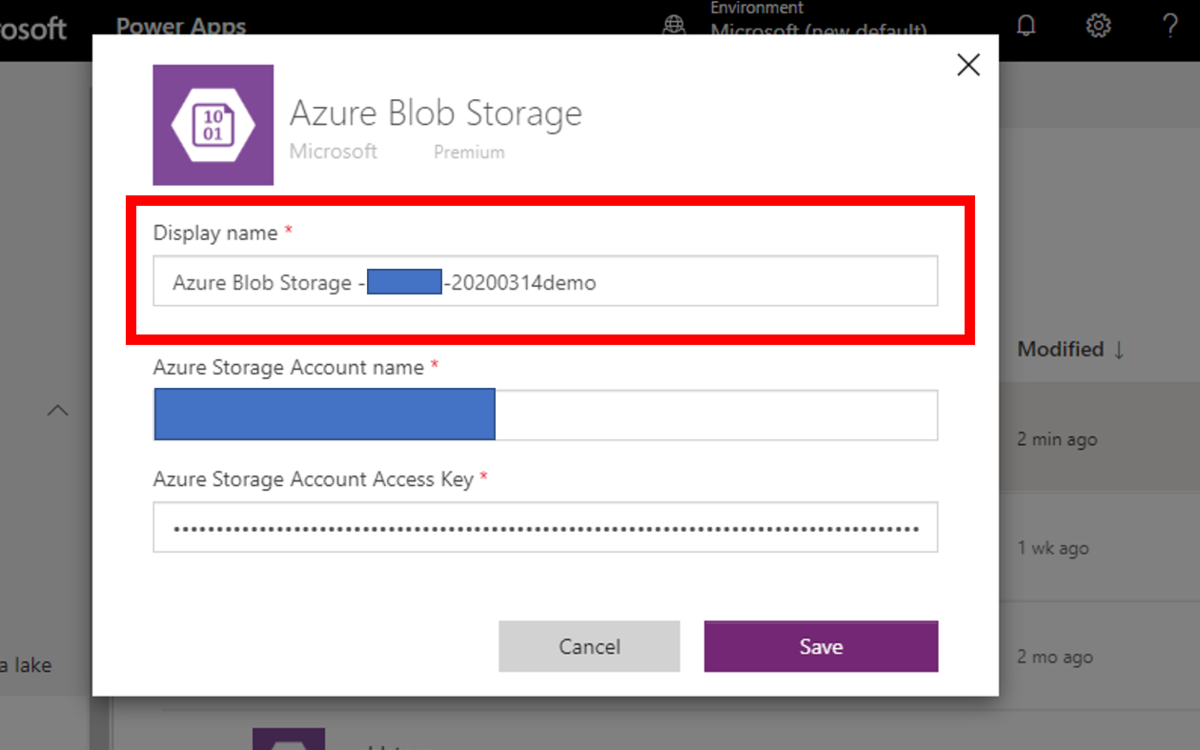
f:id:waritohutsu:20200315072808p:plain
Now, you have completed to make new connection for Azure Blob Storage.

Create apps by using the Connection on PowerApps Studio for Web

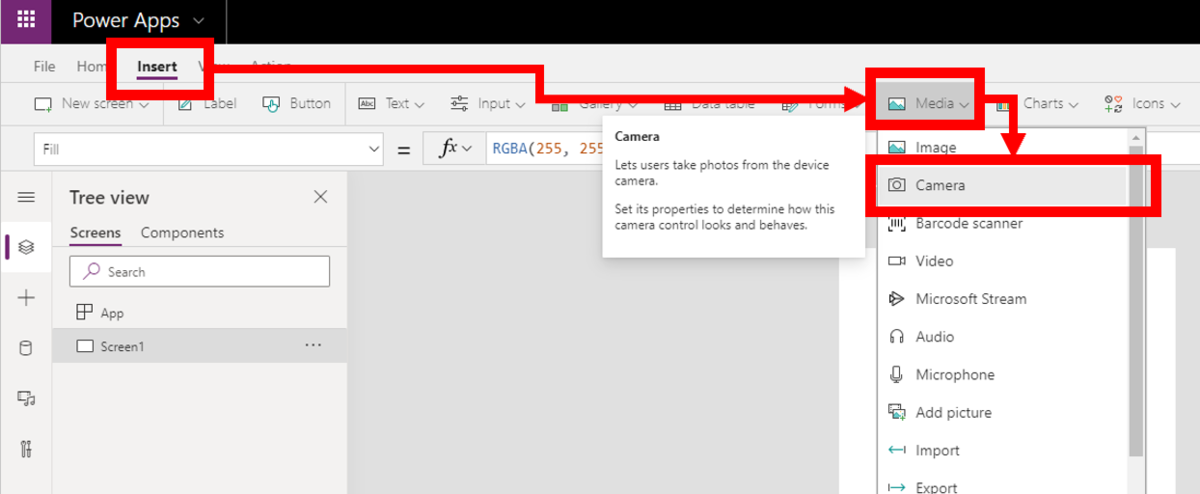
Open PowerApps Studio for Web and choose to create Blank new app as first. Insert "Camera" control by choosing "Insert -> Media -> Camera" like below.
f:id:waritohutsu:20200315073135p:plain

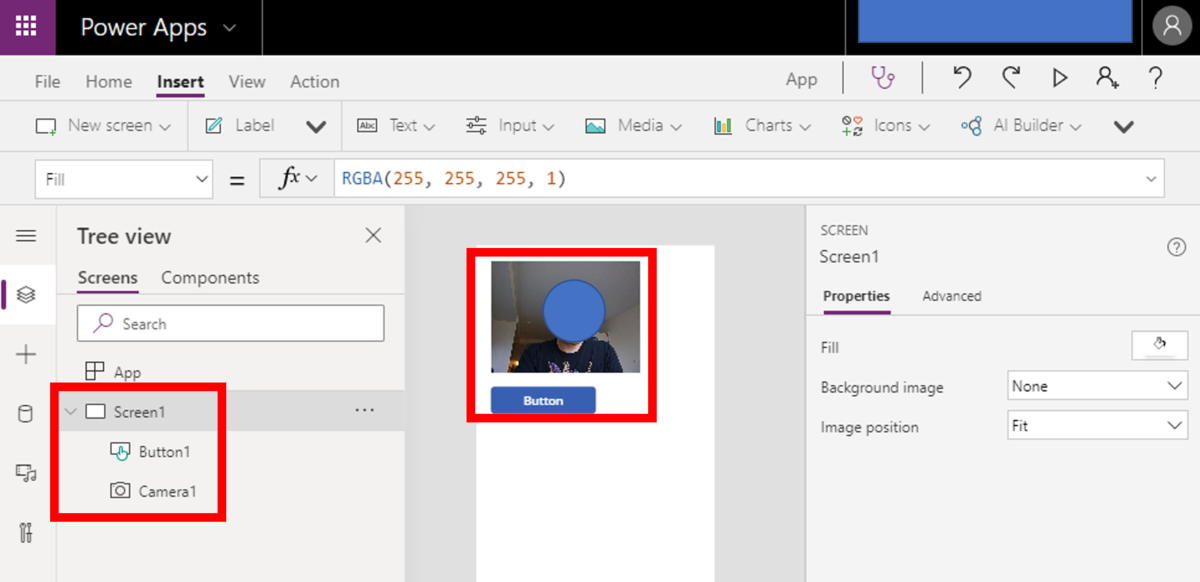
Insert new button into your app. You will find two controls as "Camera1" and "Button1" like below.
f:id:waritohutsu:20200315073401p:plain

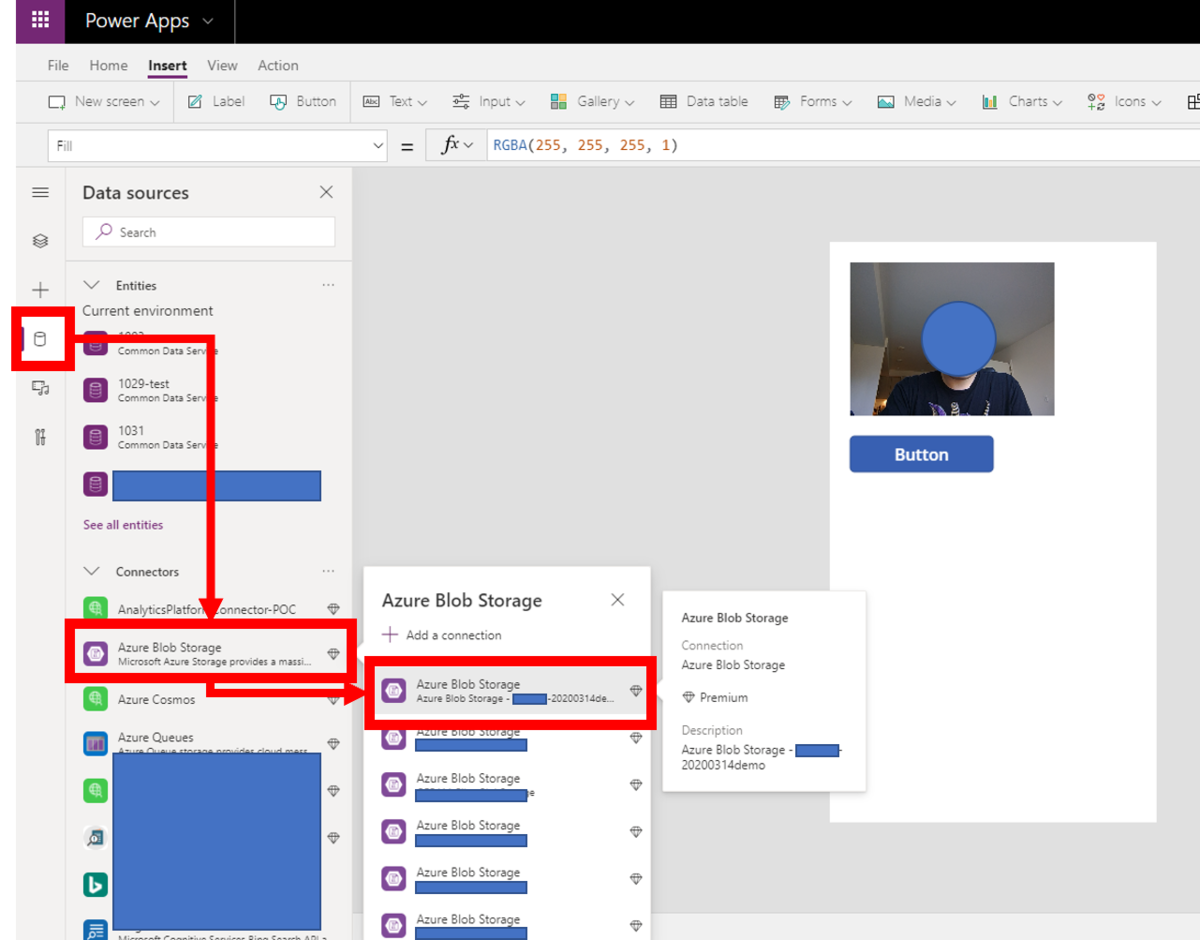
Next, add your connection for Azure Blob Storage. Choose an icon from left side and find your connection by following step an image below.
f:id:waritohutsu:20200315074037p:plain

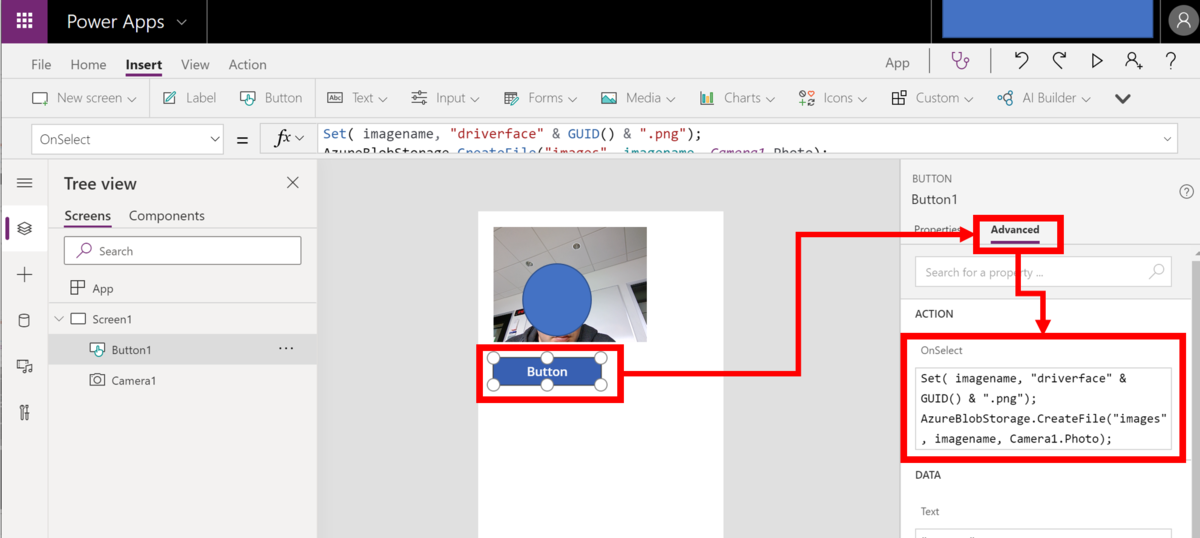
Put formulas into "OnSelect" action on Button control by following an image below.
f:id:waritohutsu:20200315074500p:plain

Set( imagename, "driverface" & GUID() & ".png");
AzureBlobStorage.CreateFile("images", imagename, Camera1.Photo);

Run your PowerApps

Run your application and click button, so you can find images on Azure Portal like below.
f:id:waritohutsu:20200315074725p:plain

Create Excel based simple apps with PowerApps

PowerApps support for various types of data sources. Of course, it's possible to connect with on-premise resources by using On-Premise Data Gateway not only Microsoft Azure data sources. In this article, you can acquire knowledge to build up simple applications to edit Excel files on OneDrive.

Create Excel file and upload it into OneDrive

Create Excel file to utilize in your PowerApps with reference to an image below. Please note to enable "My table has headers" when you create a table on the Excel file.
f:id:waritohutsu:20200311052129p:plain

Change your "Table Name" like below. This name will be used on PowerApps.
f:id:waritohutsu:20200311052342p:plain

Upload this Excel file into your OneDrive.
f:id:waritohutsu:20200311052627p:plain

Steps to generate Excel based apps

Go to https://preview.create.powerapps.com/studio/# and choose "Connections".
f:id:waritohutsu:20200311053206p:plain

Choose "New connection".
f:id:waritohutsu:20200311053332p:plain

Choose "OneDrive for Business" and click "Create" to authorize with your OneDrive for Business account.
f:id:waritohutsu:20200311053608p:plain

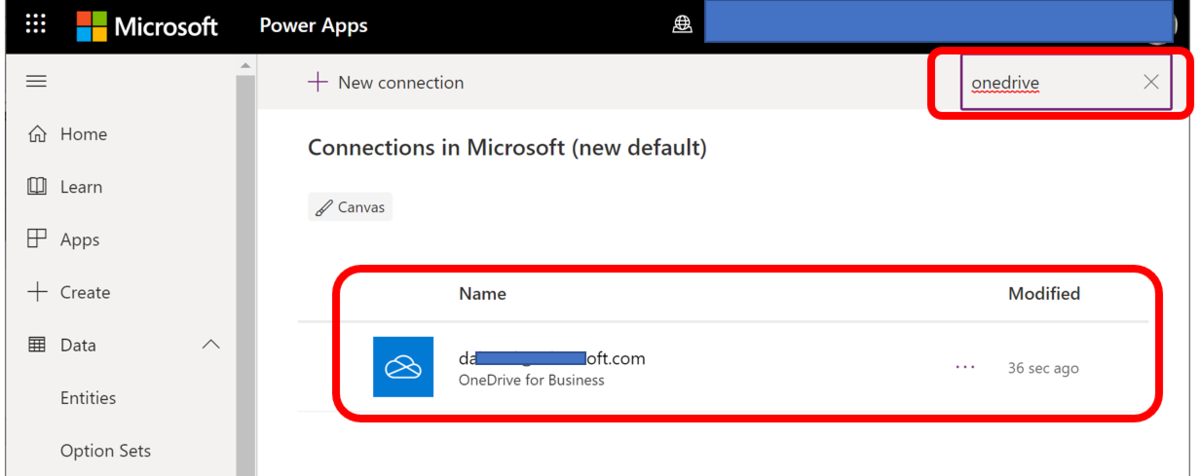
Confirm your connection like below.
f:id:waritohutsu:20200311053837p:plain

Next, go to "New" tab and choose "Phone layout" on OneDrive for Business.
f:id:waritohutsu:20200311054136p:plain

Choose OneDrive for Business connection which you have created just before. Next, choose your Excel file on OneDrive for Business account like below.
f:id:waritohutsu:20200311054554p:plain

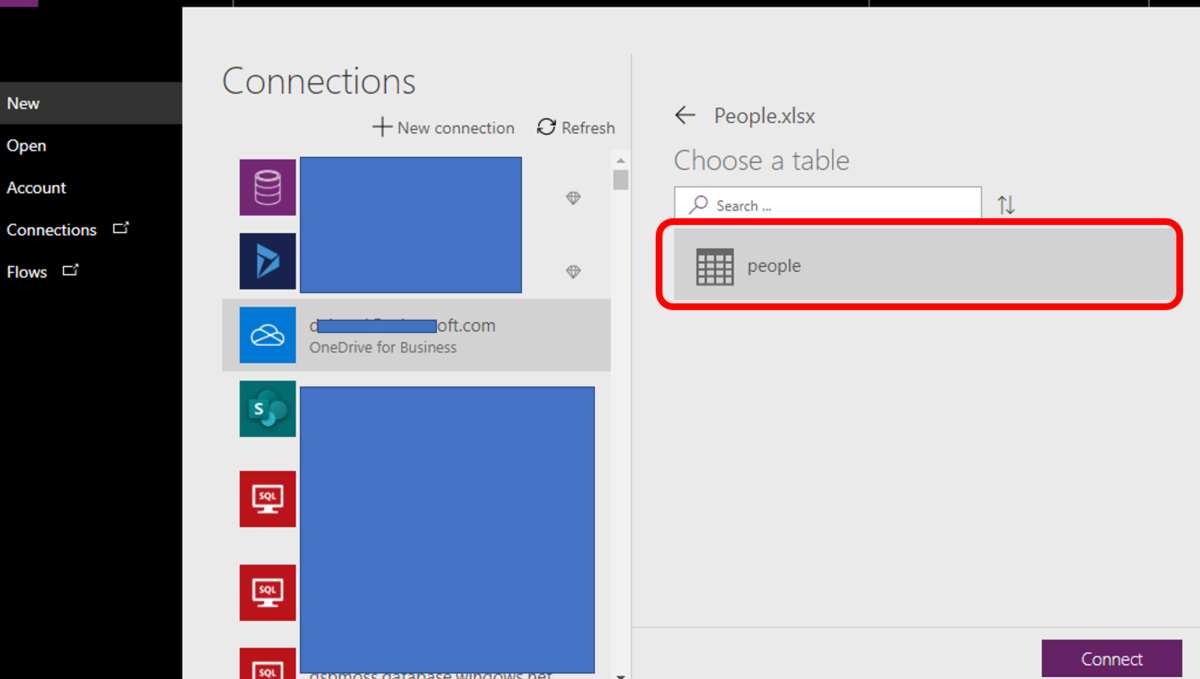
Choose a table in your Excel file.
f:id:waritohutsu:20200311054732p:plain

It takes a few minutes to generate your app based on your table. You will find app below.
f:id:waritohutsu:20200311055011p:plain

Update your PowerApps application

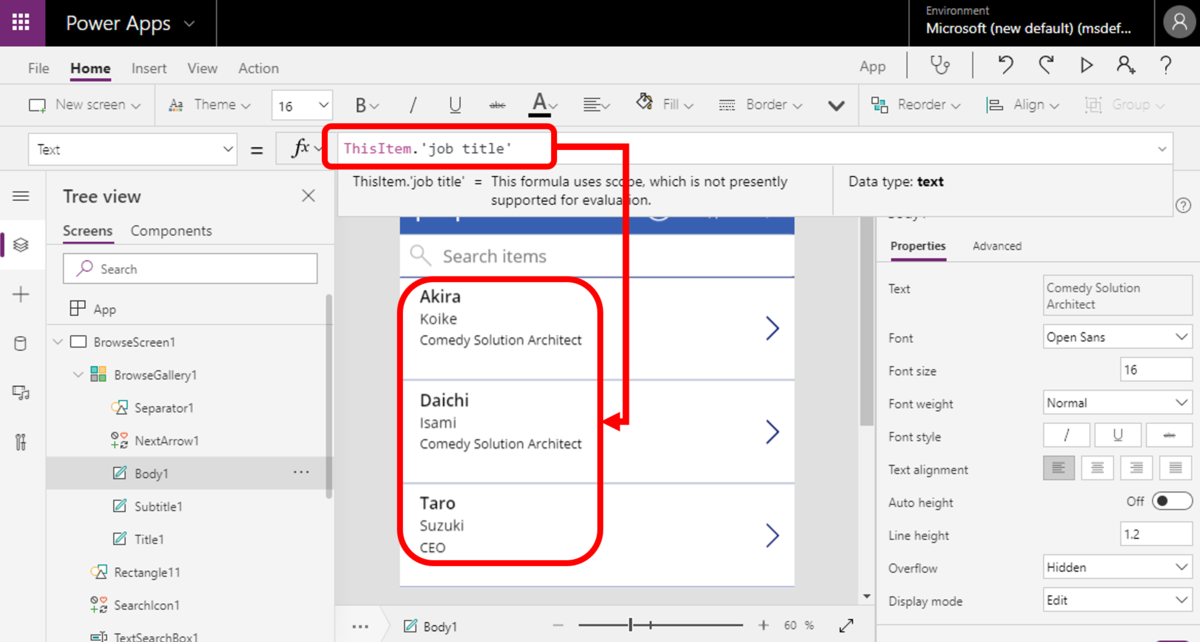
Choose "company name" area and find formula like below.
f:id:waritohutsu:20200311055251p:plain

Update a column from "company" to "job title". This change will be immediately effected into your app like below.
f:id:waritohutsu:20200311055440p:plain

How to update texts on TextInput with button clicks on PowerApps

I believe it might be first challenge to update text of TextInput because it's a little bit far from intuition steps. Most easiest way to understand how to build up this is to test for yourself. Here is an one of simplest articles to describe the steps.

Simple steps how to update text on TextInput

Open https://create.powerapps.com/studio/ and choose "Blacnk App" by following an image below.
f:id:waritohutsu:20200309052838p:plain

Choose "Insert > Text -> Text Input" to put TextInput control on your app.
f:id:waritohutsu:20200309053016p:plain

Choose "Insert > Button" to put Button Control on your app.
f:id:waritohutsu:20200309053210p:plain

You can find two controls on Screen1 like below.
f:id:waritohutsu:20200309053305p:plain

You need to utilize variable to update the text. Click your InputText control, choose "Advanced" and update Data - Default as variable name - ex. "val01" like below. You can avoid error at this time because this error will be fixed after Button control setup.
f:id:waritohutsu:20200309053431p:plain

Click your button control, choose "Advance" and update "OnSelect" formula like below.
f:id:waritohutsu:20200309054422p:plain

Reset(TextInput1);
UpdateContext({val01 : "hello"});

Debug to update text on TextInput

Execute this test apps and click button, and you can confirm behavior below.
f:id:waritohutsu:20200309054803p:plain