normalian blog

Let's talk about Microsoft Azure, ASP.NET and Java!

What is workaround when you got error messages "There was an error during download.Failed" while downloading container images

As you know, Service Fabric is one of implementations to offer Microservice Architecture provided by Microsoft. Of course, it can be deployed Docker Images both Windows and Linux base images, but you should note "Operating System" of Service Fabric cluster matches with Docker images when you want to deploy Docker images. There might be some reasons of error messages "There was an error during download.Failed" like below when you got the messages while deploying your images.
f:id:waritohutsu:20180317111137p:plain

It's caused by some reasons and it should be one of below.

  1. URL of your Docker image is invalid
  2. The authentication info of your Docker repository account is invalid
  3. There is virtualization mechanism mismatch between base OS of Docker images and operating system version of your Service Fabric cluster

No.1 and No.2 are trivial and not so difficult to fix it, but it's not easy to clarify when you got the message caused by No.3. In this article, I will dig into cause of No.3.

Docker container base images need to match the version of the host its running on. Unfortunately Windows made a breaking change where container images are not compatible across hosts like below article.
docs.microsoft.com
You need to specify your Service Fabric cluster "Operating System" based on your Docker image base OS like below image.
f:id:waritohutsu:20180317110812p:plain

  • You must specify "WindowsServer 2016-Datacenter-with-Containers" as Service Fabric cluster Operation System if your base OS is "Windows Server 2016"
  • You must specify "WindowsServerSemiAnnual Datacenter-Core-1709-with-Containers" as Service Fabric cluster Operation System if your base OS is "Windows Server version 1709"

Example to match OS Versions

It's important to match your Service Fabric cluster "Operating System" and base OS version specified in Dockerfile "FROM" keyword. And I put ServiceManifest and ApplicationManifest.xml just in case.

Example - part of Dockerfile

# This base OS for "WindowsServer 2016-Datacenter-with-Containers"
#FROM microsoft/aspnetcore-build:2.0.5-2.1.4-nanoserver-sac2016 AS base
# This base OS for "WindowsServerSemiAnnual Datacenter-Core-1709-with-Containers"
FROM microsoft/aspnetcore:2.0-nanoserver-1709 AS base
WORKDIR /app
EXPOSE 80

# This base OS for "WindowsServer 2016-Datacenter-with-Containers"
#FROM microsoft/aspnetcore-build:2.0.5-2.1.4-nanoserver-sac2016 AS build
# This base OS for "WindowsServerSemiAnnual Datacenter-Core-1709-with-Containers"
FROM microsoft/aspnetcore-build:2.0-nanoserver-1709 AS build
WORKDIR /src
COPY *.sln ./
COPY NetCoreWebApp/NetCoreWebApp.csproj NetCoreWebApp/
RUN dotnet restore
COPY . .
WORKDIR /src/NetCoreWebApp
RUN dotnet build -c Release -o /app

FROM build AS publish
RUN dotnet publish -c Release -o /app

FROM base AS final
WORKDIR /app
COPY --from=publish /app .
ENTRYPOINT ["dotnet", "NetCoreWebApp.dll"]


Example - part of ApplicationManifest.xml

  <ServiceManifestImport>
    <ServiceManifestRef ServiceManifestName="GuestContainer1Pkg" ServiceManifestVersion="1.0.0" />
    <ConfigOverrides />
    <Policies>
      <ContainerHostPolicies CodePackageRef="Code">
        <RepositoryCredentials AccountName="Username of your Container registry" Password="password of your Container registry" PasswordEncrypted="false"/>
        <PortBinding ContainerPort="80" EndpointRef="GuestContainer1TypeEndpoint"/>
      </ContainerHostPolicies>
    </Policies>
  </ServiceManifestImport>

Example - part of ServiceManifest.xml

    <EntryPoint>
      <!-- Follow this link for more information about deploying Windows containers to Service Fabric: https://aka.ms/sfguestcontainers -->
      <ContainerHost>
        <ImageName>"Username of your Container registry".azurecr.io/sample/helloworldapp:latest</ImageName>
      </ContainerHost>
    </EntryPoint>

How to pass values generated on VSTS processes into other build/release tasks

When you deploy templates with some linked templates, the linked templates should be stored public or limited access wtih SAS token. But this sometimes makes difficult to setup CI/CD pipeline on Visual Studio Team Service(VSTS). You can understand how to setup this with this article and GitHub - normalian/ARMTemplate-SASToken-InVSTS-Sample.
You can generate SAS token with VSTS task in build process and pass the value with VSTS variables, and you can also override ARM template parameters with VSTS tasks. This is key concepts of this article.

In VSTS Build Process

Create "Azure PowerShell script" task and "Azure Deployment: Create Or Update Resource Group Action" like below.
f:id:waritohutsu:20180311085121p:plain

Azure PowerShell script: inline Script – inline script
Edit "Azure PowerShell script" task like below.
f:id:waritohutsu:20180311085327p:plain

$context = New-AzureStorageContext -StorageAccountName 'your storage account name' -StorageAccountKey 'your storage access key'
$sasUrl = New-AzureStorageContainerSASToken -Container templates -Permission rwdl -Context $context 
Write-Output ("##vso[task.setvariable variable=SasUrl;]$sasUrl")

You can store generated values with VSTS variables like above.

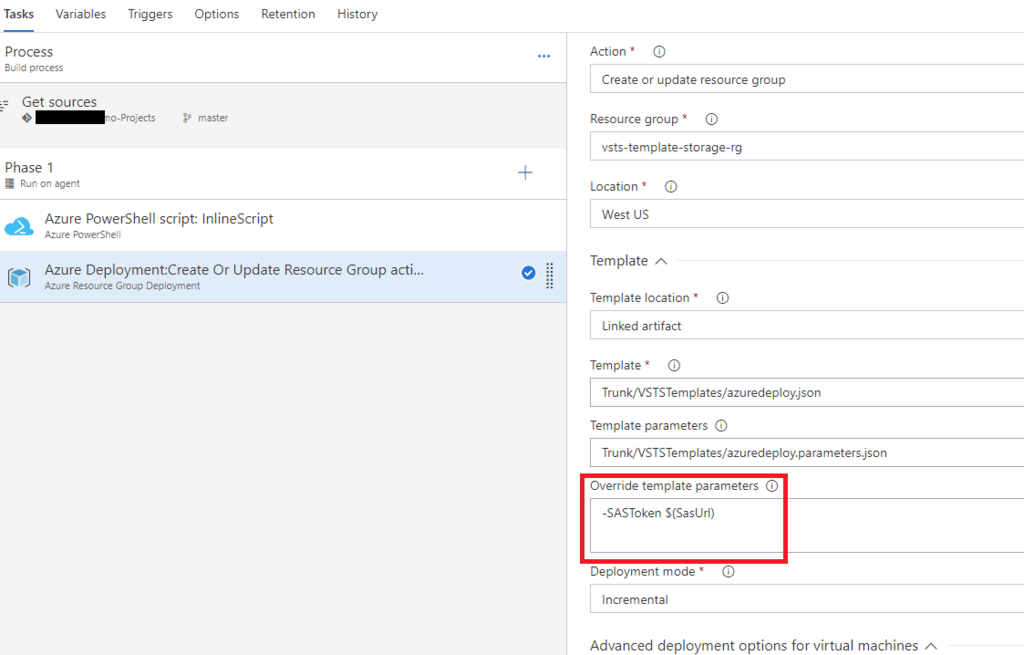
Azure Resource Group Deployment - Override template parameters
Edit "Azure Deployment: Create Or Update Resource Group Action" like below.
f:id:waritohutsu:20180311085500p:plain

-SASToken $(SasUrl)

Part of ARM template

Now you can use SAS token to specify your linked templates like below. Refer this sample if you need.

    "variables": {
      "sharedTemplateUrl": "[concat('https://'your storage account name'.blob.core.windows.net/templates/blank-azuredeploy.json', parameters('SASToken') )]",
      "sharedParametersUrl": "[concat('https://'your storage account name'.blob.core.windows.net/templates/blank-azuredeploy.parameters.json', parameters('SASToken'))]"
    },

How to setup simple Workflow with Azure Automation

You should read below article before following this article, because this article make a Azure Automation workflow collaborating Runbooks.
normalian.hatenablog.com
Azure Automation offers to collaborate with each Runbooks as Workflok, and you can setup your simple workflow with following this article!

Create your new Runbook as "PowerShell"

Create your new "PowrShell" Runbook under your Azure Automation account and edit it like below. This Runbook output your Azure resources in a location specified by a parameter.

Param
(
    [Parameter (Mandatory = $true)]
    [String] $Location = 'Japan East'
)

# Setup Authentication
$Conn = Get-AutomationConnection -Name AzureRunAsConnection
Add-AzureRMAccount -ServicePrincipal -Tenant $Conn.TenantID -ApplicationId $Conn.ApplicationID -CertificateThumbprint $Conn.CertificateThumbprint

Get-AzureRmResourceGroup -Location $Location | ForEach-Object { Write-Output $_.ResourceGroupName }

You can specify parameters with "Param" keyword like above. "PowerShell Workflow" created in next section can call "PowerShell" Runbook, so you have to create your Runbooks as "PowerShell".

Create new Runbook as "PowerShell Workflow"

You can find how to pass your parameters and how to get output with your "PowerShell" Runbook.

workflow workflow-sample
{
    Param
    (
        [Parameter (Mandatory = $true)]
        [String] $Location01 = "West US",
        [Parameter (Mandatory = $true)]
        [String] $Location02 = "West Central US"
    )

    # settings
    $automationAccountName = "mytest-automation"
    $resourceGroupName = "mytest-automation-rg"

    # Setup Authentication
    $Conn = Get-AutomationConnection -Name AzureRunAsConnection
    Add-AzureRMAccount -ServicePrincipal -Tenant $Conn.TenantID -ApplicationId $Conn.ApplicationID -CertificateThumbprint $Conn.CertificateThumbprint

    ## backup Runbook
    echo '#1 runbook starts'
    $params = @{ 'Location'=$Location01 }
    $runbookName = 'execute-azure-cmdlet'
    $job = Start-AzureRmAutomationRunbook -AutomationAccountName $automationAccountName -Name $runbookName -ResourceGroupName $resourceGroupName -Parameters $params
    $doLoop = $true
    While ($doLoop) {
        $job = Get-AzureRmAutomationJob –AutomationAccountName $automationAccountName -Id $job.JobId -ResourceGroupName $resourceGroupName
        $status = $job.Status
        if($status -eq "Failed") {
            Write-Error "Error in $runbookName"
            Write-Error $job.Exception
            throw $job.Exception
        }
        $doLoop = (($status -ne "Completed") -and ($status -ne "Suspended") -and ($status -ne "Stopped"))
        Start-Sleep -Seconds 2
    }
    echo '################# output start #################'
    $record = Get-AzureRmAutomationJobOutput –AutomationAccountName $automationAccountName -Id $job.JobId -ResourceGroupName $resourceGroupName –Stream Any | Get-AzureRmAutomationJobOutputRecord
    $record # for example
    echo '                               #################'
    $record | Where-Object { $_.Value.value -NE $null} | ForEach-Object { Write-Output $_.Value.value }
    echo '################# output end #################'
    echo '#1 runbook is ended'

    ## 
    echo '#2 runbook is starts'
    $params = @{ 'Location'=$Location02 }
    $runbookName = 'execute-azure-cmdlet'
    $job = Start-AzureRmAutomationRunbook -AutomationAccountName $automationAccountName -Name $runbookName -ResourceGroupName $resourceGroupName -Parameters $params
    $doLoop = $true
    While ($doLoop) {
        $job = Get-AzureRmAutomationJob –AutomationAccountName $automationAccountName -Id $job.JobId -ResourceGroupName $resourceGroupName
        $status = $job.Status
        if($status -eq "Failed") {
            Write-Error "Error in $runbookName"
            Write-Error $job.Exception
            throw $job.Exception
        }
        $doLoop = (($status -ne "Completed") -and ($status -ne "Suspended") -and ($status -ne "Stopped"))
        Start-Sleep -Seconds 2
    }
    echo '################# output start #################'
    $record = Get-AzureRmAutomationJobOutput –AutomationAccountName $automationAccountName -Id $job.JobId -ResourceGroupName $resourceGroupName –Stream Any | Get-AzureRmAutomationJobOutputRecord
    $record | Where-Object { $_.Value.value -NE $null} | ForEach-Object { Write-Output $_.Value.value }
    echo '################# output end #################'
    echo '#2 runbook is ended'
}

Output logs with Workflow

You can execute your Workflow and find output logs like below.

PSComputerName        : localhost
PSSourceJobInstanceId : 256fbcbd-f339-4ce5-b75b-0dc973dd0f2a
Environments          : {AzureCloud, AzureChinaCloud, AzureUSGovernment}
Context               : Microsoft.Azure.Commands.Profile.Models.PSAzureContext


#1 runbook starts

################# output start #################

PSComputerName        : localhost

PSSourceJobInstanceId : 256fbcbd-f339-4ce5-b75b-0dc973dd0f2a
Value                 : {Environments, Context}
ResourceGroupName     : mytest-automation-rg
AutomationAccountName : mytest-automation
JobId                 : eb19892d-8e2d-4572-862f-9205ca6e89fc
StreamRecordId        : eb19892d-8e2d-4572-862f-9205ca6e89fc:00636563050813081260:00000000000000000001
Time                  : 03/10/2018 18:58:01 +00:00
Summary               : 
Type                  : Output

PSComputerName        : localhost
PSSourceJobInstanceId : 256fbcbd-f339-4ce5-b75b-0dc973dd0f2a
Value                 : {value}
ResourceGroupName     : mytest-automation-rg
AutomationAccountName : mytest-automation
JobId                 : eb19892d-8e2d-4572-862f-9205ca6e89fc
StreamRecordId        : eb19892d-8e2d-4572-862f-9205ca6e89fc:00636563050827143533:00000000000000000002
Time                  : 03/10/2018 18:58:02 +00:00
Summary               : normalian-datacatalog-rg
Type                  : Output

PSComputerName        : localhost
PSSourceJobInstanceId : 256fbcbd-f339-4ce5-b75b-0dc973dd0f2a
Value                 : {value}
ResourceGroupName     : mytest-automation-rg
AutomationAccountName : mytest-automation
JobId                 : eb19892d-8e2d-4572-862f-9205ca6e89fc
StreamRecordId        : eb19892d-8e2d-4572-862f-9205ca6e89fc:00636563050827612512:00000000000000000003
Time                  : 03/10/2018 18:58:02 +00:00
Summary               : sqldb-rg
Type                  : Output

                               #################

normalian-datacatalog-rg

sqldb-rg

################# output end #################

#1 runbook is ended

#2 runbook is starts

################# output start #################

demo-automation-rg

mytest-automation-rg

################# output end #################

#2 runbook is ended

How to execute Microsoft Azure PowerShell commands on Azure Automation

As you know, Azure Automation is really great feature to automate your schedulable tasks both public cloud an on-premise. There are massive documents to describe how to do that including abstraction. I will introduce how to do that simply with screenshots.

Create your Azure Automation Account

At first, note when you create Azure Automation account. And you must create "Azure Run As account" like below, because it's mandatory to execute your Azure Automation scripts called as "Runbook". This probably need your Azure Active Directory privilege of App Registration.
f:id:waritohutsu:20180310093220p:plain

Create your Runbook

Create a Runbook used to execute your scripts. Choose "Runbook" from left side of you Azure Automation account and click "Add a runbook" like below.
f:id:waritohutsu:20180310093511p:plain
And input your Runbook name and choose "PowerShell" as your Runbook type.
f:id:waritohutsu:20180310093619p:plain

Create your scripts into your Runbook

Open your Runbook and click "Edit" to create your script. Update your script like below.

$Conn = Get-AutomationConnection -Name AzureRunAsConnection
Add-AzureRMAccount -ServicePrincipal -Tenant $Conn.TenantID -ApplicationId $Conn.ApplicationID -CertificateThumbprint $Conn.CertificateThumbprint
 
get-azurermresourcegroup | ForEach-Object { $_.ResourceGroupName }

The name of "AzureRunAsConnection" should be created in "'your Azure Automation account name'- Connections". Once again, this is mandatory to execute your script. Confirm it like below if you need.
f:id:waritohutsu:20180310095341p:plain

After updating the script, click "Test pane" to test your script. You can execute your script by clicking "Start" button, so you can take result like below.
f:id:waritohutsu:20180310095541p:plain

Now you can publish your script by clicking "Publish" button to schedule and collaborate with other Runbooks. After publishing that, confirm the status like below.
f:id:waritohutsu:20180310095747p:plain

Schedule your Runbook

Go back to top of your Azure Automation account and choose "Schedule" and click "Add a schedule" like below.
f:id:waritohutsu:20180310095922p:plain

In this example, I setup my schedule as weekly like below.
f:id:waritohutsu:20180310100022p:plain

Finally, you have to associate with your Runbook and Schedule. Go back to your Runbook, choose "Schedule" and click "Add a schedule". Associate your schedule like below.
f:id:waritohutsu:20180310100223p:plain

Now, you can execute your script based on your schedule.

How to revert new deployment to old one in Service Fabric

As you know, Service Fabric is one of services to achieve Microservice architecture. There are two options when you got bad deployments using Service Fabric.

  • manual deployment: "Start-ServiceFabricApplicationUpgrade" PowerShell command
  • VSTS deployment: create new Release using existing build packages

Revert with "Start-ServiceFabricApplicationUpgrade"

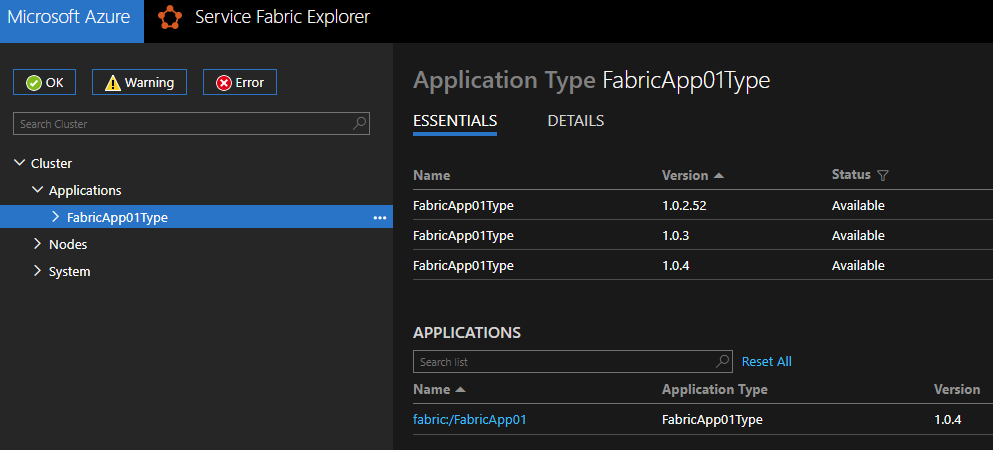
Service Fabric retains old application packages for a while like below. As far as I confirmed, it should retain more than 24 hours.
f:id:waritohutsu:20180220080334p:plain

Meanwhile the retainment, you can revert from new deployment to old one with below PowerShell commands.

Login-AzureRmAccount

$applicationName = 'fabric:/FabricApp01'

$connectArgs = @{  ConnectionEndpoint = "'<your cluster name'".westus.cloudapp.azure.com:19000';  
                   X509Credential = $True;  
                   StoreLocation = "CurrentUser";  
                   StoreName = "My";  
                   ServerCommonName = "'your cluster name'.westus.cloudapp.azure.com";  
                   FindType = 'FindByThumbprint';  
                   # "Client certificates" thumbprint. Pick up this value from "security" item in your cluster on Azure Portal
                   FindValue = "YYYYYYYYYY7e3372bc1ed5cf62b435XXXXXXXXXX"; 
                   # "Cluster certificates" thumbprint.  Pick up this value from "security" item in your cluster on Azure Portal
                   ServerCertThumbprint = "YYYYYYYYYY2E67D7E54647A12B7787XXXXXXXXXX" } 
Connect-ServiceFabricCluster @connectArgs

$app = Get-ServiceFabricApplication -ApplicationName $applicationName
$app 
$table = @{}
$app.ApplicationParameters | ForEach-Object { $table.Add( $_.Name, $_.Value)}
Start-ServiceFabricApplicationUpgrade -ApplicationName $applicationName -ApplicationTypeVersion "1.0.2.52" -ApplicationParameter $table -UnmonitoredAuto

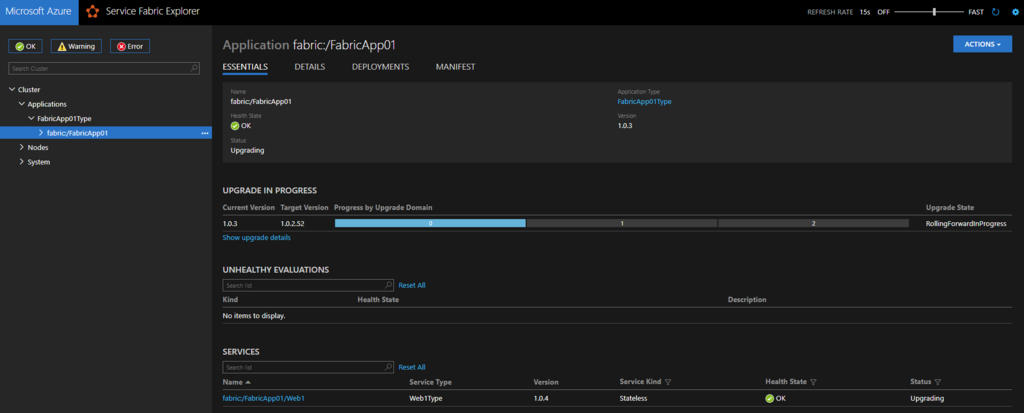
You can watch it progress in Service Fabric Explorer like below.
f:id:waritohutsu:20180220081752p:plain

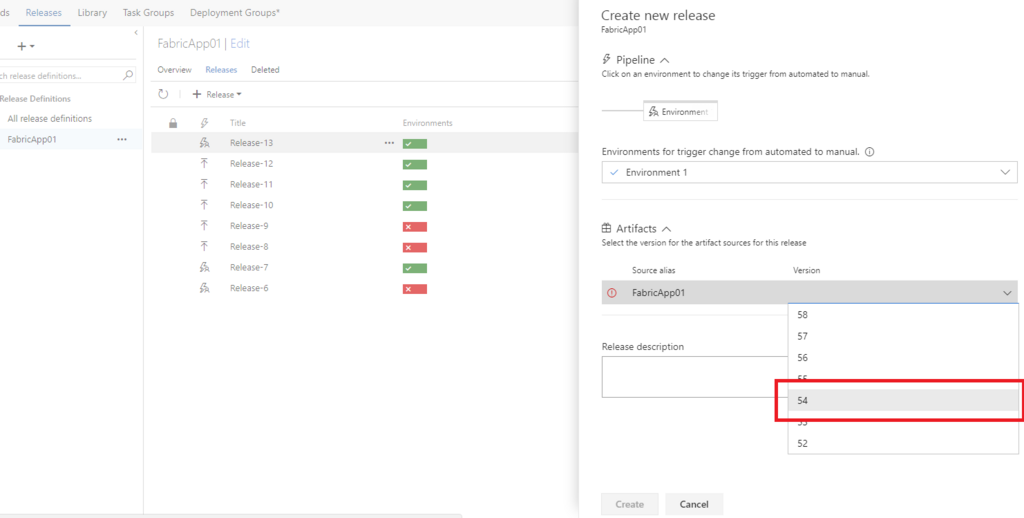
Revert with new Release using existing build packages

I believe you have already made some build packages for deployment into Service Fabric. You can create new Release in your VSTS using the packages like below.
f:id:waritohutsu:20180220081246p:plain

Setup tips for SQL DB auto export PowerShell scripts

SQL Database offered to backup SQL Database instances with their build-in features, but it was expired now. You can choose below options.

In this post, I will introduce setup tips for the scripts. Please read README of "Automate export PowerShell script with Azure Automation" to setup this script at first.

Add SQL DB instances into single script

You can add other databases to add them into “$databaseServerPairs” in below code.

And please use other credentials if you use other SQL Database servers.

Export error when SQL DB instances so large

Please read this section when you get below error.
f:id:waritohutsu:20180218102309p:plain

The error message is caused by below line.
- https://github.com/Microsoft/sql-server-samples/blob/master/samples/manage/azure-automation-automated-export/AutoExport.ps1#L115

The error is caused by below, so it seems to take too long time to copy DB data.

  if((-not $? -and $global:retryLimit -ile $dbObj.RetryCount) -or ($currentTime - $dbObj.OperationStartTime).TotalMinutes -gt $global:waitInMinutes)

Please change variable “$waitInMinutes = 30;” from 30 minutes to long time.

In order to execute the runbook do I need to have the automation account to have the ability to “Run As account”?

“Azure Run As account” is needed, because we can't execute Runbook scripts without this. It needs to enable Azure Active Directory to register applications.
https://docs.microsoft.com/en-us/azure/automation/automation-create-aduser-account#create-an-automation-account-in-the-azure-portal

" 429 Too many requests" error in Runbook Job log when exporting large SQL Database instances

You will get below error when you execute long jobs.

Get-AzureSqlDatabaseImportExportStatus : A task was canceled.
At line:181 char:11
+ ...    $check = Get-AzureSqlDatabaseImportExportStatus -Request $dbObj.Ex ...
+                 ~~~~~~~~~~~~~~~~~~~~~~~~~~~~~~~~~~~~~~~~~~~~~~~~~~~~~~~~~
    + CategoryInfo          : NotSpecified: (:) [Get-AzureSqlDatabaseImportExportStatus], TaskCanceledException
    + FullyQualifiedErrorId : 
Microsoft.WindowsAzure.Commands.SqlDatabase.Database.Cmdlet.GetAzureSqlDatabaseImportExportStatus

The error is caused by frequent requests using “Get-AzureSqlDatabaseImportExportStatus”, so it need to insert “Start-Sleep” in the script to reduce Azure Management API calls internally.

How to setup Service Fabric connections on VSTS

Visual Studio Team Service, VSTS, is really powerful tool to achieve your CI/CD pipeline. Before setting up Service Fabric connections, you need to create a *.pfx file to register as "Client Admin" certificate into your Service Fabric cluster. Please refer
Step by step how to setup Service Fabric Explorer on Azure - normalian blog if you have registered no *.pfx files as "Admin Client" certificates yet.

Create BASE64 string from your *.pfx file

Create BASE64 string for registering on VSTS portal to setup Service Fabric cluster connections.

PS C:\Users\normalian> [System.Convert]::ToBase64String([System.IO.File]::ReadAllBytes("D:\temp\yourpfxfile.pfx"))
MIIJ+gIBAzCCCbYGCSqGSIb3DQEHAaCCCacEggmjMIIJnzCCBgAGCSqGSIb3DQEHAaCCBfEEggXtMIIF6TCCBeUGCyqGSIb3DQEMCgECoIIE9jCCBPIwHAYKKoZIh
"omission"
OBBRKwq7BWPo3ZdSGscBgAYKIhP8yGwICB9A=

Pick up and save the BASE64 string.

Setup on VSTS portal

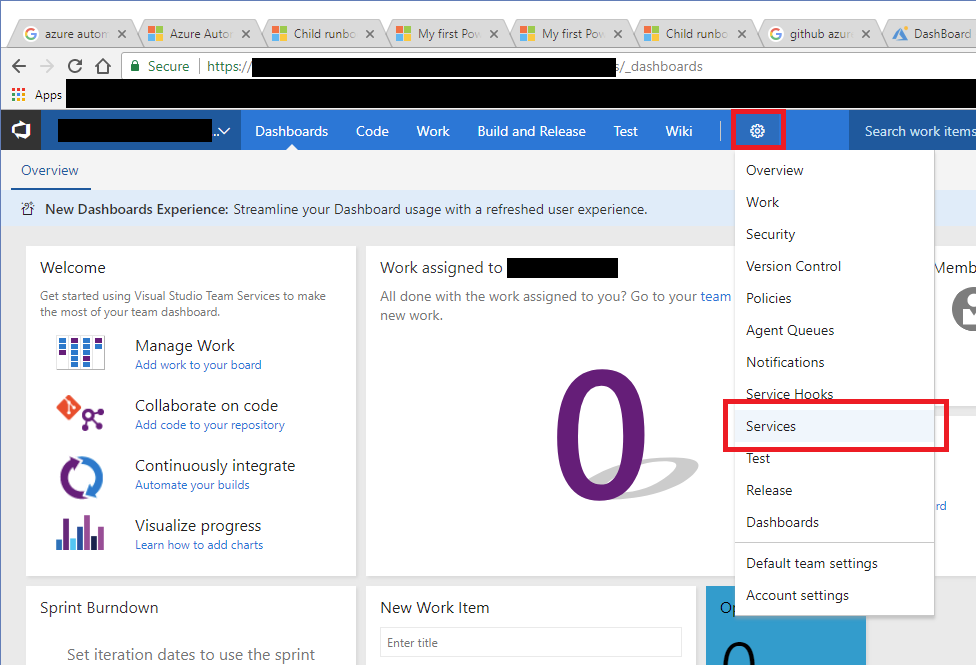
Go to your VSTS project page and choose right side icon and "Services" item like below.
f:id:waritohutsu:20180216091954p:plain

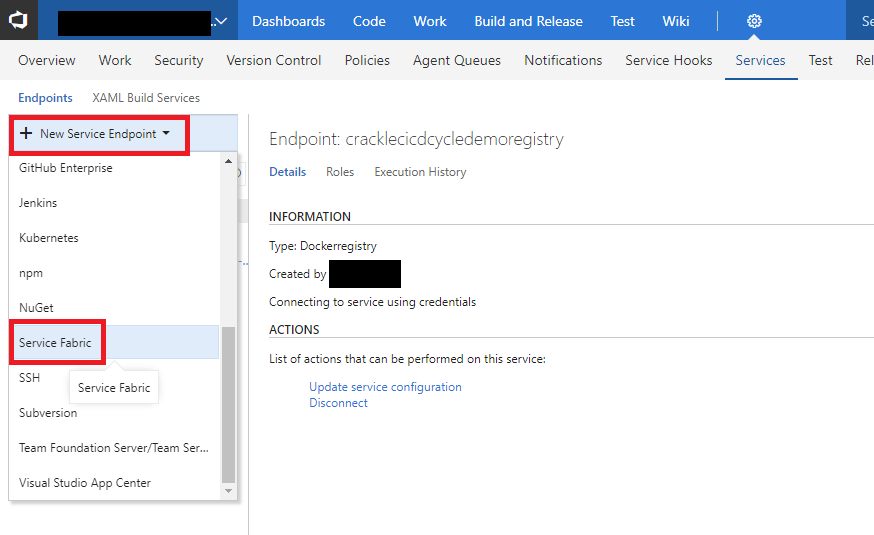
Click "New Service Endpoint" and choose "Service Fabric" like below.
f:id:waritohutsu:20180216092050p:plain

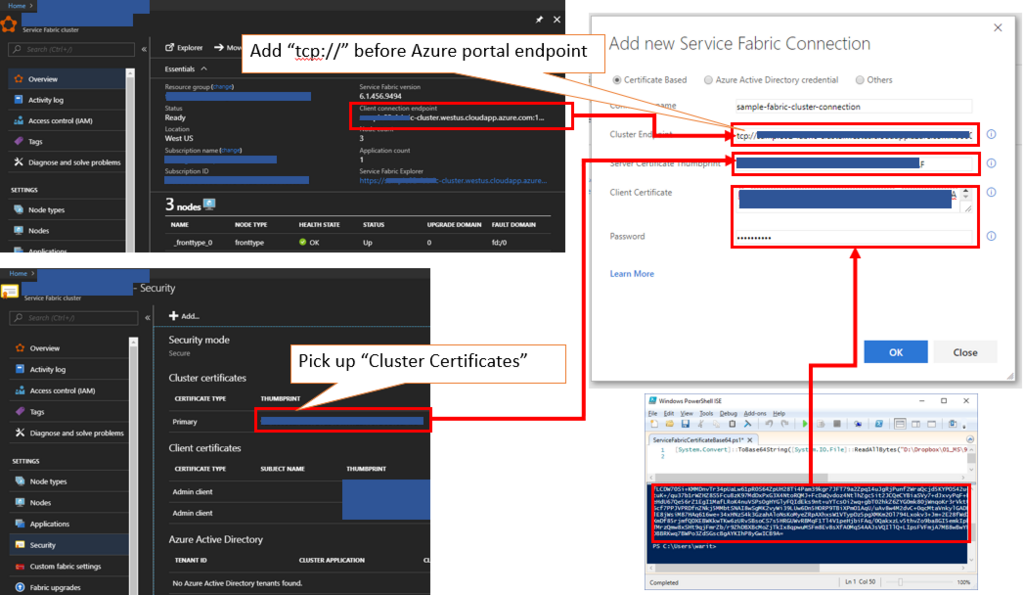
Input your info into "Add new Service Fabric Connection" wizard like below. Input *.pfx file password into "Password" section.
f:id:waritohutsu:20180216093140p:plain

Now, you can use your Service Fabric cluster in your VSTS project.