normalian blog

Let's talk about Microsoft Azure, ASP.NET and Java!

カスタムドメイン&BYOC で Azure Front Door を試した際のハマりどころ

その昔から Azure には Traffic Manager と呼ばれるリージョンレベルで負荷分散が行える機能がありましたが、同機能の位置づけはグローバル DNS 的なものであり、WAF 的な機能、URL の書き換え、SSL オフロードといった機能を利用したい場合、リクエストをリージョンレベルに振り分けた後、リージョン単位でのサービス(Azure 組み込み機能だと Application Gateway が一般的)で制御をおこなうのが一般的でした。Azure Front Door はリージョンを跨いでのリクエスト振り分けが可能なことに加え、上記で記載した機能も同リソースを用いることで実現可能です。
https://docs.microsoft.com/en-us/azure/frontdoor/front-door-overview

Azure Front Door には Standard と Premium と呼ばれる二つの SKU がありますが、特に Premium SKU を利用する場合は Private Link の利用が可能になります。Standard SKU でも機能的に十分なことが多いとは思いますが、いわゆるエンプラ的なお客様のコンプライアンスに沿うために閉域的な通信が必要な場合には必須な機能といえます。
https://azure.microsoft.com/en-us/pricing/details/frontdoor/

生まれも社畜、育ちも社畜、今は外資社畜としてコテコテのエンプラ道を歩んできた身からすれば、上記の Private Link に加えて「カスタムドメイン」と「Bring Your Own Certificate (BYOC) 」を試さざるを得ないと思い色々と試しました。結果的には以下の構成になっております。今回は Azure Front Door で SSL オフロードをしていますが、こちらは要件に合わせて調整下さい。

これに関しては色々とハマりどころがあり、ハマりどころときれいな設定手順を混ぜるとこんがらがりそうだったので、今回はハマりどころに注力して記載しております。

Azure Front Door に証明書を登録する際には Azure AD の Global Administrator 権限が必要になる場合がある

Azure Front Door は Azure Key Vault 経由でしか証明書が読み込めません。そのため Azure Front Door 向けの Service Principal を作成・登録して操作する必要があるのですが、こちらの処理時に当該 Azure AD の Global Administrator 権限が必要になります。

Note

This action requires you to have Global Administrator permissions in Azure AD.
 The registration only needs to be performed once per Azure AD tenant.

https://docs.microsoft.com/en-us/azure/frontdoor/front-door-custom-domain-https

ただこちらは Azure AD テナント毎に一度操作を実行すればよいので、Global Administrator に処理を頼むことができれば問題ありません。つまり Azure Front Door のリソースを何個作ろうと同じサービスプリンシパルを使いまわすことになります。この辺りはヘイシャーにお勤めの方とかは Microsoft.AzureFrontDoor-Cdn とかの名前で Service Principal を探せば見つかると思います(以下参照。
Register Azure Front Door CDN with Key Vault - Azure Tech Guy

Azure Front Door はオレオレ証明書をサポートしない

こちらに関しては良く言えば「セキュリティ的に厳密さが高いのがデフォルト設定になっている」ともいえますが、開発時には中々大変です。以下にはっきりと記載がありますが、自己証明書を利用する場合はアクセスがブロックされます。

When you create your TLS/SSL certificate, you must create a complete certificate chain with
an allowed Certificate Authority (CA) that is part of the Microsoft Trusted CA List. If you use 
a non-allowed CA, your request will be rejected.

Certificates from internal CAs or self-signed certificates aren't allowed.

End-to-end TLS with Azure Front Door | Microsoft Docs

トラステッド認証局 (CA) からの署名済み証明書を取得する必要がありますが、ここは Azure Front Door をお試しで試す場合に大きなハードルの一つ目です。こちらに対しては App Service Certificate を利用しました。ご存じない方も居るかも知れませんが、同機能は App Service 専用ではありません。
Add and manage TLS/SSL certificates - Azure App Service | Microsoft Docs

Azure Front Door は HTTPS 通信時に CN がマッチングしないと通信をはじく

開発環境と似たような設定で本番リリースした結果で痛い目を見ることを避けらるようになっているとも言えますが、やはり開発時にはハードルが高いです。節のタイトルに加えて Azure Front Door 自体には「apex/root ドメインは未サポート(normalian.work とかはダメで、www.normalian.work とかならOK」という制約もあります。

Enabling HTTPS via Front Door managed certificate is not supported for 
apex/root domains (example: contoso.com). You can use your own
certificate for this scenario. Please continue with Option 2 for further details.

Tutorial - Configure HTTPS on a custom domain for Azure Front Door | Microsoft Docs

ここで注意が必要なのが、当然ながら App Service Certificate は apex/root ドメイン(normalian.work 等)で作成する必要があるということです。何が問題かというと、Azure Front Door 自身は apex/root ドメインは未サポート( www.normalian.work とかならOK )の点とでドメイン名に不整合が発生します。私は

  • App Service Certificate で normalian.work ドメイン向けの Standard SKU の証明書作成
  • Azure Front Door で www.normalian.work のカスタムドメイン登録

を行い、一通りの設定をしましたが、当然疎通は通らず、Log Analytics のログを確認したところ CertificateNameCheckFailed のエラーが発生していました。

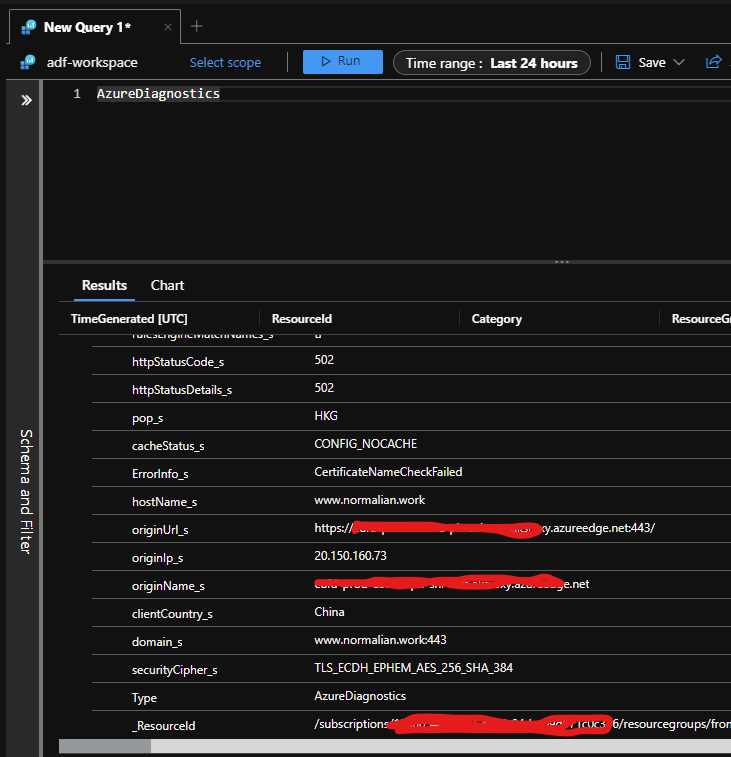
こちらに関しての回避方法は比較的容易で App Service Certificate 側でワイルドカード証明書として作成する方法です。

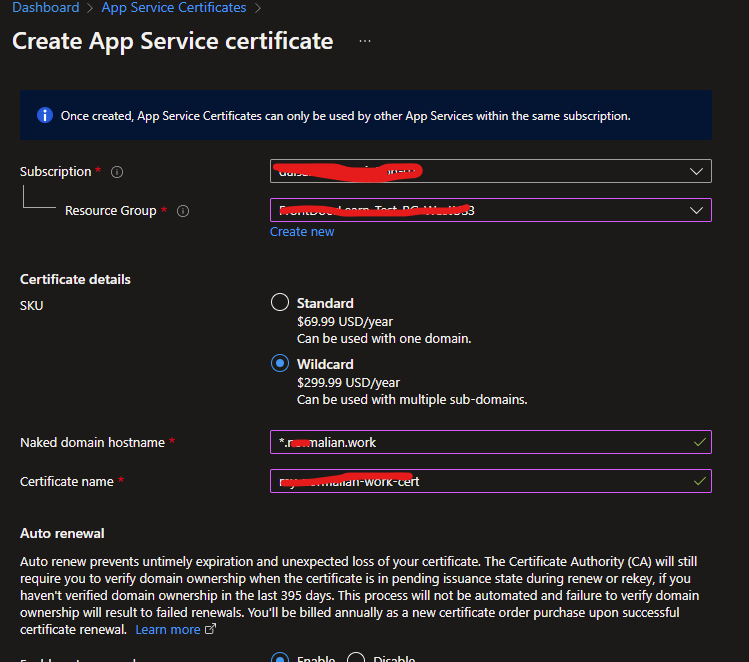
App Service Certificate 上でワイルドカード証明書として作成した場合、www.normalian.work といったドメインでも対応が可能になります。Azure Front Door には Azure Key Vault 経由で登録されるので以下の様になります。

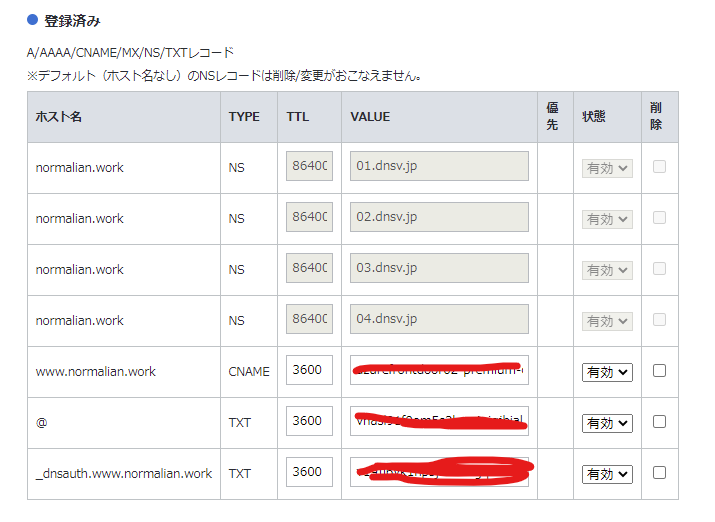
CNAME レコードの登録、TXT レコードの登録が必要

こちらに関しては大して問題ならないかもしれませんが、Azure Front Door でカスタムドメインを登録する場合はタイトルで記載した二つの処理が必要になります(以下は設定済の環境。

How to add a custom domain - Azure Front Door | Microsoft Docs

私は未だにメールの多さでちょっと辛いお名前ドットコムを使っており、以下が同サイトでの設定画面になっています。一つ目の CNAMEと三つ目の TXT レコードが Azure Front Door 向け、二つ目の TXT レコードが App Service Certificate 向けと言ったところです。

今回はほぼ証明書とカスタムドメインでのハマりどころを記載しましたが、誰かの手助けになれば幸いです。

Completely turn off your AKS clusters to reduce your cost!

As you might know, it was not possible to stop your AKS clusters completely because system pools are always required to be running. I have posted about this like below in past.
normalian.hatenablog.com

Here is quite useful feature to reduce AKS cost much effectively than before.
docs.microsoft.com

It should be really easy to follow the article. I have open Azure Portal and try to stop my AKS cluster like below, and it seems to be fine even if you have never registered "extension aks-preview" like below.
f:id:waritohutsu:20201007120040p:plain

You can find your node pools will be 0 nodes on Azure Portal or command lines after you have completed the commands.
f:id:waritohutsu:20201007120440p:plain

Let's utlize Azure Front Door to route requests globally

Azure Front Door is useful feature to manage and monitor your web traffics with global routing. Azure Front Door enables you to manage and optimize your global(multi-regions) customers easily. I believe readers of my blog want to acquire practical knowledge, so let's start to try!

At first, you need to note that Azure Front Door is global resource as you can confirm on Azure Portal below. This means you're no longer to be bothered by regional perspective at least for Azure Front Door.
f:id:waritohutsu:20200705041348p:plain

What's resources we can setup on Azure Front Door?

Azure Front Door can choose various types of resources like below. You are also possible to route requests out of Azure Platform with "Custom Host" and setup FQDNs. In this post, you can acquire knowledge how to use "Storage", "Public IP Address" and "Custom Host"
f:id:waritohutsu:20200705045658p:plain

Setup a sample scenarios

Here is an example architecture which I have setup as a sample for Azure Front Door.
f:id:waritohutsu:20200705050415p:plain

After creating your Azure Front Door instance, choose "Front Door designer" and add your owned domain on Azure Portal like below.
f:id:waritohutsu:20200705050628p:plain

Next, you can add your backend resources on "Backend pools" menu like below.
f:id:waritohutsu:20200705050804p:plain

You can add "Microsoft Cloud Workshop" site like below by setting up as "Custom host".
f:id:waritohutsu:20200705050950p:plain

Finally, you can setup rules how to forward or redirect HTTP/HTTPS requests into backend pools. In this example, all requests match with "/storage01/*" will be forwarded to my Azure Storage account into "/" path. Don't forget to specify as "/storage01/*" not ""/storage01/"
f:id:waritohutsu:20200705051353p:plain

Access a sample with Azure Front Door

You can confirm each request routings like below.
f:id:waritohutsu:20200705052118p:plain

Azure NAT Gateway enables Azure VMs to access internet without assigning Public IP

I guess some folks are not familiar with Azure NAT Gateway because this feature is quite useful but it's a little bit hard to recognize use cases. Here are my idea for Azure NAT Gateway use cases.

  1. Azure VMs, attached with Standard Internal Load Balancer, are required to assign PIP(Public IP) to access internet. Now, your Azure VMs are possible to access internet with Azure NAT Gateway without PIPs
  2. Azure VMs access Global IPs are identified as PIPs but this forces lots of effort to allow accesses from Azure to environments. Now, you can simplify Azure VMs access Global IPs by using Azure NAT Gateway

Of course, there should be much more use cases for Azure NAT Gateway. Please let me such use cases with comments of this blog. Here are architecture diagram for #1 and #2 scenarios.
f:id:waritohutsu:20200702094921p:plain

You can find each Azure VMs will access to internet via Azure NAT Gateway and their global IPs will be identified as PIP assigned to Azure NAT Gateway.

Create and attach Azure NAT Gateway to subnets

Go to Azure Portal and start to create like below. You need to put your Azure NAT Gateway name and choose region here.
f:id:waritohutsu:20200702095935p:plain

Next, choose your PIP to assign Azure NAT Gateway.
f:id:waritohutsu:20200702100019p:plain

Finally, you need to associate this Azure NAT Gateway to your subnets like below.
f:id:waritohutsu:20200702100104p:plain

PIP access via Azure NAT Gateway

Login to WildFlyVM0 having no PIP but 10.3.0.6 as private IP. Next, run "curl 'https://api.ipify.org?format=json'" to confirm global ip like below.
f:id:waritohutsu:20200702100316p:plain

Access Azure VMs individually through Private Link connections

I have posted about Azure Private Link both for "private endpoint" and "private link service". You can acquire knowledge how to exclusively expose your endpoints to your other VNETs and how to utilize such endpoints from your VMs on other VNETs.
normalian.hatenablog.com
This previous post has introduced for load balancing rules but I believe you will need to access specific VMs to take logs, confirm settings or others. Let's talk with an example in this case.

Expose WildFly endpoints with Private Link

I believe as you know, WildFly is one of the most popular Java application servers. WildFly exposes webapps endpoint as 8080 and management endpoints as 9990, so you have to meet requirements like below.

  • Need to setup load balancing rule for webapps endpoint - 8080
  • Need to access VMs individually for management endpoint - 9990

At first you need to enable both "private endpoint" and "private link service" to communicate the VNETs each others. And you can satisfy these requirements with "Load Balancing Rules" and "Inbound NAT Rules" on your Standard Load Balancer like below.
f:id:waritohutsu:20200626104601p:plain
You can put "Load Balancing Rules" for webapps endpoints and put "Inbound NAT Rules" to access each VMs by assigning ports per VM. Don't miss to pass parameters for WildFly, so here is an example to launch WildFly.

/opt/wildfly/bin/standalone.sh -b 0.0.0.0 -bmanagement 0.0.0.0 -Dcom.sun.management.jmxremote -Dcom.sun.management.jmxremote.port=8888 -Dcom.sun.management.jmxremote.authenticate=false -Dcom.sun.management.jmxremote.ssl=false

Load Balancing Rules

Create a rule for port 8080 of WildFly like below.
f:id:waritohutsu:20200626105626p:plain

Just specify a port mapping and a backend pool.
f:id:waritohutsu:20200626105653p:plain

You can access WildFly VMs with VNIC IP like below.
f:id:waritohutsu:20200626105932p:plain

Inbound NAT Rules

You need to create rules per VMs
f:id:waritohutsu:20200626105741p:plain

Here is setting for VM1. Please note to setup "Port" as "9991" because you need to mimic this setting for other VMs ex. VM2 is 9992.
f:id:waritohutsu:20200626105955p:plain

You can access each VMs with changing ports like below.
f:id:waritohutsu:20200626110158p:plain

How to expose your endpoints exclusively by using "private endpoint" and "private link service" of Azure Private Link

I believe Azure Private LInk is really essential feature especially for enterprise customers because this feature enables to exclusively expose your Azure PaaS resources and Azure VM resources. At first, we should confirm again that Azure Private Link has two types of features.

  • private link service: Expose endpoints by using Standard Load Balancer. These endpoints will be used by "private endpoint"
  • private endpoint: You can access Azure PaaS Services (for example, Azure Storage and SQL Database) and your endpoints exposed by "private link service" over a private endpoint in your virtual network.

This is a simple architecture with Private Link. Private Link( Private Endpoint and Private Link Service) will create VNICs automatically into VNETs enabled Private Link like below.
f:id:waritohutsu:20200620084516p:plain
Azure resources communicate each others exclusively with the created NICs. In this image, CentOSVM01 on myVNet exposes its endpoints with SLB(Standard Load Balancer) and SLB privately exposes endpoints with Private Link Service, so WinVM01 can access CentOSVM01 by using Private Endpoint.
You can find IP address spaces are overlapped in both VNETs but it works well by using Private Link.

What's benefits?

I believe one of the biggest benefits is you will no longer need to worry about IP addresses overlapping. VNET Peering is also quite useful feature but you have to always note addresses overlapping. You will get error messages below if you will try to connect overlapped VNETs.
f:id:waritohutsu:20200620065347p:plain

Try "private link service"

You can create your "private link service" just following an article below. Please note to use "Standard Load Balancer". In addition that, you have to choose "Internal" Load Balancer to expose your endpoints exclusively.
Quickstart - Create a Private Link service by using the Azure portal | Microsoft Docs

Go to Private Link Center page on Azure Portal and Click "Create private link service" below.
f:id:waritohutsu:20200620070858p:plain

You can find only Standard Load from this menu and setup each items properly by following wizards.
f:id:waritohutsu:20200620071413p:plain

Finally, you can confirm the result like here.
f:id:waritohutsu:20200620071557p:plain

Try "private endpoint"

It's easy to enable "private endpoint" for Azure PaaS features but we have to utilize command lines for your "private link service" endpoints. Here is sample and also refer to az network private-endpoint | Microsoft Docs.

az login
az account set -s "your subscription ID"
az network private-endpoint create \
 --resource-group "resource group name having a vnet to connet your endpoints" \
 --name "name of private endpoint" \
 --vnet-name "vnet name to connet your endpoints" \
 --subnet "subnet name of the vnet" \
 --private-connection-resource-id "/subscriptions/your subscription name/resourceGroups/your resource group name/providers/Microsoft.Network/privateLinkServices/your endpointname" 
 --connection-name "Name of the private link service connection"\
 --location "region ex. westus"

You can confirm your private endpoint like below if the command works well.
f:id:waritohutsu:20200620081627p:plain
f:id:waritohutsu:20200620081636p:plain

Access via Private Endpoint

Access to Windows VM by using Remote Desktop at first. And access CentOSVM01 with private IP like below.
f:id:waritohutsu:20200620085034p:plain

It's also possible to utilize Azure Private DNS, so you can access as internal FQDN.
f:id:waritohutsu:20200620085211p:plain

Object Replication - easiest way to replicate Block BLOBs into other regions?

Object Replication is a new feature for Azure Storage. This feature enable you to transfer BLOB objects into different regions easily with minimizing latency. You might know Data redundancy - Azure Storage | Microsoft Docs, but this feature is possible to replicate your BLOBs to only your paired region. In addition that, it's a little bit tricky to reach out your data on paired regions.

Object Replication offers feature to replicate your Block BLOBs to containers in any regions with just few setting on your Storage accounts, so this feature should be quite useful to replicate your data across countries. I believe most readers of this article would be quite busy, so here are summaries for Object Replication at this time - please note this Object Replication is under preview on June 2020 now.

  • This feature is for Block BLOBs, so you can't utilize this feature for VHD files, namely, Page BLOB
  • It takes about 2 minutes to transfer BLOB objects regardless regions but it would depends on size.
  • Need to set source containers "Public Access Level" as "Container" or "Blob", and this means it's not possible to use this feature with "Private". update on 6/14/2020
  • Enable to utilize all "Public Access Level" as "Private", "Container" or "Blob"
  • Need to setup as container level on Azure Storage accounts to replicate. You can setup up to two outbound policies per Azure Storage account
  • Available only France Central, Canada East and Canada Central on June 2020 now.
  • Pricing Tier, "Hot" "Cool" and "Archive", won't be propagated accurately. Refer to a section below. - update on 6/14/2020

How to enable Object Replication on your subscription

Follow this article at first. You need to register a couple of resource providers because this feature depends on other features such as Change feed and Versioning. Just a reference, it took about a week to enable Object Replication on my subscription.

Setup and try Object Replication on your Storage accounts

After provision of Object Replication on your subscription, you can find menu of Object Replication on your storage accounts like below. You can confirm both destination and source accounts at once.
f:id:waritohutsu:20200608025444p:plain

You can setup policies with specifying containers, Filters and "Copy over". It's also possible to handle objects which should be copied into other accounts.
f:id:waritohutsu:20200608030439p:plain

As you can confirm below, it takes about 1 minutes with less than 1MB file to replicate.
f:id:waritohutsu:20200608031250p:plain

Today, it's possible to setup up to two outbound policies per Storage accounts like below.
f:id:waritohutsu:20200608031718p:plain

Pricing Tier propagation

I have tried three types tire cases.

  • Red Box: Upload a file as "Hot" tier at first and change the tier into "Archive"
  • Green Box: Upload a file as "Archive" tier
  • Blue Box: Upload a file as "Cool" tier

f:id:waritohutsu:20200615033736p:plain

As you can confirm with the screenshot, here are results.

  • Red Box: Upload a file as "Hot" tier at first and change the tier into "Archive" -> pricing tier isn't propagated into dest blob
  • Green Box: Upload a file as "Archive" tier -> The blobs won't be copyed into dest containers
  • Blue Box: Upload a file as "Cool" tier -> "Cool" tier blobs will be copied into dest containers as "Hot" tier.