Azure AD ドメインサービスを利用して Windows も Linux もドメイン参加させてみる - その2 ~Windows と Linux マシンをドメインに参加させる~
はじめに
前回で Azure AD ドメインサービスを利用して Windows も Linux もドメイン参加させてみる - その1 ~まずはドメインサービスの有効化~ にてドメインサービスの有効化を記載したが、今回は実際に Windows Server と Linux サーバをドメインに参加させる手順を記載する。また、今回は前回手順で作成済みの以下のリソースを利用する点に留意してほしい。
- Azure Service Manager 版の仮想ネットワークを東アジアに一つ作成し、サブネットを作成
- Azure Active Directory のディレクトリを参加し、ドメイン サービスを有効化
今回は以下を作成するための概要を記載する。
DNS サーバの設定と VNET Peering 接続の設定
まず、Azure Resource Manager 上の仮想ネットワークを作成した後、仮想ネットワークに対して以下の様に DNS サーバを設定する。この IP アドレスはクラシックポータル側から取得する。

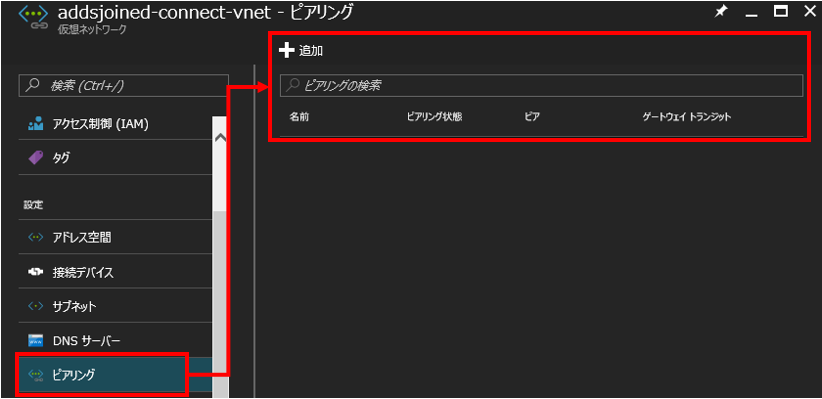
次に、以下の様に仮想ネットワーク - ピアリングを選択し、Azure Resource Manager の仮想ネットワークと Azure Service Manager モードの仮想ネットワークを接続する。

Windows Server を作成してドメイン参加を設定
Windows Server 2012 R2 の仮想マシンインスタンスと CentOS 7.2 の仮想マシンインスタンスを Azure Resource Manager 上の仮想ネットワークに作成する(こちらの手順自体は省略する)。これらを設定した時点で、以下の様な構成になっているはずだ。
├MYSERVICE-ARM-VNET:10.1.0.0/16
│ └─default:10.1.0.0/24
│    │
│    ├─ForAD-WinVM
│    │
│    └─ForAD-LinuxVM
│
<VNET Peering>
│
│
└MYSERVICE-ASM-VNET:10.100.0.0/16
  └─AD-Subnet:10.100.0.0/24
Windows Server 2012 R2 のドメイン参加
エクスプローラを開き、Computer を右クリックして Properties を選択する。その後、以下の様に作成したドメインサービスのドメイン名(例:xxxxx.onmicrosoft.com)を設定する。

Windows Server をドメイン参加する際の注意点として、Azure Active Directory に登録したユーザ名が
- exampleusername@exampledomain.onmicrosoft.com
の場合、ドメイン参加時は以下になる点だ。
- exampleusername@exampledomain
上記のユーザ認証が完了すれば、無事にドメイン参加が完了するはずだ。
CentOS 7.2 のドメイン参加
Linux サーバは Samba v4 以降を利用してドメインへの参加が可能となっている(が、この辺りは設定を踏まえて詳しい方が居たら指摘をお願いしたい)。まずは必要なパッケージのインストールを実施する。
# yum update
# yum -y install samba-winbind krb5-workstation samba-client oddjob-mkhomedir samba winbind
次に名前解決の参照順を変更する /etc/nsswitch.conf ファイルを以下の様に編集する。
# /etc/nsswitch.conf
#
# 中略
#
passwd:    files winbind
shadow:    files winbind
group:     files winbind
次にケルベロス認証の設定ファイルである /etc/krb5.conf を以下の様に変更する。
# Configuration snippets may be placed in this directory as well
includedir /etc/krb5.conf.d/

[logging]
 default = FILE:/var/log/krb5libs.log
 kdc = FILE:/var/log/krb5kdc.log
 admin_server = FILE:/var/log/kadmind.log

[libdefaults]
 dns_lookup_realm = false
 ticket_lifetime = 24h
 renew_lifetime = 7d
 forwardable = true
 rdns = false
# default_realm = EXAMPLE.COM
 default_ccache_name = KEYRING:persistent:%{uid}

[realms]
 exampledomain.onmicrosoft.com = {
  kdc = exampledomain.onmicrosoft.com
  admin_server = exampledomain.onmicrosoft.com
 }

[domain_realm]
 .exampledomain.onmicrosoft.com = exampledomain.onmicrosoft.com
exampledomain.onmicrosoft.com = exampledomain.onmicrosoft.comその後、Samba の設定ファイルである /etc/samba/smb.conf を以下の様に編集する。
# See smb.conf.example for a more detailed config file or
# read the smb.conf manpage.
# Run 'testparm' to verify the config is correct after
# you modified it.

[global]
        workgroup = exampledomain
        password server = *
        realm = exampledomain.onmicrosoft.com
        security = ads
        winbind offline logon = false
        winbind use default domain = true
        idmap config * : range = 16777216-33554431
        template shell = /bin/bash
        log file = /var/log/samba/log.%m
        max log size = 50

[homes]
        comment = Home Directories
        valid users = %S, %D%w%S
        browseable = No
        read only = No
本設定後に systemctl start smb でデーモンを起動する。その後、ケルベロス認証を以下の様に実行する。
# kinit exampleusername@EXAMPLEDOMAIN.ONMICROSOFT.COM
Password for exampleusername@EXAMPLEDOMAIN.ONMICROSOFT.COM:

# klist
Ticket cache: KEYRING:persistent:0:0
Default principal: exampleusername@EXAMPLEDOMAIN.ONMICROSOFT.COM

Valid starting       Expires              Service principal
12/14/2016 03:58:37  12/14/2016 13:58:37  krbtgt/EXAMPLEDOMAIN.ONMICROSOFT.COM@EXAMPLEDOMAIN.ONMICROSOFT.COM
renew until 12/21/2016 03:58:34この際、小文字でドメイン名を指定すると以下の様にエラーとなるので注意して欲しい。
# kinit exampleusername@exampledomain.onmicrosoft.com
Password for exampleusername@exampledomain.onmicrosoft.com:
kinit: KDC reply did not match expectations while getting initial credentials
最後に smb と winbind が OS 起動時に自動起動する様に設定を加える。
# chkconfig smb on
Note: Forwarding request to 'systemctl enable smb.service'.
Created symlink from /etc/systemd/system/multi-user.target.wants/smb.service to /usr/lib/systemd/system/smb.service.
# chkconfig winbind on
Linux/Windows Server がドメインに参加しているか確認
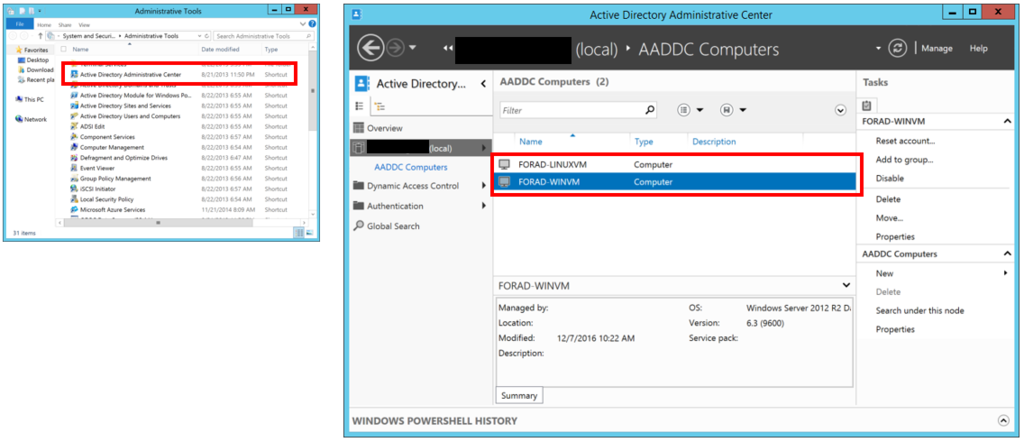
Active Directory Administrative Center と呼ばれるツールを利用して確認が可能だ。「参考情報」のリンクを参考に Windows Server 2012 R2 に設定を実施し、同ツールを起動することでドメインに参加しているサーバを以下の様に確認できる。

参考情報
- Q: I'm missing some Windows Server 2012 administration tools--how do I add them? http://windowsitpro.com/windows-server-2012/q-im-missing-some-windows-server-2012-administration-tools-how-do-i-add-them
- Linuxをドメイン(AD)に参加させる http://qiita.com/Wollest/items/26de6c33a87b963a5f55
- LinuxをActiveDirectoryドメインに参加させる http://qiita.com/gitya107/items/fcf32350ac9e25ab65d1
- ドメインが小文字等、TIPS 系 http://www.ilovex.co.jp/Division/ITD/archives/2008/12/windows_linux.html