normalian blog

Let's talk about Microsoft Azure, ASP.NET and Java!

How to setup simple Workflow with Azure Automation

You should read below article before following this article, because this article make a Azure Automation workflow collaborating Runbooks.
normalian.hatenablog.com
Azure Automation offers to collaborate with each Runbooks as Workflok, and you can setup your simple workflow with following this article!

Create your new Runbook as "PowerShell"

Create your new "PowrShell" Runbook under your Azure Automation account and edit it like below. This Runbook output your Azure resources in a location specified by a parameter.

Param
(
    [Parameter (Mandatory = $true)]
    [String] $Location = 'Japan East'
)

# Setup Authentication
$Conn = Get-AutomationConnection -Name AzureRunAsConnection
Add-AzureRMAccount -ServicePrincipal -Tenant $Conn.TenantID -ApplicationId $Conn.ApplicationID -CertificateThumbprint $Conn.CertificateThumbprint

Get-AzureRmResourceGroup -Location $Location | ForEach-Object { Write-Output $_.ResourceGroupName }

You can specify parameters with "Param" keyword like above. "PowerShell Workflow" created in next section can call "PowerShell" Runbook, so you have to create your Runbooks as "PowerShell".

Create new Runbook as "PowerShell Workflow"

You can find how to pass your parameters and how to get output with your "PowerShell" Runbook.

workflow workflow-sample
{
    Param
    (
        [Parameter (Mandatory = $true)]
        [String] $Location01 = "West US",
        [Parameter (Mandatory = $true)]
        [String] $Location02 = "West Central US"
    )

    # settings
    $automationAccountName = "mytest-automation"
    $resourceGroupName = "mytest-automation-rg"

    # Setup Authentication
    $Conn = Get-AutomationConnection -Name AzureRunAsConnection
    Add-AzureRMAccount -ServicePrincipal -Tenant $Conn.TenantID -ApplicationId $Conn.ApplicationID -CertificateThumbprint $Conn.CertificateThumbprint

    ## backup Runbook
    echo '#1 runbook starts'
    $params = @{ 'Location'=$Location01 }
    $runbookName = 'execute-azure-cmdlet'
    $job = Start-AzureRmAutomationRunbook -AutomationAccountName $automationAccountName -Name $runbookName -ResourceGroupName $resourceGroupName -Parameters $params
    $doLoop = $true
    While ($doLoop) {
        $job = Get-AzureRmAutomationJob –AutomationAccountName $automationAccountName -Id $job.JobId -ResourceGroupName $resourceGroupName
        $status = $job.Status
        if($status -eq "Failed") {
            Write-Error "Error in $runbookName"
            Write-Error $job.Exception
            throw $job.Exception
        }
        $doLoop = (($status -ne "Completed") -and ($status -ne "Suspended") -and ($status -ne "Stopped"))
        Start-Sleep -Seconds 2
    }
    echo '################# output start #################'
    $record = Get-AzureRmAutomationJobOutput –AutomationAccountName $automationAccountName -Id $job.JobId -ResourceGroupName $resourceGroupName –Stream Any | Get-AzureRmAutomationJobOutputRecord
    $record # for example
    echo '                               #################'
    $record | Where-Object { $_.Value.value -NE $null} | ForEach-Object { Write-Output $_.Value.value }
    echo '################# output end #################'
    echo '#1 runbook is ended'

    ## 
    echo '#2 runbook is starts'
    $params = @{ 'Location'=$Location02 }
    $runbookName = 'execute-azure-cmdlet'
    $job = Start-AzureRmAutomationRunbook -AutomationAccountName $automationAccountName -Name $runbookName -ResourceGroupName $resourceGroupName -Parameters $params
    $doLoop = $true
    While ($doLoop) {
        $job = Get-AzureRmAutomationJob –AutomationAccountName $automationAccountName -Id $job.JobId -ResourceGroupName $resourceGroupName
        $status = $job.Status
        if($status -eq "Failed") {
            Write-Error "Error in $runbookName"
            Write-Error $job.Exception
            throw $job.Exception
        }
        $doLoop = (($status -ne "Completed") -and ($status -ne "Suspended") -and ($status -ne "Stopped"))
        Start-Sleep -Seconds 2
    }
    echo '################# output start #################'
    $record = Get-AzureRmAutomationJobOutput –AutomationAccountName $automationAccountName -Id $job.JobId -ResourceGroupName $resourceGroupName –Stream Any | Get-AzureRmAutomationJobOutputRecord
    $record | Where-Object { $_.Value.value -NE $null} | ForEach-Object { Write-Output $_.Value.value }
    echo '################# output end #################'
    echo '#2 runbook is ended'
}

Output logs with Workflow

You can execute your Workflow and find output logs like below.

PSComputerName        : localhost
PSSourceJobInstanceId : 256fbcbd-f339-4ce5-b75b-0dc973dd0f2a
Environments          : {AzureCloud, AzureChinaCloud, AzureUSGovernment}
Context               : Microsoft.Azure.Commands.Profile.Models.PSAzureContext


#1 runbook starts

################# output start #################

PSComputerName        : localhost

PSSourceJobInstanceId : 256fbcbd-f339-4ce5-b75b-0dc973dd0f2a
Value                 : {Environments, Context}
ResourceGroupName     : mytest-automation-rg
AutomationAccountName : mytest-automation
JobId                 : eb19892d-8e2d-4572-862f-9205ca6e89fc
StreamRecordId        : eb19892d-8e2d-4572-862f-9205ca6e89fc:00636563050813081260:00000000000000000001
Time                  : 03/10/2018 18:58:01 +00:00
Summary               : 
Type                  : Output

PSComputerName        : localhost
PSSourceJobInstanceId : 256fbcbd-f339-4ce5-b75b-0dc973dd0f2a
Value                 : {value}
ResourceGroupName     : mytest-automation-rg
AutomationAccountName : mytest-automation
JobId                 : eb19892d-8e2d-4572-862f-9205ca6e89fc
StreamRecordId        : eb19892d-8e2d-4572-862f-9205ca6e89fc:00636563050827143533:00000000000000000002
Time                  : 03/10/2018 18:58:02 +00:00
Summary               : normalian-datacatalog-rg
Type                  : Output

PSComputerName        : localhost
PSSourceJobInstanceId : 256fbcbd-f339-4ce5-b75b-0dc973dd0f2a
Value                 : {value}
ResourceGroupName     : mytest-automation-rg
AutomationAccountName : mytest-automation
JobId                 : eb19892d-8e2d-4572-862f-9205ca6e89fc
StreamRecordId        : eb19892d-8e2d-4572-862f-9205ca6e89fc:00636563050827612512:00000000000000000003
Time                  : 03/10/2018 18:58:02 +00:00
Summary               : sqldb-rg
Type                  : Output

                               #################

normalian-datacatalog-rg

sqldb-rg

################# output end #################

#1 runbook is ended

#2 runbook is starts

################# output start #################

demo-automation-rg

mytest-automation-rg

################# output end #################

#2 runbook is ended

How to execute Microsoft Azure PowerShell commands on Azure Automation

As you know, Azure Automation is really great feature to automate your schedulable tasks both public cloud an on-premise. There are massive documents to describe how to do that including abstraction. I will introduce how to do that simply with screenshots.

Create your Azure Automation Account

At first, note when you create Azure Automation account. And you must create "Azure Run As account" like below, because it's mandatory to execute your Azure Automation scripts called as "Runbook". This probably need your Azure Active Directory privilege of App Registration.
f:id:waritohutsu:20180310093220p:plain

Create your Runbook

Create a Runbook used to execute your scripts. Choose "Runbook" from left side of you Azure Automation account and click "Add a runbook" like below.
f:id:waritohutsu:20180310093511p:plain
And input your Runbook name and choose "PowerShell" as your Runbook type.
f:id:waritohutsu:20180310093619p:plain

Create your scripts into your Runbook

Open your Runbook and click "Edit" to create your script. Update your script like below.

$Conn = Get-AutomationConnection -Name AzureRunAsConnection
Add-AzureRMAccount -ServicePrincipal -Tenant $Conn.TenantID -ApplicationId $Conn.ApplicationID -CertificateThumbprint $Conn.CertificateThumbprint
 
get-azurermresourcegroup | ForEach-Object { $_.ResourceGroupName }

The name of "AzureRunAsConnection" should be created in "'your Azure Automation account name'- Connections". Once again, this is mandatory to execute your script. Confirm it like below if you need.
f:id:waritohutsu:20180310095341p:plain

After updating the script, click "Test pane" to test your script. You can execute your script by clicking "Start" button, so you can take result like below.
f:id:waritohutsu:20180310095541p:plain

Now you can publish your script by clicking "Publish" button to schedule and collaborate with other Runbooks. After publishing that, confirm the status like below.
f:id:waritohutsu:20180310095747p:plain

Schedule your Runbook

Go back to top of your Azure Automation account and choose "Schedule" and click "Add a schedule" like below.
f:id:waritohutsu:20180310095922p:plain

In this example, I setup my schedule as weekly like below.
f:id:waritohutsu:20180310100022p:plain

Finally, you have to associate with your Runbook and Schedule. Go back to your Runbook, choose "Schedule" and click "Add a schedule". Associate your schedule like below.
f:id:waritohutsu:20180310100223p:plain

Now, you can execute your script based on your schedule.

How to revert new deployment to old one in Service Fabric

As you know, Service Fabric is one of services to achieve Microservice architecture. There are two options when you got bad deployments using Service Fabric.

  • manual deployment: "Start-ServiceFabricApplicationUpgrade" PowerShell command
  • VSTS deployment: create new Release using existing build packages

Revert with "Start-ServiceFabricApplicationUpgrade"

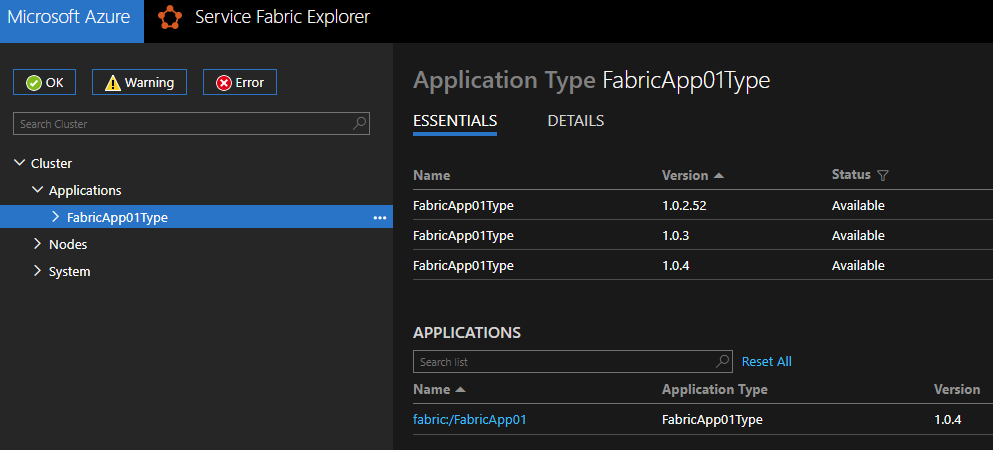
Service Fabric retains old application packages for a while like below. As far as I confirmed, it should retain more than 24 hours.
f:id:waritohutsu:20180220080334p:plain

Meanwhile the retainment, you can revert from new deployment to old one with below PowerShell commands.

Login-AzureRmAccount

$applicationName = 'fabric:/FabricApp01'

$connectArgs = @{  ConnectionEndpoint = "'<your cluster name'".westus.cloudapp.azure.com:19000';  
                   X509Credential = $True;  
                   StoreLocation = "CurrentUser";  
                   StoreName = "My";  
                   ServerCommonName = "'your cluster name'.westus.cloudapp.azure.com";  
                   FindType = 'FindByThumbprint';  
                   # "Client certificates" thumbprint. Pick up this value from "security" item in your cluster on Azure Portal
                   FindValue = "YYYYYYYYYY7e3372bc1ed5cf62b435XXXXXXXXXX"; 
                   # "Cluster certificates" thumbprint.  Pick up this value from "security" item in your cluster on Azure Portal
                   ServerCertThumbprint = "YYYYYYYYYY2E67D7E54647A12B7787XXXXXXXXXX" } 
Connect-ServiceFabricCluster @connectArgs

$app = Get-ServiceFabricApplication -ApplicationName $applicationName
$app 
$table = @{}
$app.ApplicationParameters | ForEach-Object { $table.Add( $_.Name, $_.Value)}
Start-ServiceFabricApplicationUpgrade -ApplicationName $applicationName -ApplicationTypeVersion "1.0.2.52" -ApplicationParameter $table -UnmonitoredAuto

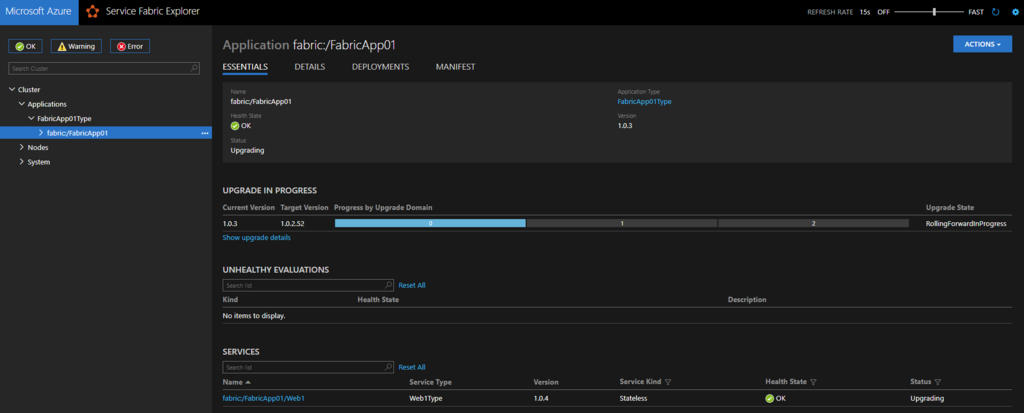
You can watch it progress in Service Fabric Explorer like below.
f:id:waritohutsu:20180220081752p:plain

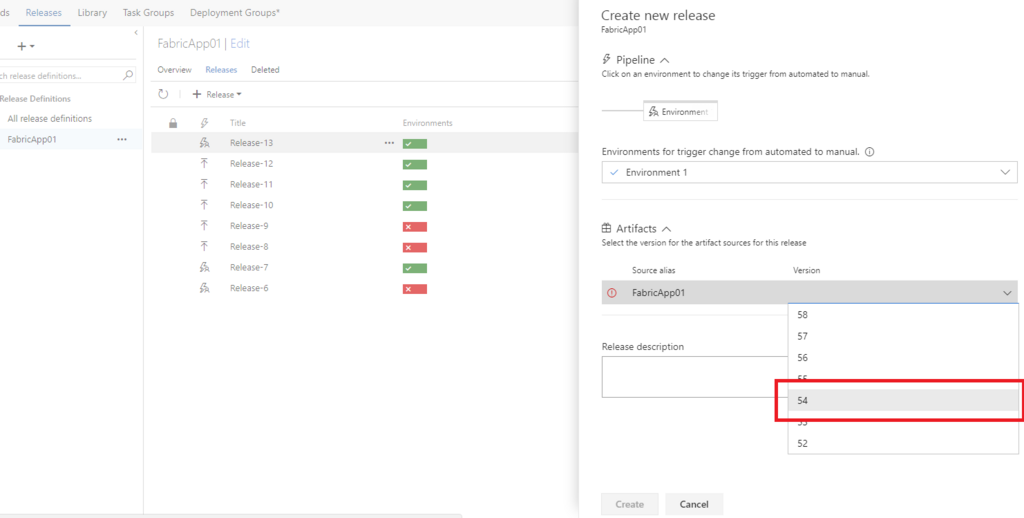
Revert with new Release using existing build packages

I believe you have already made some build packages for deployment into Service Fabric. You can create new Release in your VSTS using the packages like below.
f:id:waritohutsu:20180220081246p:plain

Setup tips for SQL DB auto export PowerShell scripts

SQL Database offered to backup SQL Database instances with their build-in features, but it was expired now. You can choose below options.

In this post, I will introduce setup tips for the scripts. Please read README of "Automate export PowerShell script with Azure Automation" to setup this script at first.

Add SQL DB instances into single script

You can add other databases to add them into “$databaseServerPairs” in below code.

And please use other credentials if you use other SQL Database servers.

Export error when SQL DB instances so large

Please read this section when you get below error.
f:id:waritohutsu:20180218102309p:plain

The error message is caused by below line.
- https://github.com/Microsoft/sql-server-samples/blob/master/samples/manage/azure-automation-automated-export/AutoExport.ps1#L115

The error is caused by below, so it seems to take too long time to copy DB data.

  if((-not $? -and $global:retryLimit -ile $dbObj.RetryCount) -or ($currentTime - $dbObj.OperationStartTime).TotalMinutes -gt $global:waitInMinutes)

Please change variable “$waitInMinutes = 30;” from 30 minutes to long time.

In order to execute the runbook do I need to have the automation account to have the ability to “Run As account”?

“Azure Run As account” is needed, because we can't execute Runbook scripts without this. It needs to enable Azure Active Directory to register applications.
https://docs.microsoft.com/en-us/azure/automation/automation-create-aduser-account#create-an-automation-account-in-the-azure-portal

" 429 Too many requests" error in Runbook Job log when exporting large SQL Database instances

You will get below error when you execute long jobs.

Get-AzureSqlDatabaseImportExportStatus : A task was canceled.
At line:181 char:11
+ ...    $check = Get-AzureSqlDatabaseImportExportStatus -Request $dbObj.Ex ...
+                 ~~~~~~~~~~~~~~~~~~~~~~~~~~~~~~~~~~~~~~~~~~~~~~~~~~~~~~~~~
    + CategoryInfo          : NotSpecified: (:) [Get-AzureSqlDatabaseImportExportStatus], TaskCanceledException
    + FullyQualifiedErrorId : 
Microsoft.WindowsAzure.Commands.SqlDatabase.Database.Cmdlet.GetAzureSqlDatabaseImportExportStatus

The error is caused by frequent requests using “Get-AzureSqlDatabaseImportExportStatus”, so it need to insert “Start-Sleep” in the script to reduce Azure Management API calls internally.

How to setup Service Fabric connections on VSTS

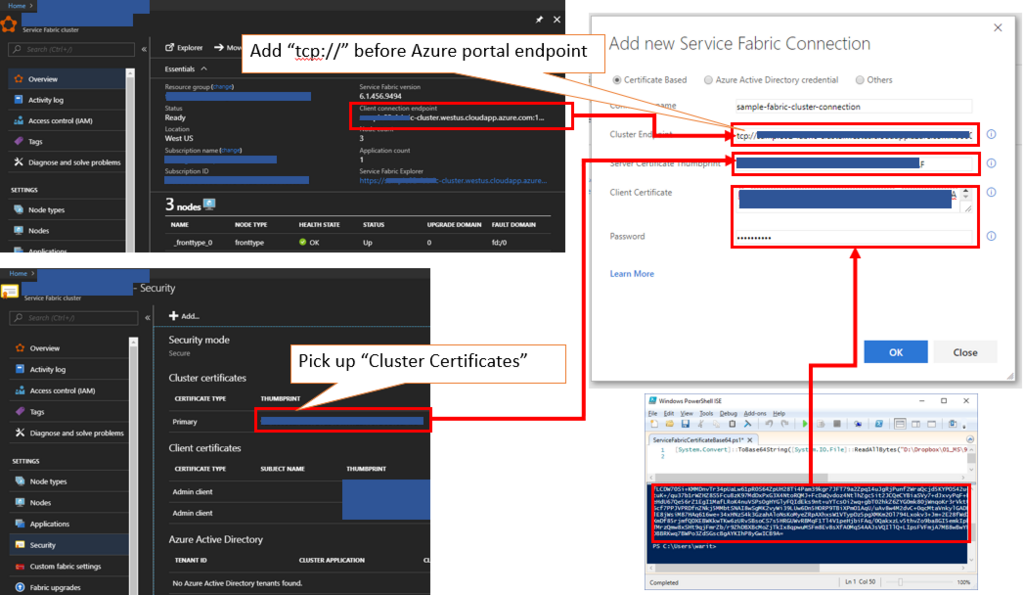
Visual Studio Team Service, VSTS, is really powerful tool to achieve your CI/CD pipeline. Before setting up Service Fabric connections, you need to create a *.pfx file to register as "Client Admin" certificate into your Service Fabric cluster. Please refer
Step by step how to setup Service Fabric Explorer on Azure - normalian blog if you have registered no *.pfx files as "Admin Client" certificates yet.

Create BASE64 string from your *.pfx file

Create BASE64 string for registering on VSTS portal to setup Service Fabric cluster connections.

PS C:\Users\normalian> [System.Convert]::ToBase64String([System.IO.File]::ReadAllBytes("D:\temp\yourpfxfile.pfx"))
MIIJ+gIBAzCCCbYGCSqGSIb3DQEHAaCCCacEggmjMIIJnzCCBgAGCSqGSIb3DQEHAaCCBfEEggXtMIIF6TCCBeUGCyqGSIb3DQEMCgECoIIE9jCCBPIwHAYKKoZIh
"omission"
OBBRKwq7BWPo3ZdSGscBgAYKIhP8yGwICB9A=

Pick up and save the BASE64 string.

Setup on VSTS portal

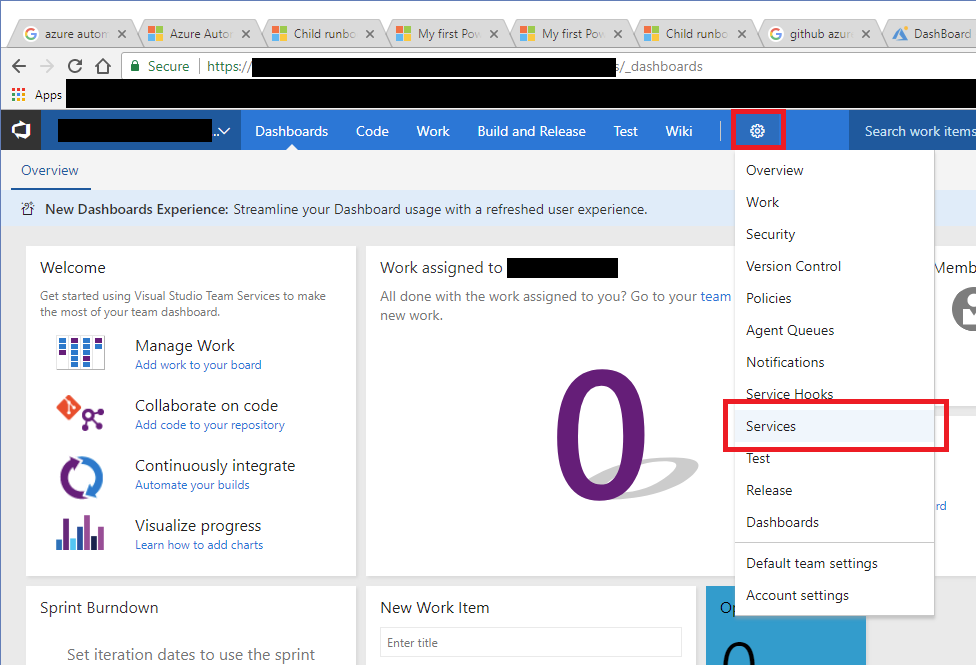
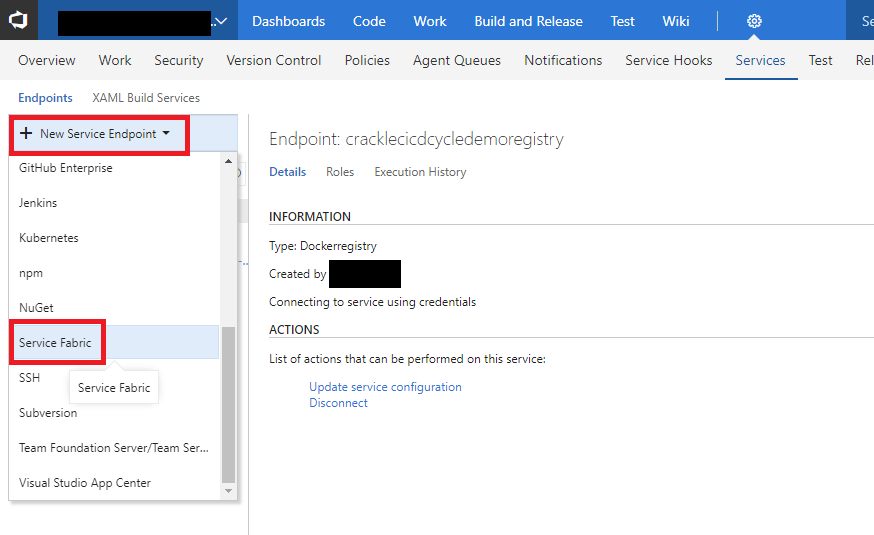
Go to your VSTS project page and choose right side icon and "Services" item like below.
f:id:waritohutsu:20180216091954p:plain

Click "New Service Endpoint" and choose "Service Fabric" like below.
f:id:waritohutsu:20180216092050p:plain

Input your info into "Add new Service Fabric Connection" wizard like below. Input *.pfx file password into "Password" section.
f:id:waritohutsu:20180216093140p:plain

Now, you can use your Service Fabric cluster in your VSTS project.

How to setup your CentOS VMs as VSTS Private Agent

VSTS is really powerful tool and you can use compute resources from cloud, but you will sometimes want to use your own custom libraries or executable files in you build processes. You can use Private Agent for such cases. In this post,
I will setup private agent with CentOS VM, but please note VSTS offers some platforms agents like below and CentOS isn't supported right now.

Step by Step to setup Private Agent

Follow below three sections.

  1. Create new pool in VSTS portal
  2. Create new “Personal access tokens” in VSTS portal
  3. Setup agent in your VM

1. Create new pool in VSTS portal

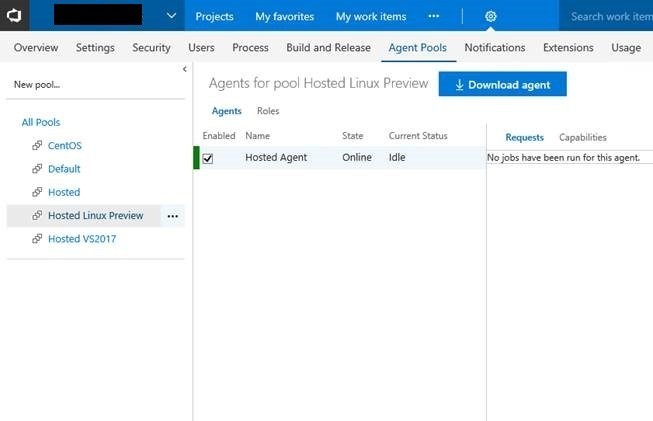
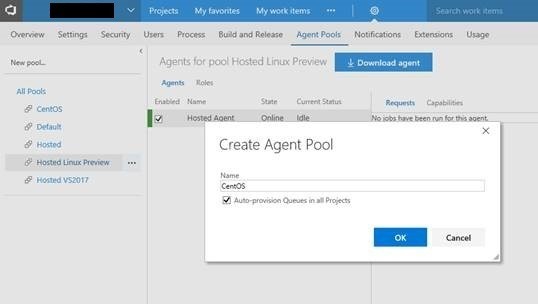
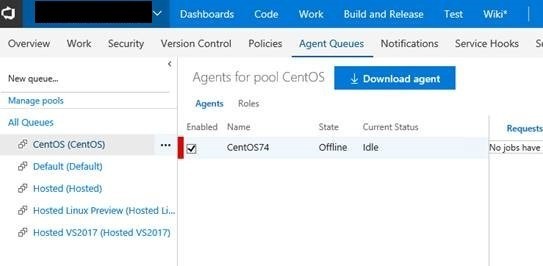
Go to “Agent Pools” tab in your VSTS and click “New pool…”.
f:id:waritohutsu:20180216004316j:plain

Input Agent pool name as you need. I recommend to name for each uses.
f:id:waritohutsu:20180216004328j:plain

Download agent package from your agents pool like below.
f:id:waritohutsu:20180216004337j:plain

2. Create new “Personal access tokens” in VSTS portal

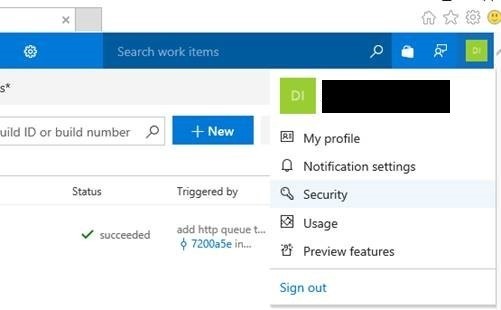
Choose “Security” from your account setting.
f:id:waritohutsu:20180216004343j:plain

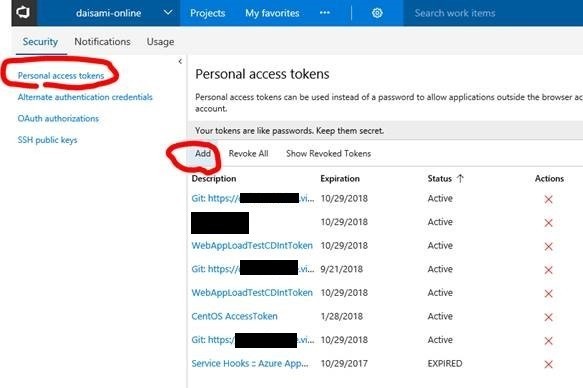
Create new “Personal access tokens”.
f:id:waritohutsu:20180216004352j:plain

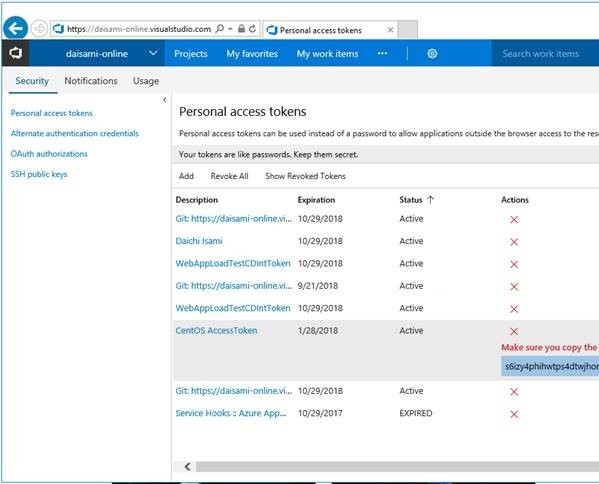
Keep access token from VSTS portal. The value never show without at the time.
f:id:waritohutsu:20180216004407j:plain

3. Setup agent in your VM

Transfer agent package into your VM and extract data. I executed below commands.

# be root
sudo su -

# I have to install below pakcages into your CentOS VM, because VSTS agent offers RedHat but not CentOS
yum install centos-release-dotnet.noarch
yum install rh-dotnetcore11-dotnetcore.x86_64

# setup agent
mkdir /opt/agent
mv vsts-agent-rhel.7.2-x64-2.123.0.tar.gz /opt/agent
tar zxvf vsts-agent-rhel.7.2-x64-2.123.0.tar.gz
chown -R azureuser /opt/agent/

cd /opt/agent/
./config.sh
./run.sh

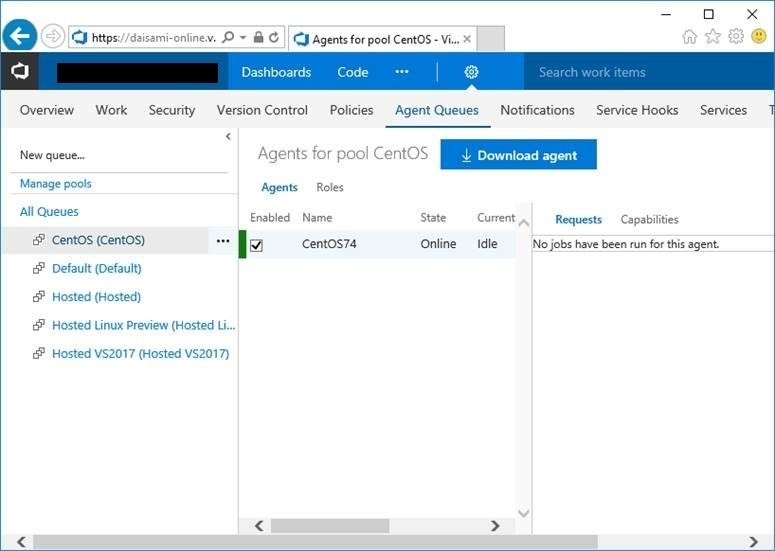
Your instance will be registered after “./config.sh” execution. You have to execute “./run.sh” to maintain “Online” status.
f:id:waritohutsu:20180216004433j:plain

ロサンゼルス生活日誌 ~その5 米国の医療制度~

すっかりご無沙汰で恐縮ですが、先日ついに米国で歯医者に行かねばならない状態になったので色々と分かった結果を共有します。良く言われる「米国の医療費は高い」と言われるお話しですが、具体的にどのくらい高いのか?どういう手続きになるのか?ということがある程度でも伝われば幸いです。

健康保険ってあるの?

まずは日本が提供する素晴らしい社会保障制度である健康保険制度ですが、私が米国に来た際に最初に聞いたのが「健康保険制度に相当する制度は米国にあるのか?」でした。結果から言うと健康保険相当の制度は無く、その当時に質問した相手が外人同僚だったこともあり理解できる的を得た回答をもらえなかった記憶があります。

相当する制度がない代わりに米国では HSA(Heath Saving Account)と呼ばれる口座に自身の医療費を積み立てますが、給与天引き等で積み立てる場合は所得税控除等のメリットがあります。更に所属する会社によっては「月の給与から $100 HSA に入れるなら会社が $50 分補助してやる」というような仕組みがある場合もあります。こちらの口座利用専用のデビットカードが発行されるので、病院等に行った際に利用できます*1

上記の HSA に加えて民間医療保険に入るのが一般的なようです。医療保険もまた仕組みが違っており、日本では原則的に「患者が医療費の3割を負担」というルール*2となりますが、何をどれだけ負担してくれるかが各保険会社によって異なります。具体的には「レントゲン取るのは全部保証してやるけど、クラウン作ったりするのは 50% までしか出さないぜ」という様なイメージです。

更にこの医療保険における日米での大きな差として、米国で自分が購入した医療保険団体に加盟している医療団体か否かで保険の補償額が異なるところです。具体的には「購入した医療保険団体に所属している病院Aでは 100% 保険でカバーしてくれる」が「購入した医療保険団体に所属していない病院Bでは保険のカバーが 0%」ということが発生する可能性があります。このため、事前に病院と購入した医療保険への加盟確認は必須となります。

日本と米国で具体的にどう違うのか?

上記をまとめると以下の様なイメージです。日本側の医療制度は割かし何にも考えなくとも「とりあえず健康保険に入っとけばいいや」なのに対し、米国側は考慮点が色々とあることが分かります。

日本 米国
積み立て or 掛け捨て 健康保険で掛け捨て制度 Health Saving Account への積み立て制度
対象の医療機関 健康保険でどの病院でも原則3割負担 医療保険団体に加盟しているか否かで値段が異なる
対象の医療処置 健康保険で外科・内科・歯医者どれでも原則3割負担 医療保険次第で異なる

歯医者に行った際に具体的にかかったお金は?

渡米前にすべて歯の治療を完遂していたのですが、ガムを食べている際に歯のクラウンが取れてしまったのでこちらの治療をお願いしました。この際に聞いた情報は以下になります。

  • クラウンを作りなおす場合、補償前金額は $1,000 程度が目安でそこから保険補償がどこまで効くか次第で異なる
  • 今回は取れたクラウンを持っておりすぐに歯医者に来てくれたので接着のみの処置であり $120 程度
  • 保険会社との交渉後に金額が確定するが $25 程度ではないか

クランとの接着だけの処置ですが、大体3000円弱といったところでしょうか。日本なら肌感的に1,000円ちょっとなイメージがあるのでやはり医療費は高めな印象です。今回は歯医者のお話だけですが、ご参考になれば。

*1:どうもこの辺り駐在員の方は医療費が会社もちだったりと制度が違うようです

*2:高齢者だと2割負担だったり、幼児は自治体によって無料だったり、高額医療とかは置いときます