normalian blog

Let's talk about Microsoft Azure, ASP.NET and Java!

Azure Front Door のログ情報を Kusto クエリで眺めてみる

前回は Azure Front Door に対してカスタムドメイン設定とBring Your Own Certificate (BYOC) 設定を行った場合のハマりどころについて紹介しました。今回は Azure Front Door のログデータを Log Analytics に送付し、Kusto Query をいくつか発行してデータを確認してみようと思います。

Azure Front Door 側のログ設定

まずは Azure Front Door 側で Diagnostic setting を有効化します。ここでは FrontDoorAccessLog, FrontDoorHealthProbeLog, FrontDoorWebApplicationFirewallLog のカテゴリがありますが、当然すべて選択して作成済の Log Analytics ワークスペースにデータを転送します。

Azure Front Door に関わらず Log Analytics のログ転送はいちど有効化して安定した後の場合、体感的には遅くとも数分以内に Log Analytics ワークスペース側にログが転送されています。しかし、初回設定時には8時間?程度の時間がかかる場合があるので注意ください。

Azure Front Door の基本的なログ情報

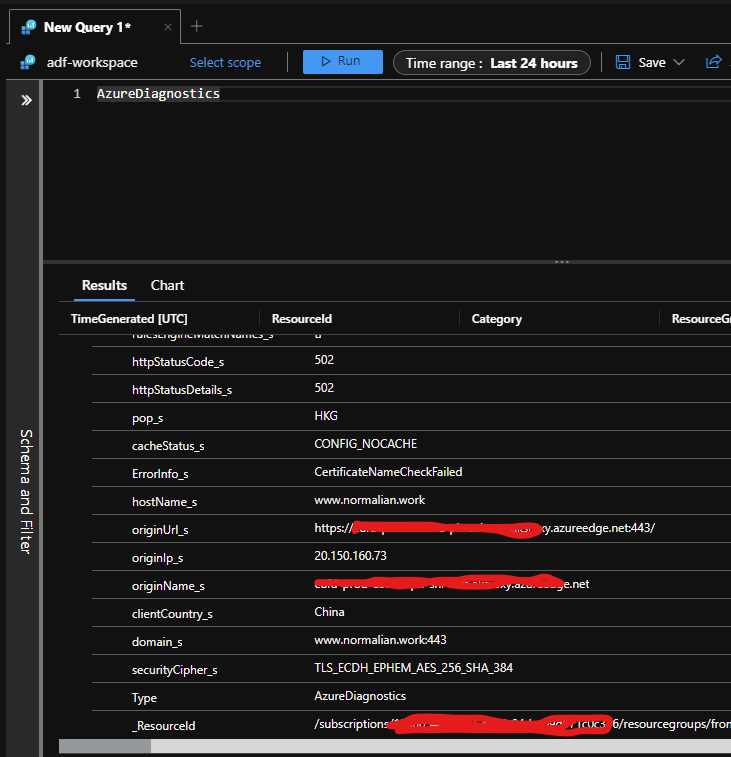
以下に何のひねりもない Kusto Query を発行した結果を張り付けたのでご賞味ください。

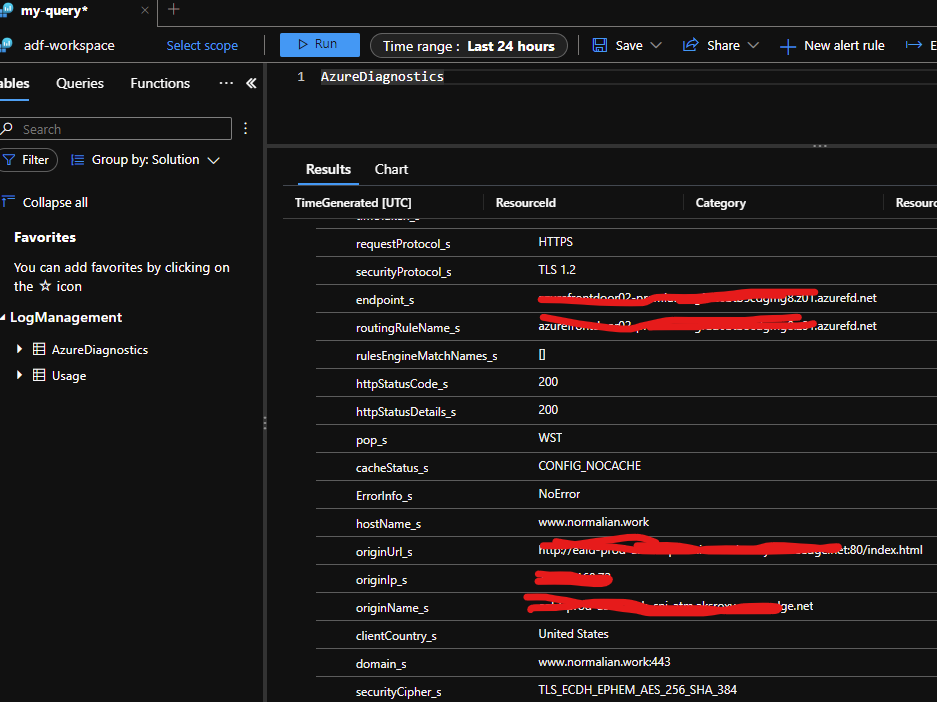
AzureDiagnostics テーブルでは通信プロトコル(HTTP/HTTPS)、ステータスコード、ホスト名、Azure Front Door の Origin URI、アクセス元の国等々が取得できるのが確認できると思います。Usage テーブルは Log Analytics ワークスペースに流れ込むデータ量がログとして蓄積されていますが、今回は割愛します。

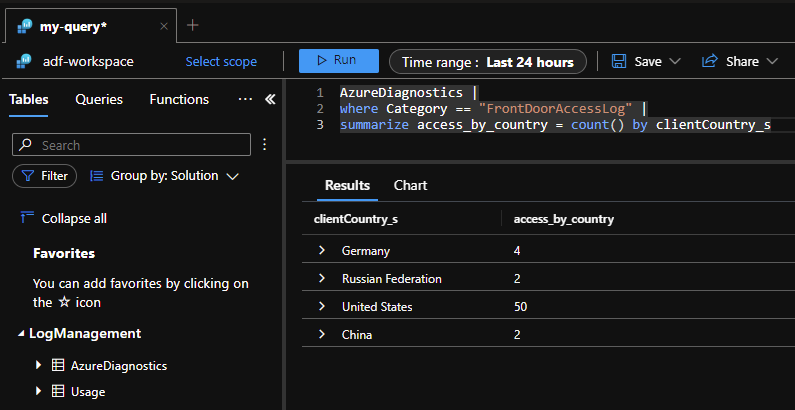
何カ国かからのアクセスが来ているかは以下の様なクエリで抽出が可能です。私は現在米国におり、テスト用に頻繁にアクセスしたのでデータに表れています。

AzureDiagnostics |
where Category == "FrontDoorAccessLog" |
summarize access_by_country = count() by clientCountry_s

次にどの URI に一番アクセスされたかを以下の Kusto Query で取得してみましょう。

AzureDiagnostics |
where Category == "FrontDoorAccessLog" |
summarize requests_of_each_uri = count() by requestUri_s |
order by requests_of_each_uri 

さらに 404 のステータスコードを返した URI が何かの一覧は以下で取得できます。

AzureDiagnostics |
where  Category == "FrontDoorAccessLog" |
where httpStatusCode_s == 404 |
summarize by requestUri_s

ここまでで FrontDoorAccessLog カテゴリの基本的な情報を操作する方法は理解で来たと思いますので、次は FrontDoorWebApplicationFirewallLog 側を見てみます。

Azure Front Door の WAF 機能のログを確認してみる

FrontDoorWebApplicationFirewallLog は WAF 機能でのマッチングしたリクエストの情報が出力されます。試しに以下のカスタムルールを作成し、当該 Azure Front Door に付与します。

本ルールはアクセス元の地域が米国だった場合に Log Analytics ワークスペース側に情報を転送するものです。実際に Kusto Query を発行して情報を確認します。

AzureDiagnostics |
where Category == "FrontDoorWebApplicationFirewallLog"


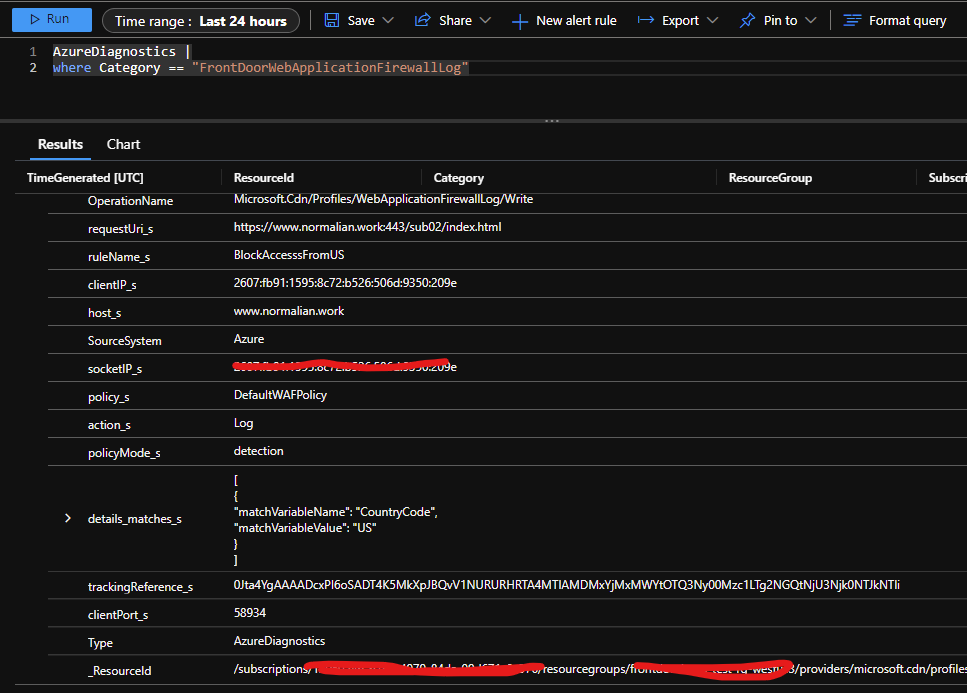
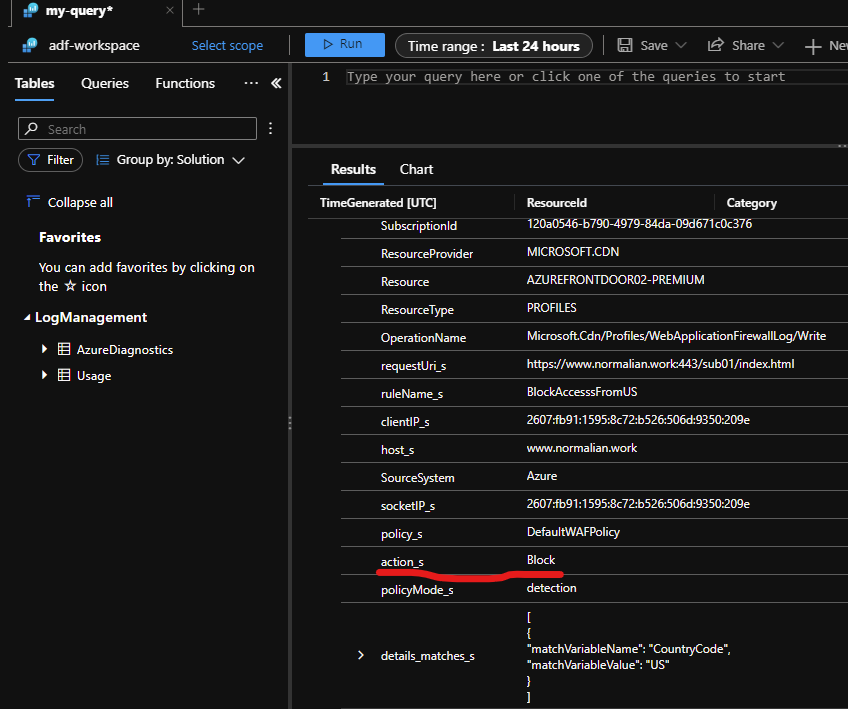
ご覧の通り、どの URI にアクセス時、ルールにマッチングしたか、どの様なアクションが取られたか等がログの情報から分かります。スクリーンショットでは action_s は Logであり、ログ情報が出力されるだけの設定です。

感の良い方なら気づいたかもしれませんが、ルール名にある通り最初はアクセスをブロックしようとしました。ログとしては以下です。action_s は Block として出力されているのですが、ブラウザからは普通にアクセスできてしまいました。こちらは私の設定ミスかもしれませんので、何か気づきが有ればまた更新したいと思います。これは policyMode_s に記載があるとおり detection モードで動作していることが原因です。こちらを prevention モードに変更すればブロックされます。

カスタムドメイン&BYOC で Azure Front Door を試した際のハマりどころ

その昔から Azure には Traffic Manager と呼ばれるリージョンレベルで負荷分散が行える機能がありましたが、同機能の位置づけはグローバル DNS 的なものであり、WAF 的な機能、URL の書き換え、SSL オフロードといった機能を利用したい場合、リクエストをリージョンレベルに振り分けた後、リージョン単位でのサービス(Azure 組み込み機能だと Application Gateway が一般的)で制御をおこなうのが一般的でした。Azure Front Door はリージョンを跨いでのリクエスト振り分けが可能なことに加え、上記で記載した機能も同リソースを用いることで実現可能です。
https://docs.microsoft.com/en-us/azure/frontdoor/front-door-overview

Azure Front Door には Standard と Premium と呼ばれる二つの SKU がありますが、特に Premium SKU を利用する場合は Private Link の利用が可能になります。Standard SKU でも機能的に十分なことが多いとは思いますが、いわゆるエンプラ的なお客様のコンプライアンスに沿うために閉域的な通信が必要な場合には必須な機能といえます。
https://azure.microsoft.com/en-us/pricing/details/frontdoor/

生まれも社畜、育ちも社畜、今は外資社畜としてコテコテのエンプラ道を歩んできた身からすれば、上記の Private Link に加えて「カスタムドメイン」と「Bring Your Own Certificate (BYOC) 」を試さざるを得ないと思い色々と試しました。結果的には以下の構成になっております。今回は Azure Front Door で SSL オフロードをしていますが、こちらは要件に合わせて調整下さい。

これに関しては色々とハマりどころがあり、ハマりどころときれいな設定手順を混ぜるとこんがらがりそうだったので、今回はハマりどころに注力して記載しております。

Azure Front Door に証明書を登録する際には Azure AD の Global Administrator 権限が必要になる場合がある

Azure Front Door は Azure Key Vault 経由でしか証明書が読み込めません。そのため Azure Front Door 向けの Service Principal を作成・登録して操作する必要があるのですが、こちらの処理時に当該 Azure AD の Global Administrator 権限が必要になります。

Note

This action requires you to have Global Administrator permissions in Azure AD.
 The registration only needs to be performed once per Azure AD tenant.

https://docs.microsoft.com/en-us/azure/frontdoor/front-door-custom-domain-https

ただこちらは Azure AD テナント毎に一度操作を実行すればよいので、Global Administrator に処理を頼むことができれば問題ありません。つまり Azure Front Door のリソースを何個作ろうと同じサービスプリンシパルを使いまわすことになります。この辺りはヘイシャーにお勤めの方とかは Microsoft.AzureFrontDoor-Cdn とかの名前で Service Principal を探せば見つかると思います(以下参照。
Register Azure Front Door CDN with Key Vault - Azure Tech Guy

Azure Front Door はオレオレ証明書をサポートしない

こちらに関しては良く言えば「セキュリティ的に厳密さが高いのがデフォルト設定になっている」ともいえますが、開発時には中々大変です。以下にはっきりと記載がありますが、自己証明書を利用する場合はアクセスがブロックされます。

When you create your TLS/SSL certificate, you must create a complete certificate chain with
an allowed Certificate Authority (CA) that is part of the Microsoft Trusted CA List. If you use 
a non-allowed CA, your request will be rejected.

Certificates from internal CAs or self-signed certificates aren't allowed.

End-to-end TLS with Azure Front Door | Microsoft Docs

トラステッド認証局 (CA) からの署名済み証明書を取得する必要がありますが、ここは Azure Front Door をお試しで試す場合に大きなハードルの一つ目です。こちらに対しては App Service Certificate を利用しました。ご存じない方も居るかも知れませんが、同機能は App Service 専用ではありません。
Add and manage TLS/SSL certificates - Azure App Service | Microsoft Docs

Azure Front Door は HTTPS 通信時に CN がマッチングしないと通信をはじく

開発環境と似たような設定で本番リリースした結果で痛い目を見ることを避けらるようになっているとも言えますが、やはり開発時にはハードルが高いです。節のタイトルに加えて Azure Front Door 自体には「apex/root ドメインは未サポート(normalian.work とかはダメで、www.normalian.work とかならOK」という制約もあります。

Enabling HTTPS via Front Door managed certificate is not supported for 
apex/root domains (example: contoso.com). You can use your own
certificate for this scenario. Please continue with Option 2 for further details.

Tutorial - Configure HTTPS on a custom domain for Azure Front Door | Microsoft Docs

ここで注意が必要なのが、当然ながら App Service Certificate は apex/root ドメイン(normalian.work 等)で作成する必要があるということです。何が問題かというと、Azure Front Door 自身は apex/root ドメインは未サポート( www.normalian.work とかならOK )の点とでドメイン名に不整合が発生します。私は

  • App Service Certificate で normalian.work ドメイン向けの Standard SKU の証明書作成
  • Azure Front Door で www.normalian.work のカスタムドメイン登録

を行い、一通りの設定をしましたが、当然疎通は通らず、Log Analytics のログを確認したところ CertificateNameCheckFailed のエラーが発生していました。

こちらに関しての回避方法は比較的容易で App Service Certificate 側でワイルドカード証明書として作成する方法です。

App Service Certificate 上でワイルドカード証明書として作成した場合、www.normalian.work といったドメインでも対応が可能になります。Azure Front Door には Azure Key Vault 経由で登録されるので以下の様になります。

CNAME レコードの登録、TXT レコードの登録が必要

こちらに関しては大して問題ならないかもしれませんが、Azure Front Door でカスタムドメインを登録する場合はタイトルで記載した二つの処理が必要になります(以下は設定済の環境。

How to add a custom domain - Azure Front Door | Microsoft Docs

私は未だにメールの多さでちょっと辛いお名前ドットコムを使っており、以下が同サイトでの設定画面になっています。一つ目の CNAMEと三つ目の TXT レコードが Azure Front Door 向け、二つ目の TXT レコードが App Service Certificate 向けと言ったところです。

今回はほぼ証明書とカスタムドメインでのハマりどころを記載しましたが、誰かの手助けになれば幸いです。

Tips to attach Ultra disk to Azure VMs

I believe Ultra disks are essential for mission critical workloads - SAP, Oracle DB or other high IOPS workloads. Here are some tips to attach Ultra disks for your existing VMs.

Confirm availability and zone for Ultra disk

Ultra disk is not available in all Azure regions. You should confirm availability for Ultra disk in your regions.
Select a disk type for Azure IaaS VMs - managed disks - Azure Virtual Machines | Microsoft Docs
But I can attach Ultra disk to my "Standard B4ms (4 vcpus, 16 GiB memory)" VM in West US 2 region as of 17th Jan 2022. The availability might be expanded.
f:id:waritohutsu:20220118065937p:plain
f:id:waritohutsu:20220118065852p:plain

In addition to regional perspective, you need to note that you should put your Ultra disks on same zones with your VMs, otherwise you can't attach your Ultra disks to your VMs.
f:id:waritohutsu:20220118065319p:plain

Adjust IOPS and disk size for your env

As default, it's only 1024 IOPS even if you will choose Ultra disk. You should change the disk size and Disk IOPS to retrieve Ultra disk performance completely. This screenshot shows maximum IOPS per disk as of Jan 2022.
f:id:waritohutsu:20220118064101p:plain

Enable additionalCapabilities.ultraSSDEnabled property for your VMs

You would get error below if you will try to attach Ultra disks to your VMs. It's required to enable additionalCapabilities.ultraSSDEnabled property on your VMs.
f:id:waritohutsu:20220118065457p:plain

Keep in mind that you have to make your VMs deallocated when you will enable additionalCapabilities.ultraSSDEnabled property by running commands below or other ways.

az account set --subscription "your subscription"
az vm update -n "your vm name" -g "your resource group name" --ultra-ssd-enabled true

Tips to onboard for Azure Lighthouse

Azure Lighthouse is really cool feature to retrieve all Azure resources across Azure AD tenants who have owned by your customers or departments. It's sometimes required to retrieve Azure resources across Azure AD tenants especially if you're a Microsoft partner, because CSP contract requires to setup each Azure AD tenants per your customer. This official document is definitely useful to get started with Azure Lighthouse, but some tips are needed to know before following this.
docs.microsoft.com

Assign "Owner" role explicitly to your subscription on customer side

Azure Lighthouse requires RBAC(Role Based Access Control) roles, but your fresh Azure subscriptions might not be assigned "Owner" role among RBAC - you might be assigned as "classic Administrators". You will get "The user needs Microsoft.Authorization's Owner role on the subscription to create managed services resources" error below if you would run command without "Owner" role.
f:id:waritohutsu:20210923093923p:plain

It's quite easy to solve this issue. You just need to assign "Owner" role on customer side like below. Please note it takes a few minutes to be effective your role assignment.
f:id:waritohutsu:20210923094657p:plain

新型コロナ(COVID-19)のモデルナワクチン接種備忘録

昨今は日本でも大分ワクチン接種が盛んになってきたようです(2021年6月4日時点)。皆さんご存じの通り、米国側はかなりワクチン接種が進んでおり、つい先日は米国疾病予防管理センター(CDC)がワクチン接種が完了した人間はマスクを着用しなくても良いという発表をしたこともあり、マスクをしない人が日常生活ではかなり増えてきました(この CDC の発表、現地の別メディアだと「まだマスクが無いのは早すぎる」と書かれているのも結構見るので賛否両論です)。
下の写真は Kirkland というコストコブランドで有名な地区にある公園ですが、ファーマーズマーケットが開催されていることに加えてマスクしてない人も結構いるレベルで回復している状態です(ファーマーズマーケットの区画内は mask required。
f:id:waritohutsu:20210605170834p:plain
日本側のニュースを動画等で見ると副反応が過剰に取り上げられている印象を受けるので、実際にワクチン接種をした身としての実体験を公開し、今後日本でワクチンを接種する方々に対しての参考になり不安を少しでも払拭できればと思い本投稿を記載させて頂きました。

あんたの年齢・性別・健康状態は?

30代後半のオッサンです。血圧が高めなことを除くとおおむね健康なので、デブを是正中です(白目

どこのワクチン受けたの?

本題の新型コロナワクチンですが、私はモデルナで受けてきました。私は運よく早めに予約できたこともあり、4月下旬には一回を受け、5月の中旬には二回目の接種を受けました。こちらについては日本の厚生労働省の記事にもありますが、一回目の接種後から四週間は期間を空けてから摂取する必要があるためです。二回目のワクチン接種後、更に二週間後に fully vaccination(ワクチン接種完了)となり、新型コロナのワクチン抗体が獲得された状態になります。
www.mhlw.go.jp
上記の通りに私は一回目にワクチン接種したのが4月の下旬となりますが、fully vaccination の状態になったのは5月の下旬でした。したがって、ワクチン接種完了にはワクチン接種の一回目を受けてから一カ月強の期間が必要ということになります。
この辺りの時期感等はワクチンの提供元によって異なると思いますので、今回の記事はモデルナワクチンにのみに言及している点にご注意下さい。現地で接種した他の方の話を聞いていても、ファイザーはモデルナよりも副反応が軽いらしいです。

どうやって予約したの?

私が住んでいる Seattle の King County と呼ばれる場所ではオンライン予約のシステムが接種会場を County 内の横断で検索可能になっており、そちらで予約を取得できます。知人のまた聞きで噂を聞きましたが、事前に接種会場場所が個別に公開した後、King County 側のサイトからでも検索できるように登録しているという様な話を聞いたことがあります(※噂話レベルという点にご留意下さい)。
日本のマイナンバーに相当するソーシャルセキュリティー番号の提示や免許証等の身分証明書を求められることもなく、予約自体や接種当日の窓口等もかなりゆるゆるな感じでした(多分ですが、一人が何回もワクチン接種をしようとしたら余裕で出来ると思います。是非は置いといて)。

モデルナワクチン接種一回目の副反応は?

私が住んでいる場所からはちょっと離れた Issaquah と呼ばれる場所にある診療所?に行きました。雑居ビルの様な感じでアレコレ入っているのですが、下の画像での赤丸のところに窓口がありました。
f:id:waritohutsu:20210605172518p:plain
実はプリンタの不調で事前にプリントを必要とする同意書をもっていけなかったのですが、窓口でその旨伝えたら普通にその場で同意書もらえたので全く問題ありませんでした。肝心の接種そのものですが、筋肉注射なので以下の様に上腕二頭筋にぶっすり刺されます。
f:id:waritohutsu:20210605172909p:plain
この注射が結構痛いです(物理的に)。当日の注射を担当してくれた方はかなり腕がいいのか、一瞬で注射して一瞬で終わらせてくれたので大したことはありませんでしたが、結構痛かったのは覚えてます。
接種後に15分間は反応の様子見のため、車の運転を見合わせて待ちましたが、特に何の反応もなかったのでそのまま車で自宅に帰りました。接種一回目は全くと言っていいほど副反応がなく、念のために自重しましたが、ワクチン接種後の当日にジョギングをしようかと思える程に体調に問題ありませんでした。
二日目以降は体調に特に問題が無かったのですが、ワクチンを注射された左肩に痛みが残り、2~3日位は腕をあげる際にちょっと苦労したのは覚えています。ただ、体温上昇やけだるさは全くと言っていいほどありませんでした。

モデルナワクチン接種二回目の副反応は?

一回目のワクチン接種の四週間後、二回目も同じ場所にワクチン接種に向かいました。写真は上記と全く差がないので割愛しますが、副反応は全く異なりました。具体的には以下となります。私の場合は約1.5日位はほぼ仕事にならない状態でした。二回目接種時にワクチンを打ってくれる方から聞きましたが、ワクチン接種の12時間後~36時間後がもっとも副反応が重いということです。

  • 当日:全く変化なし、やや気だるい”気がする”程度
  • 二日目:体温が 38.1 度位まで上昇。頭痛、せき、めまい等は全くないが、けだるさが付きまとい何かに集中はできず、散歩等もする気にならないレベル
  • 三日目:大幅に状態は改善。体温は 37.6 度程度、集中力を長時間要する作業はできないが、メールの確認・簡単な返信位は問題ないレベル
  • 四日目:完全に回復

結局どうしたらいいの?

「その人に依って副反応の重さは変わる」というのが大前提ですが、他の方の話を数人に聞いた限りでは、副反応自体は特に気だるいだけでゴロゴロしている限りは特に辛いことは無いので、個人的なお勧めはワクチン接種の翌日・翌々日は有給なりで休日をとり、youtube なり Netflix なりでダラダラと見て時間をつぶせるものを用意しておいた方が良いと思います。漫画でも良いと思いますが、小説は正直読む気はしなかったです。

米国側は2020年の新型コロナ感染拡大時の感染者数・死者数とも悲惨なものでしたが、ワクチン開発と普及が迅速だったこともあり、国内はかなり新型コロナ前の状態に戻りつつあると思います。日本でも既にかなり普及が広まってきた状態だと思うので、このパンデミックを早めに終わらせるためのご参考になれば幸いです。

Store passwords and secrets securely by using App Service and Azure Key Vault on each environment without code changes

It was sometimes painful task to change settings, connection string and others depending on environment - production, QT, staging or development. It's also quite important to ensure to keep secret and security for others. As a solution for the case, you can significantly simplify to retrieve secrets from Azure Key Vault with Managed Identity even now. In this post, you can acquire knowledge how to completely separate settings and password from application codes by using App Service, Azure Key Vault and Managed Identity like below.
f:id:waritohutsu:20210429071157p:plain

From next section, you can setup single environment by using App Service and Key Vault first,

App Service by using Managed Identity and Azure Key Vault

In this section, you need to reminder how to setup Managed Identity and Azure Key Vault on App Service with single environment. First, create your App Service and Key Vault like below.
f:id:waritohutsu:20210429063541p:plain

Enable System assigned managed identity like here. And pick up Object ID for this managed identity.
f:id:waritohutsu:20210429063743p:plain

Visit your Key Vault and create "Secret" like here to retrieve from your apps on Azure App Service in later.
f:id:waritohutsu:20210429064043p:plain

Assign access policy to your managed identity on Azure App Service by following steps below.
f:id:waritohutsu:20210429064404p:plain

Select your managed identity by putting your object id on search box and choose it like below. Change Secret permissions as you need - I have changed only "Get" to allow only reading.
f:id:waritohutsu:20210429064522p:plain

Visit your Azure App Service and put environment settings as KEY_VAULT_URI as https://xxxxxxxxxxxx.vault.azure.net/ and ENV_NAME as production like below.
f:id:waritohutsu:20210429064844p:plain

Now, it's a time to write up your application code. Lunch your Visual Studio and import modules below, Azure.Identity and Azure.Security.KeyVault.Secrets, to utilize Managed Identity and Azure Key Vault.
f:id:waritohutsu:20210429065229p:plain

you can retrieve secret on your Key Vault from App Service.

using Azure;
using Azure.Identity;
using Azure.Security.KeyVault.Secrets;
using Microsoft.AspNetCore.Mvc;
using Microsoft.AspNetCore.Mvc.RazorPages;
using Microsoft.Extensions.Logging;
using System;
using System.Collections.Generic;
using System.Linq;
using System.Threading.Tasks;

namespace daisamiappservice.Pages
{
    public class IndexModel : PageModel
    {
        private readonly ILogger<IndexModel> _logger;

        public IndexModel(ILogger<IndexModel> logger)
        {
            _logger = logger;
        }

        public async Task OnGet()
        {
            try
            {
                string uri = Environment.GetEnvironmentVariable("KEY_VAULT_URI");
                SecretClient client = new SecretClient(new Uri(uri), new DefaultAzureCredential());

                Response<KeyVaultSecret> secret = await client.GetSecretAsync("secret");

                ViewData["Secret"] = $"{secret.Value.Name} : {secret.Value.Value}";
            }
            catch (Exception exp)
            {
                ViewData["Error"] = $"Something went wrong: {exp.Message}";
            }
        }
    }
}

You can retrieve secret like here without putting any secret strings on your app.
f:id:waritohutsu:20210429065704p:plain

Enable App Service deployment slot and Managed Identity to separate secrets completely for each environment

App Service offers deployment slots feature without lunching up new App Service instances. You just need to create deployment slot on your Azure App Service and enable managed identity again on your deployment slot because it's a separated Azure resource with production env. Create new Azure Key Vault and put settings like here. Don't forget to enable Deployment slot setting to prevent swap settings.
f:id:waritohutsu:20210429070259p:plain

Now, you can deploy as single code for each environment. Deploy your app into deployment slot and swap it into production. You can confirm your settings like below.
f:id:waritohutsu:20210429070650p:plain

Finnally, you can store secrets within Azure Key Vault and retrieve them by using Managed Identity without any specific password on your application codes or settings.

Execute Azure Automation Runbooks with Managed Identity

In past, it was required to execute Runbooks on Azure Automation by using RunAsAccount, but it's still mandatory to renew a self-signed certificate - as far as I remember, it would be annual. This renewal sometimes causes issues because some folks are unfamiliar about this.
Now, Azure Automation has just started to support for Managed Identity. This enable you not to force the renewal, and you can simplify your Runbooks scripts not only the renewal. In this article, you can run through to setup a Runbook Retrieving running VMs on your subscription.

Steps retrieving running VMs on your subscription

Follow steps are below.

  1. Create your Azure Automation account
  2. Enable Managed Identity on your Azure Automation account and assign proper RBAC roles
  3. Import "Az.Accounts" and "Az.Compute" modules to execute Az PowerShell commands on your Runbooks
  4. Create a Runbook and put PowerShell scripts

Enable Managed Identity on your Azure Automation account

I believe we can skip "Create your Azure Automation account" because it's too trivial. It's quite simple to enable Managed Identity on Azure Automation. Visit your Azure Automation account and choose new item named "Identity" like below. Then, switch "Status" as "On" and save it.
f:id:waritohutsu:20210425031827p:plain

Next, click "Azure role assignments" to assign "Virtual Machine Contributor" role to retrieve Azure VMs.
f:id:waritohutsu:20210425031957p:plain

Choose "Scope" as you need and choose "Virtual Machine Contributor" role like below.
f:id:waritohutsu:20210425035403p:plain

Import "Az.Accounts" and "Az.Compute" modules to execute Az PowerShell commands on your Runbooks

Azure Automation accounts don't import Azure Az PowerShell modules as default at this April 2021. Choose "Modules" from left side menus, and click "Browse gallery" button like below.
f:id:waritohutsu:20210425035902p:plain

Put "Az" in search box, so you can find all Az modules like below. Az modules has dependencies for each others, so import "Az.Accounts" first, and then import "Az.Compute" as next.
f:id:waritohutsu:20210425040041p:plain

Create a Runbook and put PowerShell scripts

Create new Runbook on your Azure Automation account and put scripts below.

Connect-AzAccount -Identity
Get-AzVM -Status | Where-Object PowerState -Like "*Running*" | Format-Table -AutoSize

Execute your Runbook and then you can find output below on "Job" menu.
f:id:waritohutsu:20210425040407p:plain