normalian blog

Let's talk about Microsoft Azure, ASP.NET and Java!

Enable to access Azure subscriptions across Azure AD tenants

All Azure subscriptions are associated to an Azure AD tenant. As you know, you can use some different Azure AD tenants like below. This sometimes causes some issues, but you can learn how to use these features properly though this post.
f:id:waritohutsu:20171229161730p:plain:w200
Azure AD also manages your "School or Work Account" in your organization. You have to choose account type whether "School or Work Account" or "Microsoft Account"/"Personal Account" when you login Azure. This account types can express simply like below.

  • "Microsoft Account" and "Personal Account" are technically same, and they are managed by Microsoft services. They were called "LIVE ID" in past.
  • "School or Work Account" is managed by your own Azure AD tenant such like "xxxxx.onmicrosoft.com", and you can assign custom domain name for your tenant as "contoso.com" and others.

As far as I have tried, it's easy to access subscriptions across Azure AD tenants using "Microsoft Account". But almost all companies use "School or Work Account" for governance perspective. Because "Microsoft Account"s are managed by Microsoft, so it's difficult to enable or disable their accounts immediately.
It's needed to invite other Azure AD tenant users into your Azure AD tenant when you want to grant other Azure AD tenant users to access your subscriptions associated with your Azure AD tenant.

How to enable to access subscriptions from other Azure AD tenant users

There are two steps to grant your subscriptions to other Azure AD tenant users.

  1. Invite the users into your Azure AD tenant
  2. Assign IAM roles

Invite the users into your Azure AD tenant

Refer Inviting Microsoft Account users to your Azure AD-secured VSTS tenant | siliconvalve or follow below steps.

  1. Login to portal.azure.com
  2. Login with your Global Admin credentials of your AD tenant
  3. Go to Azure Active Directory option on the blade
  4. In the next blade you will find an option of “user setting”
  5. Under “User setting” kindly check the option “admin and users in guest inviter role can invite”
  6. The option “admin and users in guest inviter role can invite” should be yes
  7. After that, go to users and groups in the same blade and click on “all users”
  8. Under all users, you will see the option “New guest user”
  9. After clicking on that, you can invite the user of other AD tenants.
  10. Once the user will accept the invitation, you can give access to the resource under the subscription of your AD tenant.

How to change AAD tenant associated to your subscriptions

You have already known how to create your own AAD tenant, but it sometimes causes some issues. As you know, all Azure subscriptions should be associated to an AAD tenant. You should change the AAD tenant of your subscriptions when you create new AAD tenant. You can learn how to change AAD tenant associated to your subscriptions in this post.

Step by step how to change AAD tenant in Azure portal

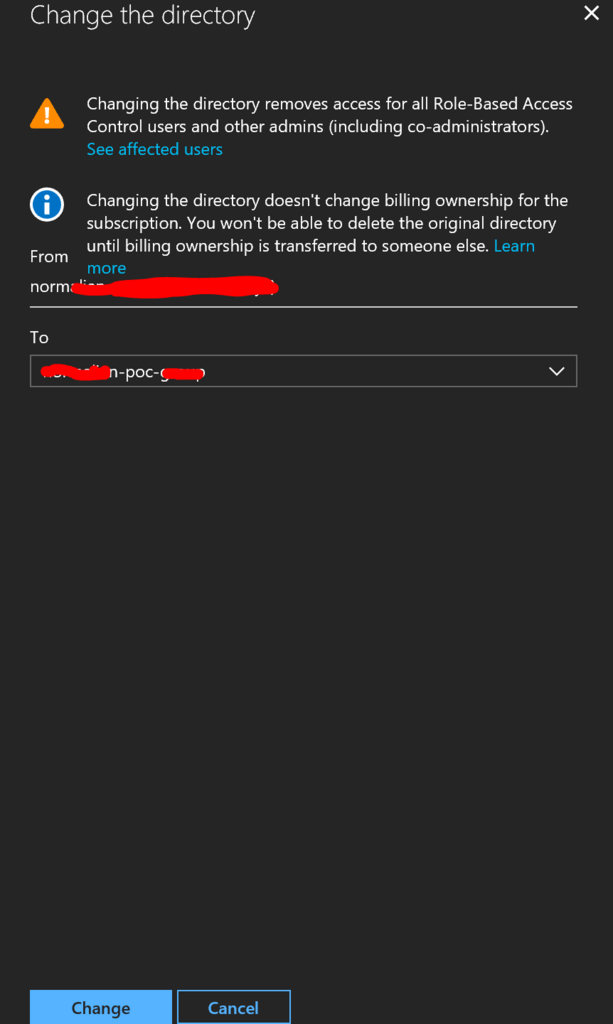
Choose your subscription need to change AAD tenant and click "Change directory" button like below.
f:id:waritohutsu:20171229163802p:plain

Choose your new AAD tenant should be associated your subscription.
f:id:waritohutsu:20171229163910p:plain

You can check its completion with portal notification like below, but it needed a few minutes to reflect into portal in my case. Please wait without hurry.
f:id:waritohutsu:20171229163958p:plain

How to create your own Azure Active Directory tenant

You sometimes want to create own tenant when you try to use Azure AD authentication or "School or Work Accounts" independently with your organization Azure AD tenant. Especially, you will really want to create it when you will be in charge of some PoC using Microsoft Azure. You can learn how to create your own Azure Active Directory tenant in this post.

Step by step to create new tenant in Azure portal

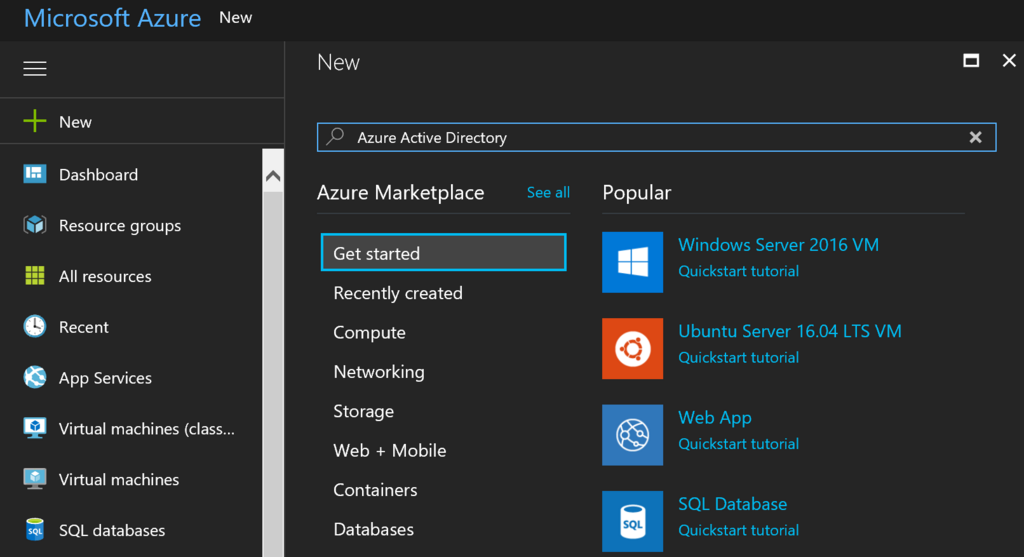
Please click "+ New" button in left side of Azure portal and input "Azure Active Directory" like below.
f:id:waritohutsu:20171229161418p:plain

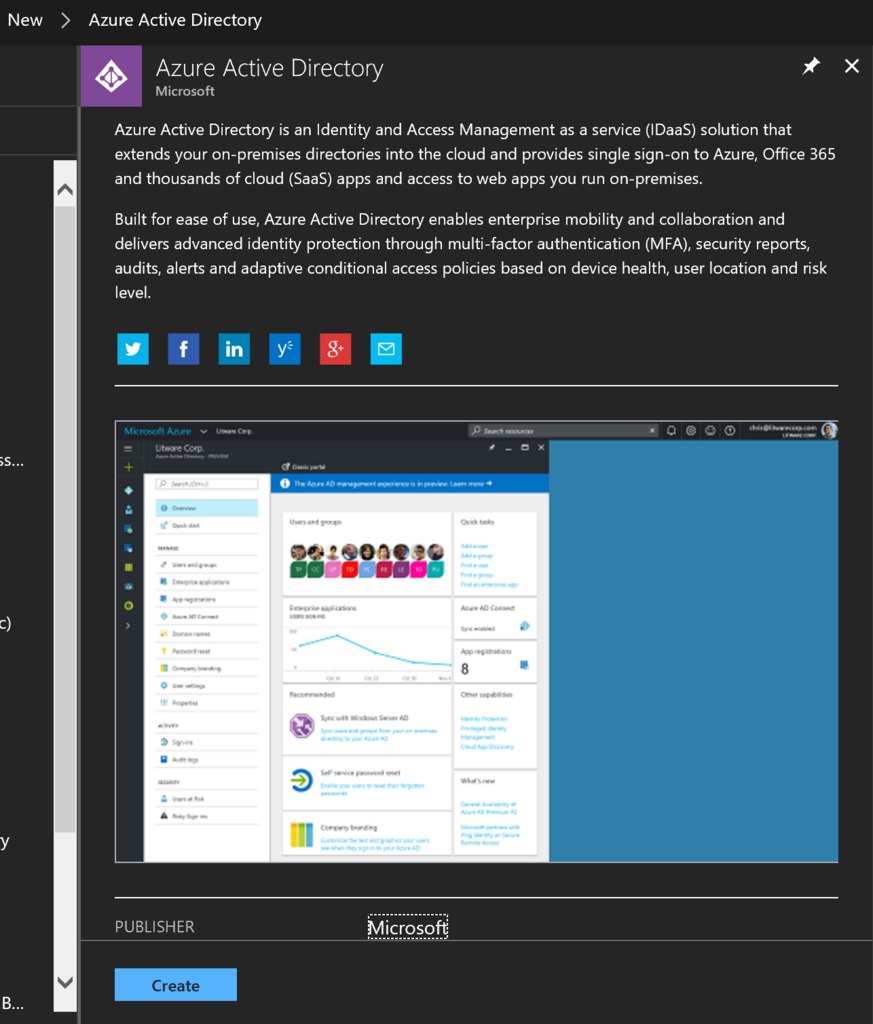
You can find "Azure Active Directory" by Microsoft like below, and please click "Create" button.
f:id:waritohutsu:20171229161529p:plain

Input your organization name and domain name, equal "tenant name", and choose your region.
f:id:waritohutsu:20171229161628p:plain

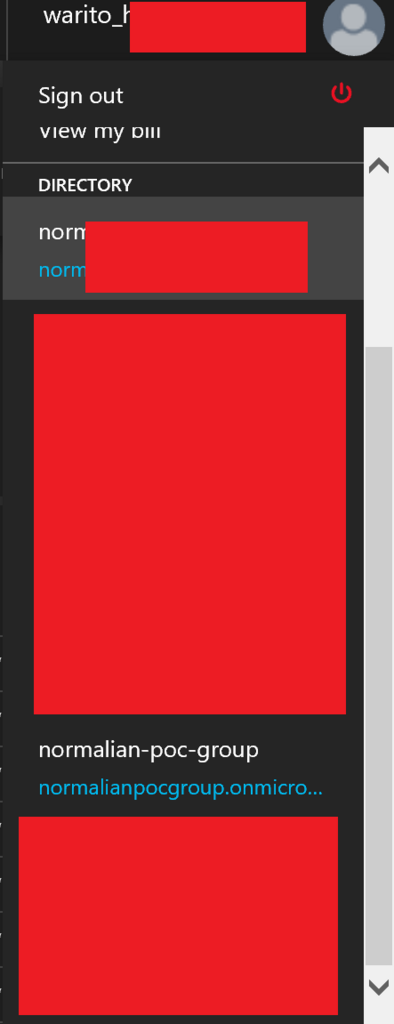
After a few minutes later, you can find your new tenant from upper-right like below.
f:id:waritohutsu:20171229161730p:plain

How to deploy your Azure Functions with VSTS when your project has multiple solutions

This article introduces how to deploy your Azure Functions with VSTS when your projects have multiple solutions like below. Please refer GitHub - AzureFunctions-CSharp-Sample if you need Azure Functions sample.

Your-Sample-Project
└─Trunk
    ├─HttpDemoFunctionApp
  └─JobDemoFunctionApp
        └─JobDemoFunctionApp

How to setup this build process

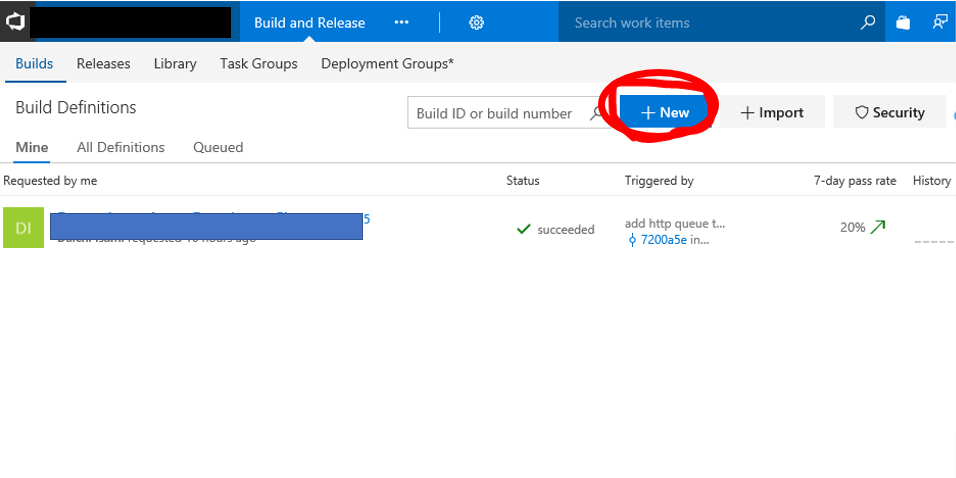
Open "Build and Release" tab in your VSTS project, and click "+New" button like below.
f:id:waritohutsu:20171031021259p:plain

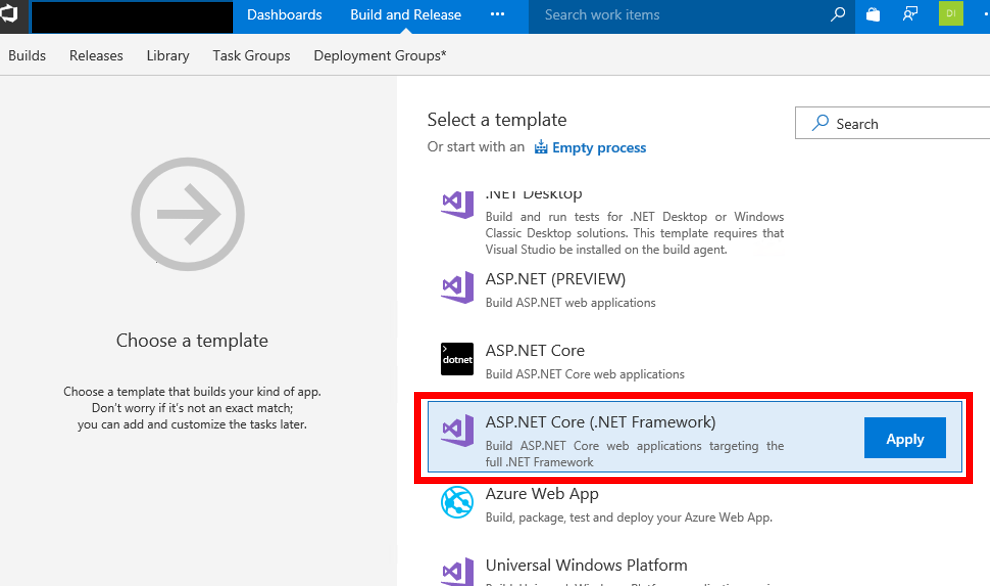
Choose "ASP.NET Core (.NET Framework)" template like below.
f:id:waritohutsu:20171031021310p:plain

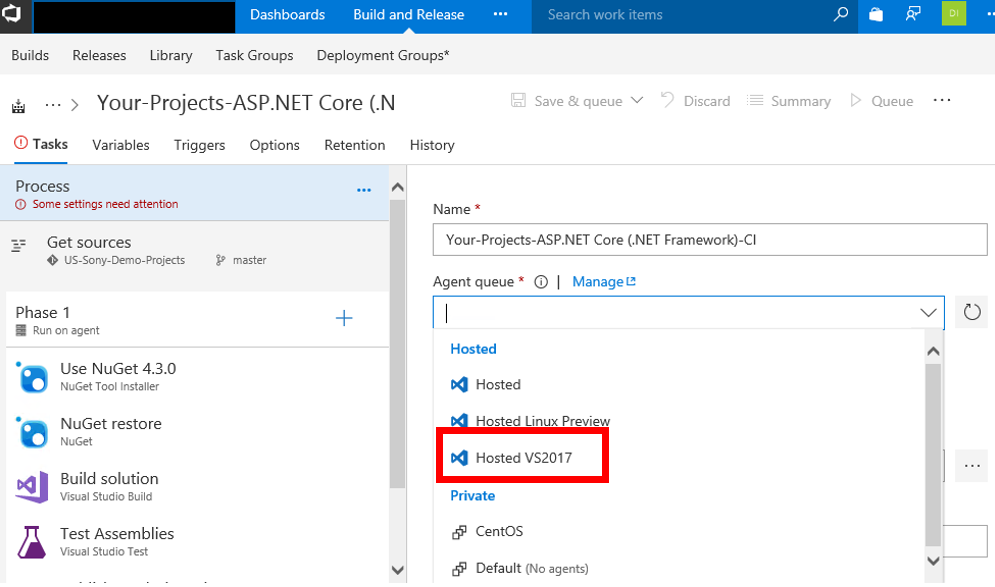
After creating a process, choose"Hosted VS2017" as "Agent queue". You will get error when you run this process if you choose other Agents.
f:id:waritohutsu:20171031021324p:plain

Choose your Azure Functions solution to deploy like below.
f:id:waritohutsu:20171031021341p:plain

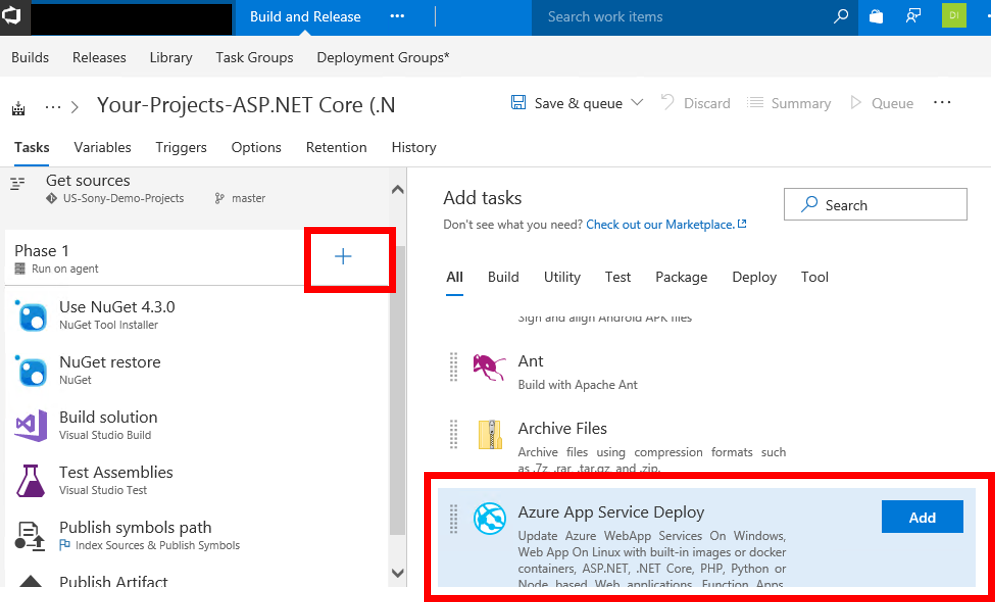
Add "Azure App Service Deploy" task like below.
f:id:waritohutsu:20171031021354p:plain

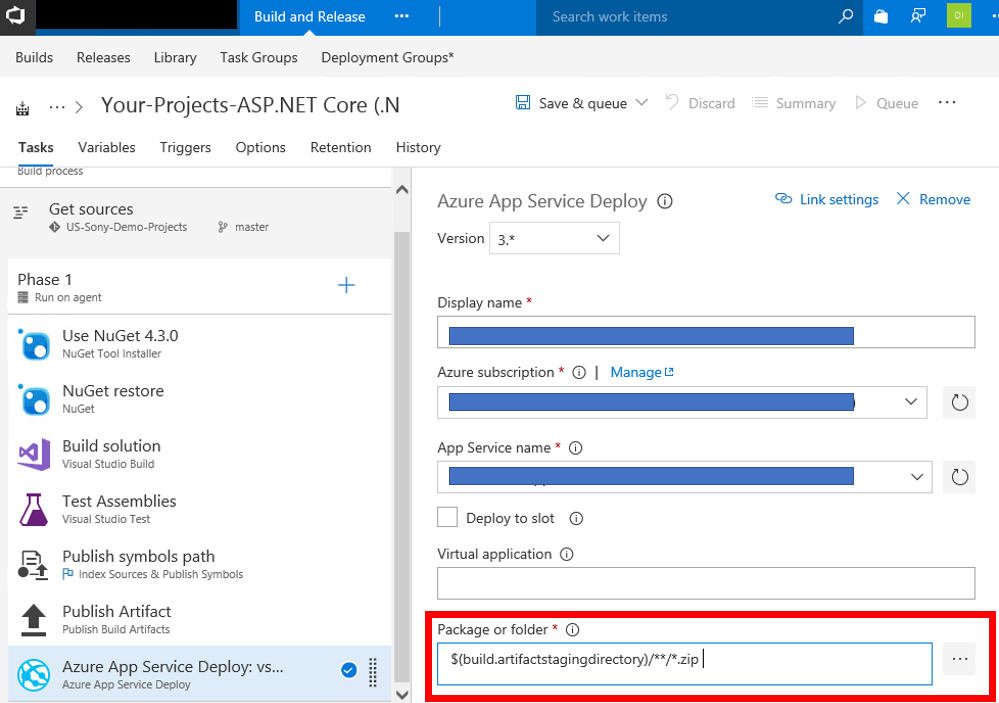
After adding the task, choose your Azure Functions and change "Package or folder" from "$(System.DefaultWorkingDirectory)/**/*.zip" to "$(build.artifactstagingdirectory)/**/*.zip".
f:id:waritohutsu:20171031021405p:plain

Tips

I got below error when I chose "Hosted" as "Agent queue", because the process failed to build my application. The cause was MSBuild didn't support Azure Functions application right now.

Got connection details for Azure App Service:'xxxxfunctionapp'

Error: No package found with specified pattern

How to create Hive tables via Ambari on Microsoft Azure HDInsight

As you know, HDInsight is powerful service to analyze, manage and process BigData on Microsoft Azure. You can create Hadoop, Storm, Spark and other clusters pretty easily! In this article, I will introduce how to create Hive tables via Ambari with cvs files stored in Azure Storage.
At first, you have to create your HDInsight cluster associated an Azure Storage account. In this article, I create a Spark 2.1.x cluster as HDInsight cluster.

Store CSV files into your Azure Storage

Upload your CSV files into the Azure Storage account. In this article, I upload Nikkei Average CSV file like below.

DATE,CLOSE,START,HIGH,LOW
2012/1/5,8488.71,8515.66,8519.16,8481.83
2012/1/6,8390.35,8488.98,8488.98,8349.33
2012/1/10,8422.26,8422.99,8450.59,8405.18
2012/1/11,8447.88,8440.96,8463.72,8426.03
2012/1/12,8385.59,8423.1,8426.83,8360.33
2012/1/13,8500.02,8471.1,8509.76,8458.68
2012/1/16,8378.36,8409.79,8409.79,8352.23
2012/1/17,8466.4,8420.12,8475.66,8413.22
2012/1/18,8550.58,8458.29,8595.78,8446.09
2012/1/19,8639.68,8596.68,8668.94,8596.68
2012/1/20,8766.36,8751.18,8791.39,8725.32
2012/1/23,8765.9,8753.91,8795.27,8744.54
2012/1/24,8785.33,8815.36,8825.09,8768.51
2012/1/25,8883.69,8842.01,8911.62,8816.09
2012/1/26,8849.47,8890.49,8894.6,8834.93
2012/1/27,8841.22,8851.02,8886.02,8810.89
2012/1/30,8793.05,8803.79,8832.48,8774.23
2012/1/31,8802.51,8781.44,8836.68,8776.65

It's stored into Azure Storage account associated with HDInsight cluster, and its path is described as "https://"storage-account-name"."spark-container-name".blob.core.windows.net/financedata/nikkei_stock_average_daily_en.csv". You can specify the path in Hive query as "wasb://"spark-container-name"@"storage-account-name".blob.core.windows.net/financedata/nikkei_stock_average_daily_en.csv".

Create Hive tables from your CSV files

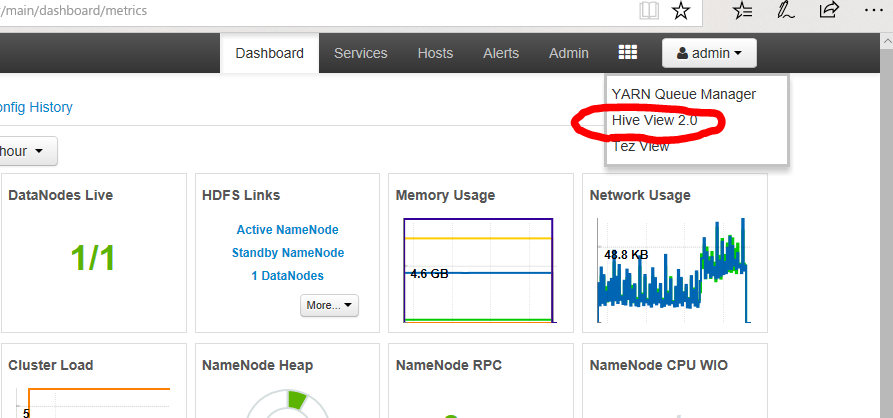
Open https://portal.azure.com/ and choose your HDInsight cluster. You can open Ambari portal to click a link of "https://'your-cluster-name'.azurehdinsight.net" in "Overview" page. Next, click "Hive View 2.0" button like below.
f:id:waritohutsu:20171002124722p:plain

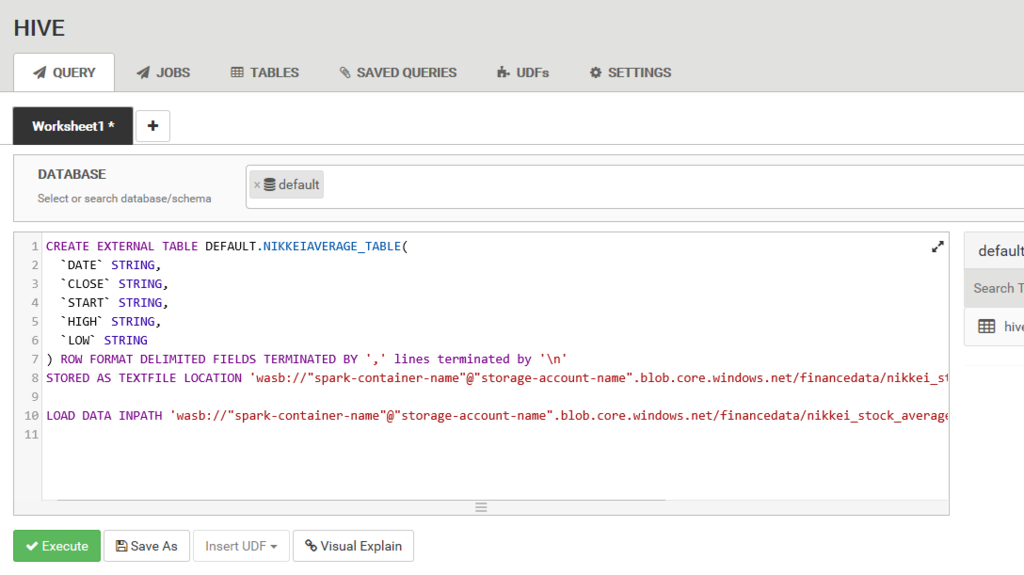
Now, you can execute Hive query using below portal site.
f:id:waritohutsu:20171002124752p:plain
Copy below query and execute it into the site.

CREATE EXTERNAL TABLE DEFAULT.NIKKEIAVERAGE_TABLE(
  `DATE` STRING,
  `CLOSE` STRING,
  `START` STRING,
  `HIGH` STRING,
  `LOW` STRING
) ROW FORMAT DELIMITED FIELDS TERMINATED BY ',' lines terminated by '\n'
STORED AS TEXTFILE LOCATION 'wasb://"spark-container-name"@"storage-account-name".blob.core.windows.net/financedata/nikkei_stock_average_daily_en.csv';

LOAD DATA INPATH 'wasb://"spark-container-name"@"storage-account-name".blob.core.windows.net/financedata/nikkei_stock_average_daily_en.csv' INTO TABLE DEFAULT.NIKKEIAVERAGE_TABLE;

Check your query result

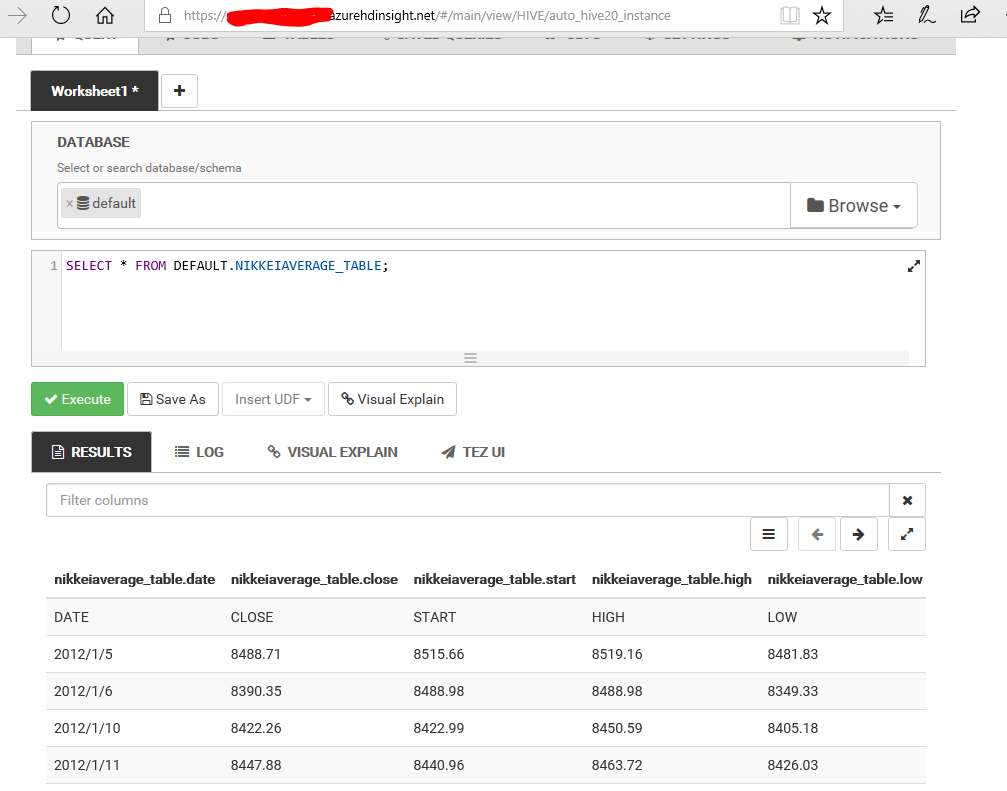
After executing your query, run below query to check the data in Ambari.

SELECT * FROM DEFAULT.NIKKEIAVERAGE_TABLE;

So, you can get below result.
f:id:waritohutsu:20171002150636p:plain

How to copy comma separated CSV files into Azure SQL Database with Azure Data Factory

You can learn how to copy data of CSV files into SQL Database with Azure Data Factory following this post. Please note, you must install SSMS from Download SQL Server Management Studio (SSMS) before following this post.
After setting up SSMS, follow below step to copy data of CSV files into SQL Database.

  • Upload CSV files into Azure Storage
  • Create a table in your SQL Database
  • Copy CSV files into your SQL Database with Azure Data Factory

After downloading "USDJPY.csv" file from http://www.m2j.co.jp/market/historical.php, upload the file into your Azure Storage.

Create a table in your SQL Database

Setup your SQL Database instance if you don't have it. After creating the instance, setup firewall following Azure SQL Database server-level and database-level firewall rules to access with "sqlcmd" command from your computer.
Execute below command from your client computer. And note to execute below with one liner, because I just add line breaks to read easily.

normalian> sqlcmd.exe -S "server name".database.windows.net -d "database name" -U "username"@"server name" -P "password" -I -Q 
"CREATE TABLE [dbo].[USDJPY]
(
    [ID] INT NOT NULL PRIMARY KEY IDENTITY(1,1), 
    [DATE] DATETIME NOT NULL, 
    [OPEN] FLOAT NOT NULL, 
    [HIGH] FLOAT NOT NULL, 
    [LOW] FLOAT NOT NULL, 
    [CLOSE] FLOAT NOT NULL
)"

You can remove the table using below command if you mistake something for this setting.

normalian> sqlcmd.exe -S "server name".database.windows.net -d "database name" -U "username"@"server name" -P "password" -I -Q "DROP TABLE [dbo].[USDJPY]"

Copy CSV files into your SQL Database with Azure Data Factory

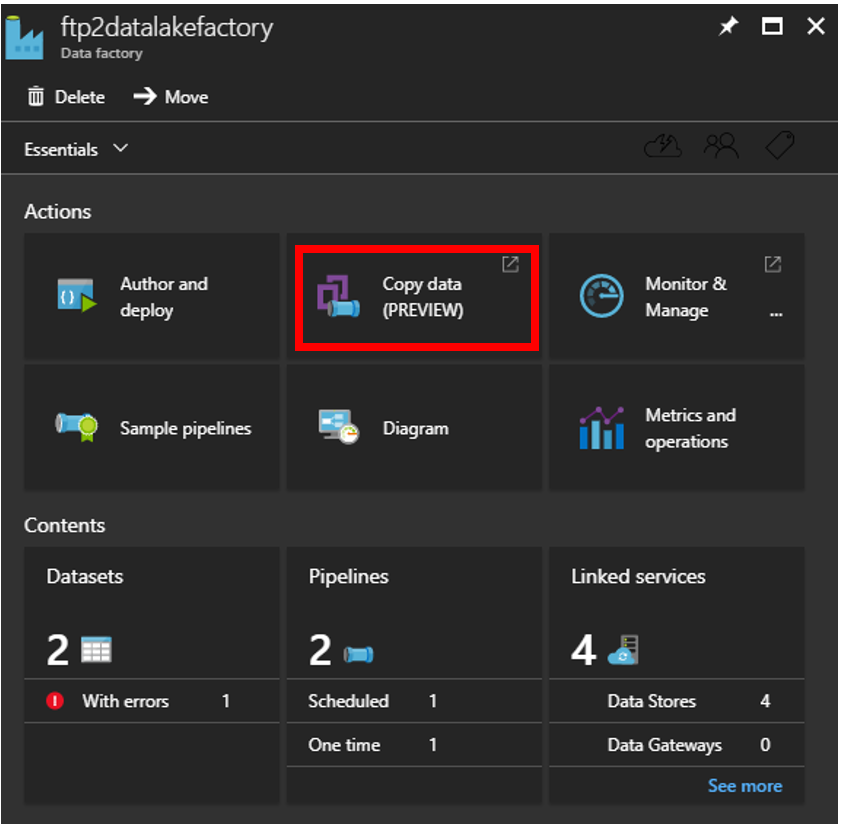
At first, create your Azure Data Factory instance. And choose "Copy data(PREVIEW)" button like below.
f:id:waritohutsu:20170904232426p:plain

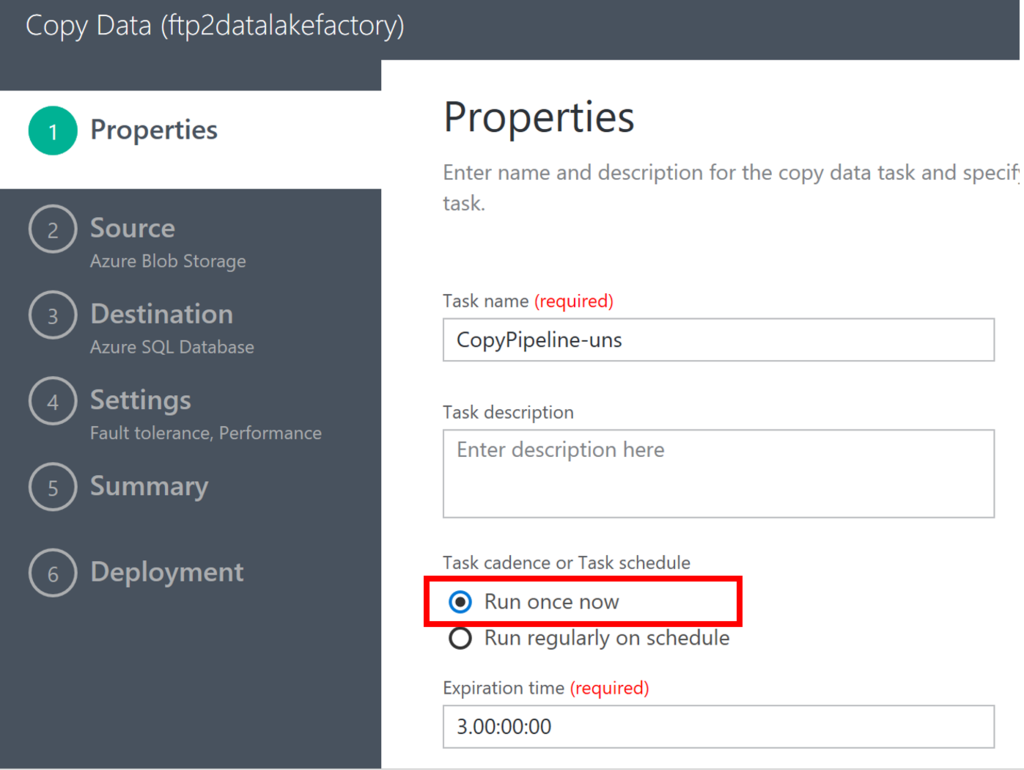
Next, choose "Run once now" to copy your CSV files.
f:id:waritohutsu:20170904232454p:plain

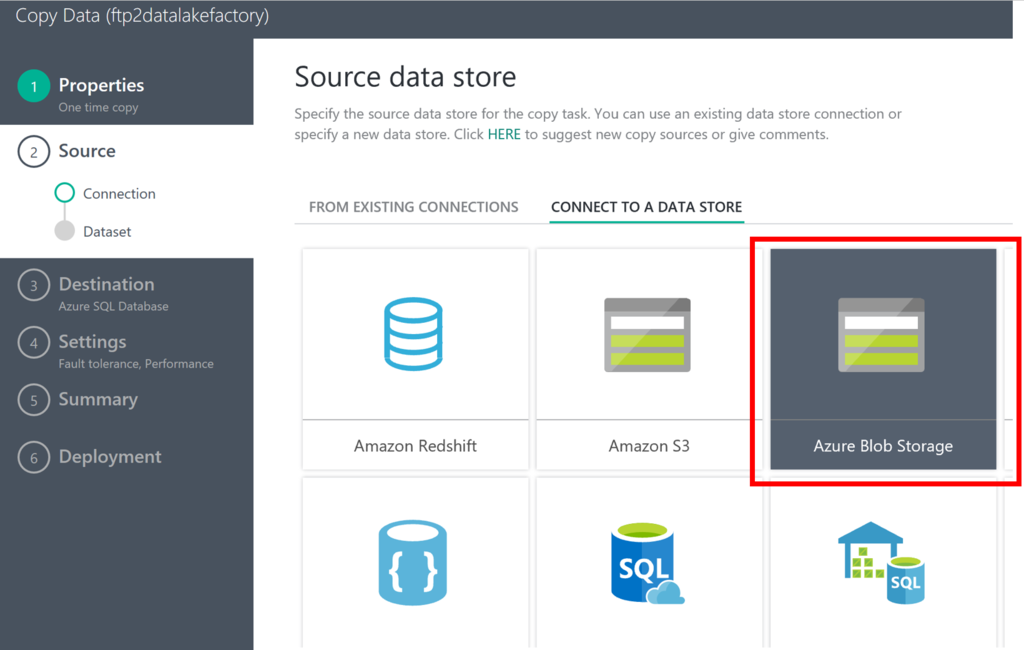
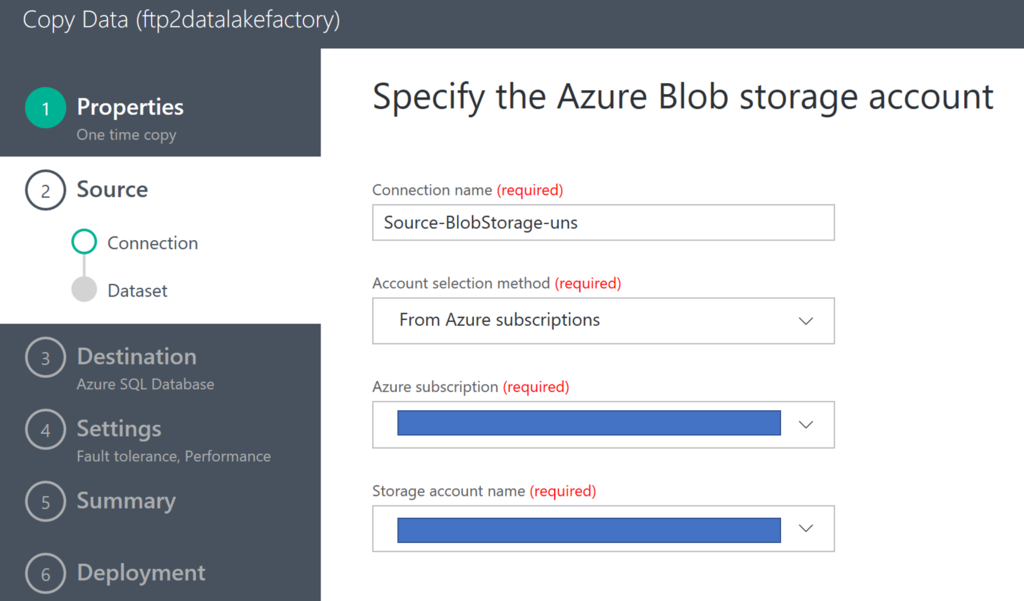
Choose "Azure Blob Storage" as your "source data store", specify your Azure Storage which you stored CSV files.
f:id:waritohutsu:20170904232523p:plain
f:id:waritohutsu:20170904232551p:plain

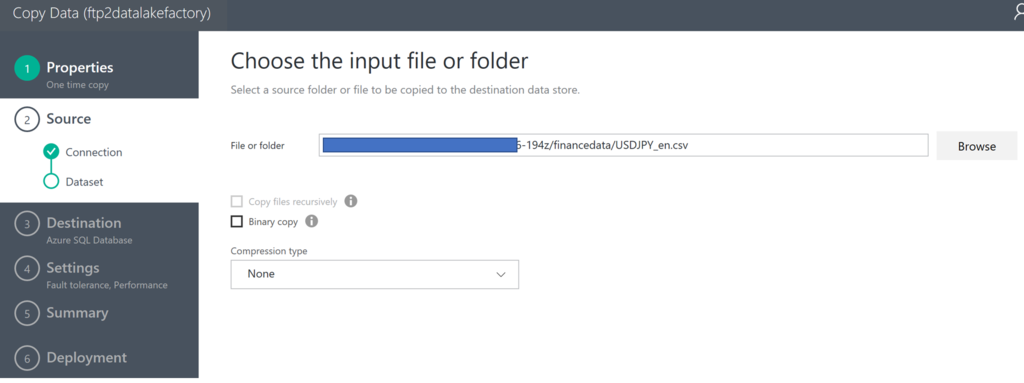
Choose your CSV files from your Azure Storage.
f:id:waritohutsu:20170904232635p:plain

Choose "Comma" as your CSV files delimiter and input "Skip line count" number if your CSV file has headers.
f:id:waritohutsu:20170904232717p:plain

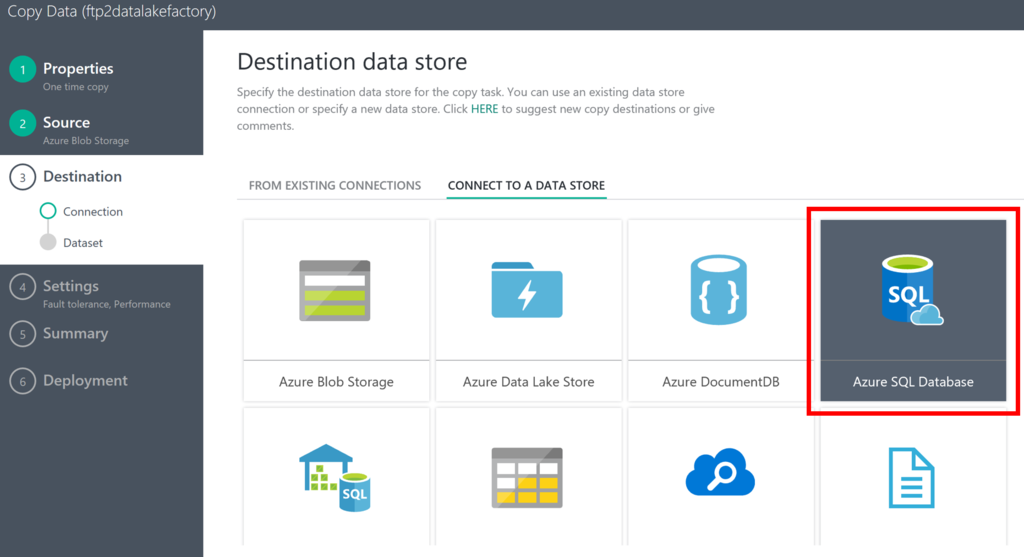
Choose "Azure SQL Database" as your "destination data store".
f:id:waritohutsu:20170904232750p:plain

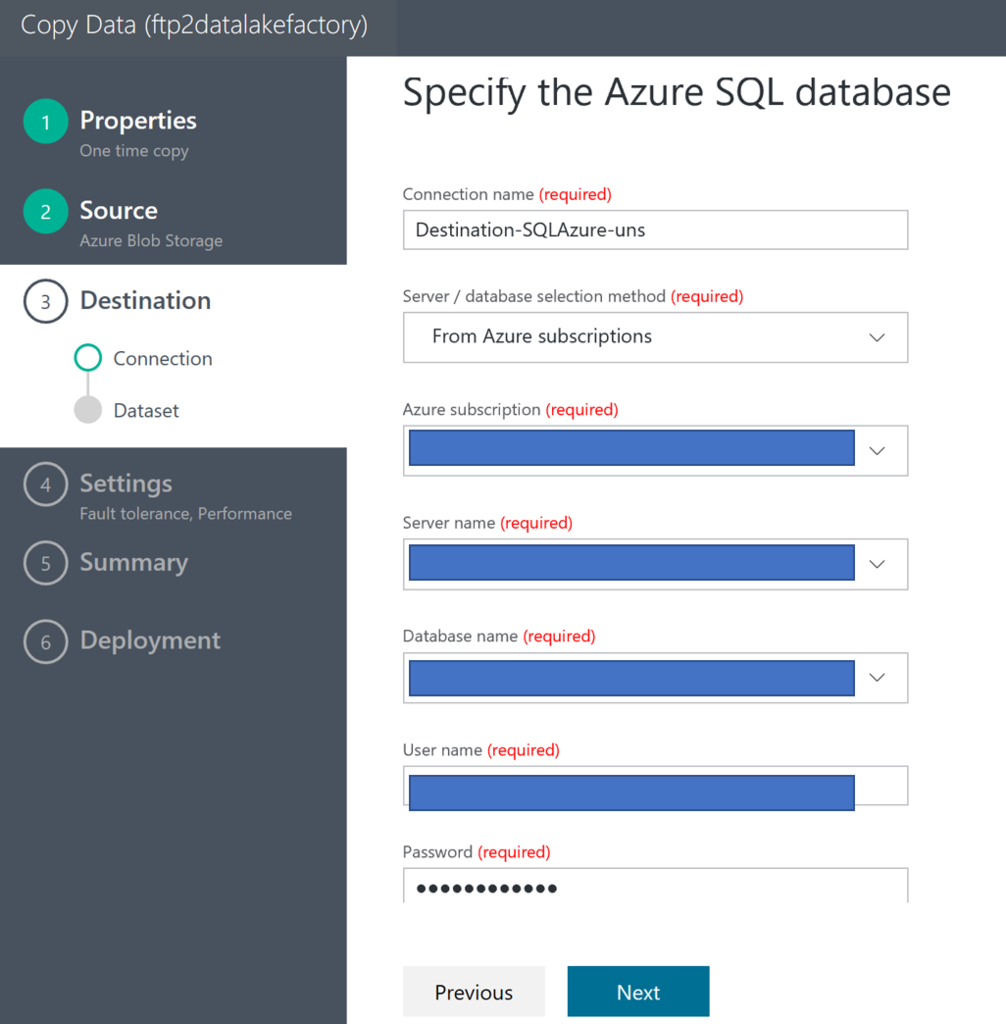
Input your "Azure SQL Database" info to specify your instance.
f:id:waritohutsu:20170904232823p:plain

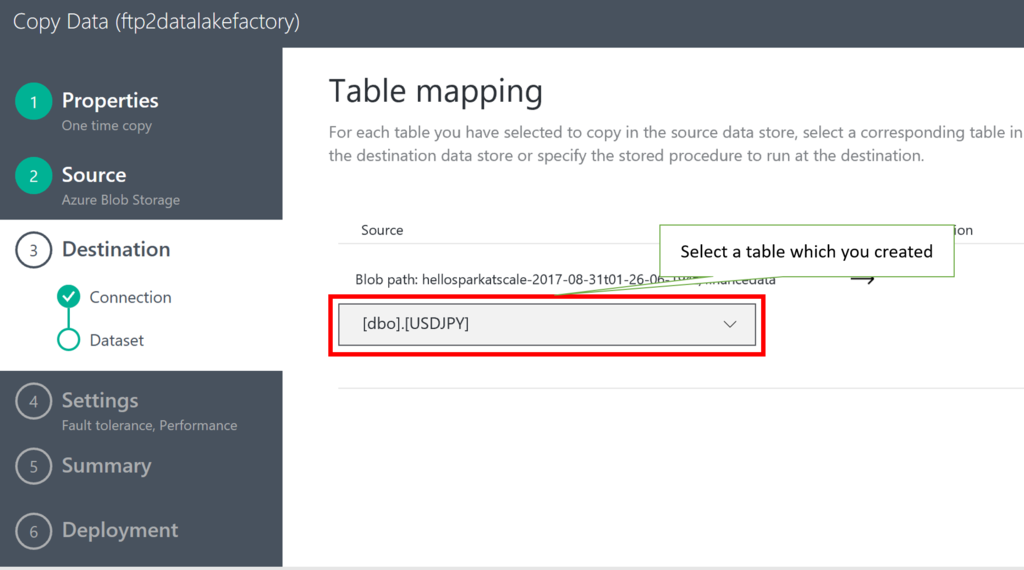
Select your table from your SQL Database instance.
f:id:waritohutsu:20170904232852p:plain

Check your data mapping.
f:id:waritohutsu:20170904232921p:plain

Execute data copy from CSV files to SQL Database just confirming next wizards.
f:id:waritohutsu:20170904232958p:plain

After completing this pipeline, execute below command in your machine. You can get data from SQL Database.

normalian> sqlcmd.exe -S "server name".database.windows.net -d "database name" -U "username"@"server name" -P "password" -I -Q "SELECT * FROM [dbo].[USDJPY] ORDER BY 1;"

You can get some data from SQL Database if you have setup correctly.

Create joined query result from Nikkei and DJIA using Spark APIs with HDInsight

In previous topic, I have introduced how to use Hive tables with HDInsight in How to use Hive tables in HDInsight cluster with Nikkei and DJIA. I will introduce how to use Spark APIs with HDInsight in this topic.

requirements

You have to complete below requirements to follow this topic.

Modify csv file titles

You have already downloaded USDJPY.csv and nikkei_stock_average_daily_jp.csv files, but titles of the csv files are written by Japanese. Modify the titles into English to use from Spark APIs easily like below.

  • USDJPY.csv file
日付,始値,高値,安値,終値
2007/04/02,117.84,118.08,117.46,117.84

DATE,OPEN,HIGH,LOW,CLOSE
2007/04/02,117.84,118.08,117.46,117.84
  • nikkei_stock_average_daily_jp.csv
データ日付,終値,始値,高値,安値
"2014/01/06","15908.88","16147.54","16164.01","15864.44"

DATE,CLOSE,OPEN,HIGH,LOW
"2014/01/06","15908.88","16147.54","16164.01","15864.44"

And save the csv files as "USDJPY_en.csv" and "nikkei_stock_average_daily_en.csv". And upload the csv files into your Azure Storage associated with your Spark cluster like below.
f:id:waritohutsu:20170903124441p:plain

Refer below URL and Path example if you can't figure out which path you should locate the csv files, because some people sometimes confuse them.

Create Spark application with Scala

At first, refer https://docs.microsoft.com/en-us/azure/hdinsight/hdinsight-apache-spark-intellij-tool-plugin. You have to follow the topic until "Run a Spark Scala application on an HDInsight Spark cluster" at section "Run a Spark Scala application on an HDInsight Spark cluster". Now, you have a skeleton of your spark application. Update your scala file like below.

import org.apache.spark.SparkConf
import org.apache.spark.SparkContext
import org.apache.spark.sql.types.TimestampType
import org.apache.spark.sql.{SaveMode, SparkSession}

object MyClusterApp {
  def main(args: Array[String]): Unit = {
    val spark = SparkSession.builder().appName("MyClusterApp").getOrCreate()

    val dataset_djia = "wasb://hellosparkxxxxxxx-2017-08-77777-33-yy-zzz@hellosparkatxxxxxxxtorage.blob.core.windows.net/financedata/DJIA.csv"
    val dataset_nikkei = "wasb://hellosparkxxxxxxx-2017-08-77777-33-yy-zzz@hellosparkatxxxxxxxtorage.blob.core.windows.net/financedata/nikkei_stock_average_daily_en.csv"
    val dataset_usdjpy = "wasb://hellosparkxxxxxxx-2017-08-77777-33-yy-zzz@hellosparkatxxxxxxxtorage.blob.core.windows.net/financedata/USDJPY_en.csv"

    // Load csv files and create a DataFrame in temp view, you have to change this when your data will be massive
    val df_djia = spark.read.options(Map("header" -> "true", "inferSchema" -> "true", "ignoreLeadingWhiteSpace" -> "true")).csv(dataset_djia)
    df_djia.createOrReplaceTempView("djia_table")
    val df_nikkei = spark.read.options(Map("header" -> "true", "inferSchema" -> "true", "ignoreLeadingWhiteSpace" -> "true")).csv(dataset_nikkei)
    df_nikkei.createOrReplaceTempView("nikkei_table")
    val df_usdjpy = spark.read.options(Map("header" -> "true", "inferSchema" -> "true", "ignoreLeadingWhiteSpace" -> "true")).csv(dataset_usdjpy)
    df_usdjpy.createOrReplaceTempView("usdjpy_table")

    // Spark reads DJIA date as "DATE" type but it reads Nikkei and USDJPY date as "STRING", so you have to cast the data type like below.
    val retDf = spark.sql("SELECT djia_table.DATE, djia_table.DJIA, nikkei_table.CLOSE/usdjpy_table.CLOSE as Nikkei_Dollar FROM djia_table INNER JOIN nikkei_table ON djia_table.DATE = from_unixtime(unix_timestamp(nikkei_table.DATE , 'yyyy/MM/dd')) INNER JOIN usdjpy_table on djia_table.DATE = from_unixtime(unix_timestamp(usdjpy_table.DATE , 'yyyy/MM/dd'))")
    //val retDf = spark.sql("SELECT * FROM usdjpy_table")
    retDf.write
      .mode(SaveMode.Overwrite)
      .format("com.databricks.spark.csv")
      .option("header", "true")
      .save("wasb://hellosparkxxxxxxx-2017-08-77777-33-yy-zzz@hellosparkatxxxxxxxtorage.blob.core.windows.net/financedata/sparkresult")
  }
}

After updating your scala file, run the application following https://docs.microsoft.com/en-us/azure/hdinsight/hdinsight-apache-spark-intellij-tool-plugin. You can find result files in your Azure Storage like below if your setup is correct!
f:id:waritohutsu:20170903124521p:plain

Download the part-xxxxxxxxxxxxxxx-xxx-xxxxx.csv file and check the content, and you can get date, DJIA dollar and Nikkei dollar data like below.

DATE,DJIA,Nikkei_Dollar
2014-01-06T00:00:00.000Z,16425.10,152.64709268854347
2014-01-07T00:00:00.000Z,16530.94,151.23238022377356
2014-01-08T00:00:00.000Z,16462.74,153.77193819152996
2014-01-09T00:00:00.000Z,16444.76,151.54432674873556
2014-01-10T00:00:00.000Z,16437.05,152.83892037268274
2014-01-14T00:00:00.000Z,16373.86,148.021883098186
2014-01-15T00:00:00.000Z,16481.94,151.22182896498947
2014-01-16T00:00:00.000Z,16417.01,150.96539162112933
2014-01-17T00:00:00.000Z,16458.56,150.79988499137434
2014-01-20T00:00:00.000Z,.,150.18415746519443
2014-01-21T00:00:00.000Z,16414.44,151.47640966628308
2014-01-22T00:00:00.000Z,16373.34,151.39674641148324
2014-01-23T00:00:00.000Z,16197.35,151.97414794732765
2014-01-24T00:00:00.000Z,15879.11,150.54342723004694